
The Maya Pivot Tool is a UV plotter and texture generator which collapses an input hierarchy into a texture which can be read from an Unreal shader. This project aims to be compatible with the 'Pivot Painter 2' toolset which is included in Unreal, but it sadly limited to 3DS Max only (For more information, see here: Pivot Painter 2.) In addition to this, the Pivot Tool also adds support for exporting skinning data to textures; this means you can apply joint-based animation in a vertex shader while treating your content as a static mesh.
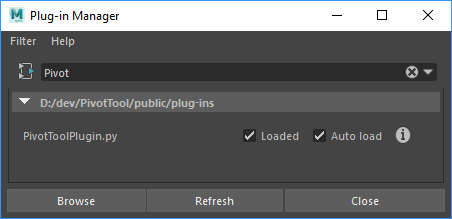
Installing the Pivot Tool is a breeze. Simply download the latest release, extract it to somewhere safe on your computer and run the install batch file! If you want to install it manually, either create a custom Maya Module and point it to your download directory, or dump the contents of 'plug-ins' into your user plugins directory.
This has only been tested with Maya 2018 and 2019. You're welcome to try it with earlier versions, but it'll most likely fail on anything before 2017 due to the switch to PySide2
Once installed, fire up Maya and load the plugin...
When you're ready to set up pivot textures, click Create -> Create Pivot Set

This will create a PivotNode and PivotOutputNode in your scene. The PivotNode object will become the parent for all the geometry you wish to collapse into a single mesh; so ensure you re-parent any new content. The output node will contain the geometry after the generation process, you can freely rename either of the pivot nodes to help with your export process.
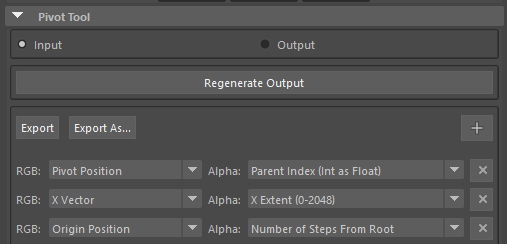
Select either the input or output node and open the Attribute Editor. The Input/Output options just hide/show the pivot nodes, this can be handy if you want to quickly switch between your data. The Regenerate Output button will perform the UV plotting and collapsing process. Finally, the last section contains options for the output textures you can create. Clicking the '+' button will add a new output, you can have as many as you like. You should note that options under 'Alpha' may change based upon the RGB source you pick, this is because some RGB sources will output at 16-bit floating point textures rather than 8-bit integer textures. For more details on this, or the output options, check out the Pivot Painter 2 documentation here: Pivot Painter 2.
Note: When adding or modifying the contents of the texture outputs, you will have to regenerate the output again.
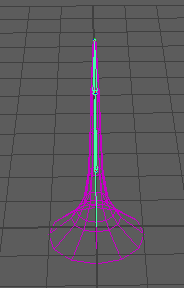
The Pivot Tool will automatically detected skinned objects under the input node and will treat each joint as a pivot position. There is a hard limit to a single influence per vertex; this is because it would alter the purpose of the tool somewhat (If there is a desire for this, it could be added... one day). The SM_Tentacle asset is an example of a skinned mesh; you can find it in the content examples depot (see links above).