- Reprojects single view games to any number of screens to make the displays appear to be a window into a virtual world.
- Supports flat and curved screens.
- Supports Steam VR with and without head tracking. (OpenVR Client).
- Supports Reshade for non-VR games with and without head tracking. (ReShade Client).
- Supports SuperDepth3D for conversion of flat games to stereoscopic through ReShade and the Reshade Client.
- Supports head tracking through OpenTrack.
- Can be used in monoscopic and stereoscopic modes; stereoscopic is not required.
- Will convert a 60hz side by side or checkerboard stereoscopic source into 120hz sequential stereoscopic.
- Supports black frame insertion and Blur Busters CRT simulator for use with either monoscopic or stereoscopic modes to reduce motion blur.
- Black frame insertion or CRT sim can be used in stereoscopic to run the game at 60hz, sync glasses at 120hz, and output to the screen at 240hz. You want to do this to reduce crosstalk for the best experience in stereoscopic.
- Supports upscalers such as FSR1.
- Scalable infrastructure; Game can be run at a lower resolution and framerate than the dispay; WibbleWobble will upscale to display resolution and framerate. (this is NOT frame generation)
- Supports a simple Arduino interface for running stereoscopic VESA sender units.
- Supports a simple Arduino interface for running infrared and DLP shutter glasses without a VESA sender.
- Supports Open3DOLED sync emitter.
- Supports NVIDIA Emitter. Thanks to FlintEastwood, cms and others for their work on making this emitter function.
- Supports sequential DLP projector protocol (3D Ready).
- Can be used without reprojection and head tracking if all you want to do is upscale, use the sequential stereoscopic features, black frame insertion, CRT Sim, etc..
-
Many games don't support multi-view rendering and those that do support it require the world rendered for each view to fill all monitors.:
- WibbleWobble allows the game to render a single view and reprojects that view across the user's desktop using a high performance shader. This means that the world is rendered through a single view and that view is placed in front of the user via head tracking, saving performance.
- Because WibbleWobble controls the size of the game window, performance is scalable.
- Because the user is able to select their desired FOV, performance is scalable.
-
VR accessibility issues.:
- Some people want to use VR but they may have physical disabilties that prevent them from enjoying VR.
- WibbleWobble allows the user to have a VR-alike immersive experience without the need to wear a headset in both monoscopic and stereoscopic modes.
-
NVIDIA killed sequential stereoscopic on 3x series and up cards.:
- WibbleWobble implements sequential stereoscopic in open source with the help of Reshade effects such as SuperDepth3D.
- WibbleWobble also has Arduino sketches for controlling XPand IR shutter glasses as well as any VESA stereoscopic sender unit.
- You don't need a special stereoscopic monitor or video card for this to work either; a 120hz+ monitor with a low response time and preferrably some form of motion blur reduction should work however YMMV.
-
People have a hard time figuring out the right FOV for games to suit their sim rigs; giant world, distortions etc..:
- WibbleWobble requires the user to setup their display rig one time only and then input a matching FOV value per game to get a life size reprojection every time.
- WibbleWobble also does not require head tracking and can be simply used to reproject the view to real world size.
-
Currently does not work with TrackIR hardware:
- If anyone knows a workaround for using TrackIR hardware with OpenTrack please let me know by raising an issue on GitHub.
-
Head Tracking using the ReShade Client only works with TrackIR supported games:
- WibbleWobble provides similar game support as the freetrack 2.0 enhanced output in OpenTrack.
- Unless you want to support the WibbleWobble public api for head tracking in your application.
-
Currently does not support freetrack:
- This should be a fairly simple fix but I haven't even thought about it, any ideas please raise an issue on GitHub.
-
Download and unzip the latest release: Releases Here
-
Register WibbleWobble:
In Windows Explorer, right-clickWibbleWobbleClient/Register.batand select Run as administrator. -
Disable Desktop Scaling:
Disable desktop scaling in Windows settings. WibbleWobble and some games are not DPI aware, and scaling can cause window size issues. (For example, Assetto Corsa.)
-
Install OpenTrack (Win32):
WibbleWobble only supports the Win32 version of OpenTrack. Choose the appropriate installer based on your head tracking device: -
Copy Modules Folder:
Copy themodulesfolder fromWibbleWobbleClient/OpenTrack/Win32into your OpenTrack installation directory. -
Configure OpenTrack:
- WibbleWobble.ini is provided in the modules/presets folder and should contain these settings already but in case something gets changed accidentally, here are each of the settings.
- Run OpenTrack and select wibblewobbletrack as the output.
- Click the Hammer (Settings) button next to wibblewobbletrack to open the configuration UI.
- Under Selected Interface, choose "Use TrackIR, disable freetrack".
- Check Custom location and browse to
WibbleWobbleClient/NPClient. - Under Mapping Properties, set:
- X, Y, Z: Max Input = 100cm, Max Output = 100cm.
- Yaw Max Input = 180
- Pitch Max Input = 90, Max Output = 90
- Roll Max Input = 180
- Map the Center shortcut to "Shift+." so WibbleWobble and OpenTrack recenter together.
- Under Output for Axis Assignment, assign Yaw, Pitch, Roll, X, Y, Z 1:1 with no remapping.
- Disable Relative translation.
-
Open Steam and install SteamVR if not already installed.
-
Navigate to the WibbleWobbleVR folder and Run Install.bat to register the path of WibbleWobbleVR with SteamVR; you may need to run as administrator.
-
Open \config\steamvr.vrsettings and add the following lines to the steamvr section
"forcedDriver": "WibbleWobbleVR", "activateMultipleDrivers": "true",
NOTE: To disable WibbleWobbleVR, remove the "forcedDriver": "WibbleWobbleVR", line.
-
Disable head tracking for room setup.
-
Launch Steam VR
-
Press SHIFT + / to toggle the focus on the overlay and then ALT + TAB to the SteamVR widget.
-
Click on the hamburger icon top left of the SteamVR widget and select Room Setup
-
Select STANDING ONLY
-
For ESTABLISH TRACKING it should say Headset Ready, click NEXT
-
For Calibrate your space. click CALIBRATE CENTER and wait; then click NEXT
-
For Locate the floor. you can set this to the distance that your head is from the floor or leave it at 0, then click CALIBRATE FLOOR and wait; then click NEXT
-
Click DONE
To uninstall the driver completely, navigate to the WibbleWobbleVR folder and Run Uninstall.bat; you may need to run as administrator.
-
Install Reshade Addon:
RunWWReshadeAddon/Reshade/ReShade_Setup_6.3.3_Addon.exe. WibbleWobble only supports DX11 and DX12.
Note: Do not use this version of Reshade with games that have anti-cheat. Use at your own risk.- Install Reshade into the game you want to use. (Depending on the game you may need to perform extra steps to make Reshade work).
-
Copy WWReshadeAddon Files:
Copy the contents ofWWReshadeAddon/Release/architectureinto the same folder as the game’s executable (where you installed Reshade).- For 64-bit games, use the contents of
x64. - For 32-bit games, use the contents of
Win32.
- For 64-bit games, use the contents of
-
Run the Game:
After starting the game, complete or skip the Reshade tutorial and close the Reshade UI. -
Use Windowed Mode:
Put the game into Windowed mode. WibbleWobble will not function in fullscreen mode.
-
Start the Game:
Launch the game and reach a point where you're viewing the in-game world. -
Launch WibbleWobble:
Press Shift + End to start WibbleWobble. -
Configure or Play:
- Once launched, you can adjust WibbleWobble’s settings () or begin playing.
- Game specific settings for the ReShade Client are modified inside "Game Config".
-
Maintain Focus on the Game Window:
The game window should remain in focus. If the WibbleWobble window is in focus when the WibbleWobble UI is closed, ALT + TAB or click on the game window to focus it. This should happen automatically, but if not, refocus manually. -
ReCenter the view: Place your head at the centre of the play space and press "SHIFT + ." to recenter tracking. You need to do this every time you run WibbleWobble to center the tracking. If the reprojection behaves strangely such as scaling irregularly this means your head is in the wrong position when recentering. You may need to move your head a little closer or further away than expected when recentering; this takes some practice.
-
OPTIONALLY: Toggle the overlay focus: Press Shift + / to toggle the focus on the overlay. You can do this to be able to use the mouse accurately within the game. There is a mouse cursor fix coming to remove the need to do this.
-
Don't close the WibbleWobble window WibbleWobble will currently not recover if you close the WibbleWobble window. You must restart the game if you do this. Use the "SHIFT + /" key to toggle the overlay focus if you need to get around the desktop.
-
Start the Game:
Launch the game in VR mode; -
Confirm entering VR (NOT ALL GAMES) If you see a black screen chances are the game is waiting for you to confirm that it should enter VR.
- SHIFT + / will unfocus the WibbleWobble window allowing you to ALT + TAB to find the window for the game and click the required buttons.
- SHIFT + / again will re-focus the WibbleWobble window once you have confirmed entering VR mode.
- Sometimes it's enough to just focus the game window with ALT + TAB and hit enter to confirm the option.
-
Configure or Play:
- Once launched, you can adjust WibbleWobble’s settings or begin playing.
- VR specific settings such as resolution, fov, etc.. can be changed inside VR Config.
- Changes to Resolution require a SteamVR restart; this is an OpenVR limitation.
- Some games prevent the automatic focus change to the WibbleWobbleUI; if you press SHIFT + END and nothing happens or the UI draws and you can't control it; focus the WibbleWobble window with ALT + TAB to regain control.
-
Maintain Focus on the Game Window:
The game window should remain in focus. If the WibbleWobble window is in focus when the WibbleWobble UI is closed, ALT + TAB until the game window is in focus. -
ReCenter the view: Place your head at the centre of the play space and press "SHIFT + ." to recenter tracking. You need to do this every time you run WibbleWobble to center the tracking. If the reprojection behaves strangely such as scaling irregularly this means your head is in the wrong position when recentering. You may need to move your head a little closer or further away than expected when recentering; this takes some practice.
-
OPTIONALLY: Toggle the overlay focus: Press "SHIFT + /" to toggle the focus on the overlay. You can do this to be able to use the mouse accurately within the game. There is a mouse cursor fix coming to remove the need to do this.
-
Don't close the WibbleWobble window WibbleWobble will currently not recover if you close the WibbleWobble window. You must restart the game if you do this. Use the SHIFT + / key to toggle the overlay focus if you need to get around the desktop.
- Start WibbleWobble: SHIFT + END
- Toggle UI: SHIFT + END
- Toggle overlay focus: SHIFT + /
- ReCentre tracking: SHIFT + .
- Switch Stereo eye order: SHIFT + ,
-
Toggle UI:
After launching WibbleWobble, toggle its UI with Shift + END. -
Tool Box Window:
The main WibbleWobble UI includes a Tool Box with configuration options.
- Click Rig Config in the Tool Box to open the Rig Configuration window.
- Left mouse and drag within the screen visualiser rotates around the screens.
- Mouse scroll wheel while hovering the screen visualiser zooms in and out.
- Click Edit Screen 0 to open the Screen Config.
Common Properties:
- Local Position (X, Y, Z) (m): Screen position relative to your head.
- Local Rotation (Pitch, Yaw, Roll) (°): Euler angles in degrees.
- Min U: This represents the normalized horizontal coordinate on the texture that corresponds to the left edge of the screen.
- Max U: This represents the normalized horizontal coordinate on the texture that corresponds to the right edge of the screen.
- Min V: This represents the normalized vertical coordinate on the texture that corresponds to the top edge of the screen.
- Max V: This represents the normalized vertical coordinate on the texture that corresponds to the bottom edge of the screen.
Flat Screen:
- Width/Height (m): Visible area dimensions.
Cylinder (Curved) Screen:
- Height (m): Visible area height.
- Radius (m): Curve radius.
- Fill Angle (°): Curve coverage in degrees.
- Curve Steps: Higher values result in a smoother curve.
Hints:
Effective refresh rate: This is how often in HZ WibbleWobble will send a frame to the screen. (See Display Refresh Rate HZ in Client Config)
Half Effective refresh rate: This is half how often in HZ WibbleWobble will send a frame to the screen. (See Display Refresh Rate HZ in Client Config)
- Window Size (X, Y pixels): Overlay window dimensions. Match your desktop/monitor with scaling disabled.
- Source Format:
- Single: The image coming from the game is expected to be a single view.
- Side by Side Half: The image coming from the game is expected to be in stereoscopic side by side format where each eye is half the source width. (Most software will output sbs in this format)
- Checkerboard: The image coming from the game is expected to be in checkerboard format.
- Side by Side Full: The image coming from the game is expected to be in stereoscopic side by side format where each eye is the full source width.
- Reshade Effects:
- Enabled: Captures image with Reshade effects.
- Disabled: Captures image without Reshade effects.
- Reprojection:
- Enabled: Uses head tracking for reprojection.
- Disabled: No reprojection, just stretches the image.
- Display Refresh Rate HZ (0 to ∞): Enter your display refresh rate here. It should be the exact value seen in System/Display/Advanced display settings. If you leave this at 0 the system will guess, but it can get it wrong.
- Frame Rate Limit HZ (0 to ∞): Limits client framerate. Only use this if you aren't using Stereo and are happy with tearing (0 = no limit)
- VSYNC (0,1,2): Controls vertical sync options. Do not enable Beam Race Sync and this at the same time. Do not use Frame Rate Limit HZ and this at the same time
- DWM Flush:
- Enabled: Calls DWMFlush() after present; Useful in stereoscopic with VSYNC set to 1.
- Disabled: Default.
- Beam Race Sync:
- Enabled: Another form of vsync for stereoscopic. Do not enable VSYNC and this at the same time. Do not enable DWMFlush with this. Do not use Frame Rate Limit HZ and this at the same time.
- Disabled: Off.
- Beam Race Scanline Count:
- Scanline count to wait after vertical blank.
- DLP 3D Pixel Height:
- The height in pixels of the DLP 3D Ready signal line at the bottom of the screen for sequential output to DLP projectors. 0 == disabled.
- Black Frame Insertion Interval:
- How often to insert black frames. 1 = every second frame, 2 = every fourth frame, etc.. This is useful for stereo when running your display at 240hz and stereo framerate at 120hz.
- Elevate Process Priority:
- Enabled: Attempt to elevate the process priority to realtime; this can be useful with the OpenVR Client to allow it more time to do it's thing, it can also cause issues and won't work outside of an administrator account. Use wisely.
- Disabled: No process priority elevation.
- Window Size (X,Y pixels): WibbleWobble resizes the game window to these values.
- FOV Vertical (°): Vertical field of view of the game in degrees. This should match the field of view set in the game. Some games use an abstract value for this and it may not match 1:1. Changing this this value also recalculates FOV Horizontal to suit the game window aspect ratio.
- FOV Horizontal (°): Horizontal field of view of the game in degrees. This should match the field of view set in the game. Some games use an abstract value for this and it may not match 1:1. Changing this this value also recalculates FOV Vertical to suit the game window aspect ratio.
- World Scale: Usually leave at 1.0.
- Frame Capture Delay: Frame delay for reducing visual judder.
- Axis Mappings (Yaw, Pitch, Roll): Remap if the game’s axes differ.
- Axis Multipliers (Yaw, Pitch, Roll, X, Y, Z): Apply multipliers, including -1 to invert.
- Resolution (X,Y pixels): This is the render resolution of each eye. If you change Resolution values, you must save and restart SteamVR; this is an OpenVR limitation.
- Display Frequency: Display frequency in hz. if you change Display Frequency you must save and restart SteamVR; this is an OpenVR limitation.
- FOV Vertical (°): Vertical field of view of the game in degrees. Changing this this value also recalculates FOV Horizontal to suit the Resolution aspect ratio.
- FOV Horizontal (°): Horizontal field of view of the game in degrees. Changing this this value also recalculates FOV Vertical to suit the Resolution aspect ratio.
- World Scale: Usually leave at 1.0.
- IPD: Interpupilary distance; the distance between your eyes in metres.
- Focal Length: The focus distance from your eyes in metres.
- Frame Capture Delay: Frame delay for reducing visual judder.
- Optimise Single Eye: This breaks some games so if you get weird artifacts try setting this to Disabled. if you change this setting you must save and restart SteamVR; this is an OpenVR limitation.
- Disabled: Draw both eyes, left then right, no optimisation.
- Left: Draw only the left eye.
- Right: Draw only the right eye.
- Both: Draw both eyes side by side, each with half FOV. This is probably the buggiest option; can look messed up due to vignette, eyes can render out of sync, etc...
- Headset Identification: This setting is required by some apps that explicitly limit support to certain headset brands/models. (For example: DEOVR requires WibbleWobble to identify as a Vive for head tracking to work.)
- WibbleWobble: Default.
- Vive: Identify as a Vive.
- Device Name:
- Disabled: Not used.
- Head: Device sets the head pose.
- Lerp Multiplier: Adjust head tracking extrapolation (1 = full, 0 = none).
- Axis Multipliers (Yaw, Pitch, Roll, X, Y, Z): Apply multipliers, including -1 to invert.
Hints:
Effective refresh rate: This is how often in HZ WibbleWobble will send a frame to the screen. (See Display Refresh Rate HZ in Client Config)
Half Effective refresh rate: This is half how often in HZ WibbleWobble will send a frame to the screen. (See Display Refresh Rate HZ in Client Config)
- Sync Rate HZ: This is the rate the emitter syncs each eye. Use one of the hints at top of the window to calculate this value. Make sure Your Display Refresh Rate HZ in Client Config is set to the refresh rate of your display.
- Sync Offset Microseconds: This is a time offset from vsync before syncing the emitter; can be negative to shutter glasses before vsync if needed.
- COM Port: Port for sending stereo sync signals; disabled when set to None.
Hints:
Effective refresh duration: This is how often in microseconds WibbleWobble will send a frame to the screen. (See Display Refresh Rate HZ in Client Config)
Sync Rate duration: This is how often in microseconds the emitter will sync. (See Sync Rate HZ in Emitter Config)
Half Sync Rate duration: This is half of how often in microseconds the emitter will sync. (See Sync Rate HZ in Emitter Config)
- Enabled: Check the box to enable the emitter.
- Open Delay Microseconds: Delay in microseconds from the sync point before the emitter opens an eye. I find leaving this at 0 and changing the Sync Offset Microseconds in Emitter Config works better for a sync offset.
- Open Duration Microseconds: How long an eye stays open in microseconds. Tune this value relative to the hints at the top of the window Sync Rate duration and Half Sync Rate duration. You want this value to be less than Sync Rate duration or you won't get stereo.
- W: W is a mystery but it's one of the timing values that's sent with the protocol so it's here for completeness. Doesn't seem to do anything, i've been using it at 0 happily.
If you do not have the driver for the NVIDIA emitter installed, it is available in the 425.31 nvidia drivers package
- Run the graphics driver installer, but don't install just let it extract the files.
- Take note of where the drivers files are extracted to.
- In explorer navigate to the folder that the files are extracted to.
- The emitter driver is located in a sub-folder named NV3DVisionUSB.Driver.
- Now you can close the 425.31 graphics driver installer and install only the emitter driver.
Effects are broken into two types.
-
Frame Buffer Effects: These effects work on the framebuffer that comes from the game, these are applied first, before reprojection.
-
Post Effects: These effects work on the output after reprojection and are performed in screen space.
-
Place a tick in the tickbox to enable an effect.
-
Press the Configure button on an effect to configure it's properties.
-
Press the up and down arrows on an effect to change their order in the list; The first item in the list is applied first.
-
FrameBufferDecode This should always be enabled if you wish to use the stereoscopic features, it is responsible for decoding side by side, checkerboard etc..


Enable both of these effects and ensure that FSREASU is before FSRRCAS in the list of effects. Press the Configure button to change settings.
- FSREASU [EASU] Edge Adaptive Spatial Upsampling ....... 1x to 4x area range spatial scaling, clamped adaptive elliptical filter. Press the Configure button to change settings.
- FSRRCAS [RCAS] Robust Contrast Adaptive Sharpening .... A non-scaling variation on CAS. Press the Configure button to change settings.
Effects Config (CRT Sim) Click me for more information at Blur Busters
WARNING : If you want to use this effect, be sure to set Black Frame Insertion Interval in Client Config to 0. Don't enable BFI and this effect at the same time.
CRTSim [CRTsim] Blur Busters CRT Beam Simulator BFI with Seamless Gamma Correction.
- Best results occur on display configured to standard SDR gamma curve and ABL/APL disabled to go 100% bandfree
- Please set your display gamma to 2.2 or 2.4, turn off ABL/APL in display settings, and set your OLED to SDR mode.
- Will NOT work well with some FALD and MiniLED due to backlight lagbehind effects.
- Need future API access to OLED ABL/ABL algorithm to compensate for OLED ABL/APL windowing interference with algorithm.
Config Properties
- BFI Interval: How often to insert black frames. 0 = disabled, 1 = every second frame, 2 = every fourth frame, etc..
- Gamma: Your display's gamma value. Necessary to prevent horizontal-bands artifacts.
- Gain vs Blur: Brightness-vs-motionblur tradeoff for bright pixel.
- 1.0 is unchanged brightness (same as non-CRT, but no blur reduction for brightest pixels, only for dimmer pixels).
- 0.5 is half brightness spread over fewer frames (creates lower MPRT persistence for darker pixels).
- ~0.7 recommended for 240Hz+, ~0.5 recommended for 120Hz due to limited inHz:outHz ratio.
- Scan Direction: CRT Scan direction; can be useful to counteract an OS rotation of your display.
Open3D OLED Config Click me for more information
Open3D OLED uses on screen trigger boxes to trigger it's emitter, this configuration ui allows changing the trigger box position and dimensions.
-
Scale: Scales the entire trigger box; any value greater than zero will enable the trigger box. Set to 1.0 to use absolute sizes specified below.
-
Background: Top Left X: Background frame top left X coordinate in pixels relative to the top left of the screen.
-
Background: Top Left Y: Background frame top left Y coordinate in pixels relative to the top left of the screen.
-
Background: Size X: Background frame width in pixels.
-
Background: Size Y: Background frame height in pixels.
-
Left Trigger: Top Left X: Left eye trigger X coordinate in pixels relative to Background: Top Left X.
-
Left Trigger: Top Left Y: Left eye trigger Y coordinate in pixels relative to Background: Top Left Y.
-
Left Trigger: Size X: Left eye trigger width in pixels.
-
Left Trigger: Size Y: Left eye trigger height in pixels.
-
Right Trigger: Top Left X: Right eye trigger X coordinate in pixels relative to Background: Top Left X.
-
Right Trigger: Top Left Y: Right eye trigger Y coordinate in pixels relative to Background: Top Left Y.
-
Right Trigger: Size X: Right eye trigger width in pixels.
-
Right Trigger: Size Y: Right eye trigger height in pixels.
WARNING: When using on screen trigger boxes it's advised to move the box and reposition the emitter occasionally to prevent burn in on screens susceptible to burn in.
This is an example of setting up three screens in a conventional wrap around manner. More or less than three screens can be added using similar principles.
- Enable NVidia surround or AMD Eyefinity so that your desktop is wrapped to your monitors.
- Enter the WibbleWobble UI with the Shift + End hotkey.
- Click on Client Config in the Tool Box window and set Window Size X and Window Size Y to match your desktop resolution.
- OPTIONALLY - Click on Client config in the Tool Box window and disable reprojection temporarily so you can see the texture mapped to all screens.
- Click on Rig Config in the Tool Box window.
- Add up to three screens by pressing the Add Screen button an appropriate amount of times.
- Click the Edit Screen buttons once for each screen to get an Edit Screen # window for each screen.
- For triple screens, order the screens left to right, Screen 0 on the left, Screen 1 in the middle and Screen 2 on the right.
- For each screen select the appropriate Screen Type and set the dimensions, curve properties, etc.
- For screen 0 decrease the Local Position X value to move it to the left.
- For screen 2 increase the Local Position X value to move it to the right.
- For screen 0 change the Local Rotation Yaw value to a negative angle in degress that matches the angle your side monitors relative to the centre monitor.
- For screen 2 change the Local Rotation Yaw value to a positive angle in degress that matches the angle your side monitors relative to the centre monitor.
- For screen 0 change the Max U value to 0.333333; this maps the right edge of screen 0 to one third of the texture in the horizontal direction.
- For screen 1 change the Min U value to 0.333333; this maps the left edge of screen 1 to one third of the texture in the horizontal direction.
- For screen 1 change the Max U value to 0.666666; this maps the right edge of screen 1 to two thirds of the texture in the horizontal direction.
- For screen 2 change the Min U value to 0.666666; this maps the left edge of screen 2 to two thirds of the texture in the horizontal direction.
- Sit in the position you will be sitting while playing and measure from your eyes to the centre monitor.
- Input this measurement in metres into the Local Position Z field of screen 1.
- For screen 0 and screen 1 adjust the Local Position X and Local Position Y values until the side screens line up with how they do in reality. You can perform measurements of the positions of your real screens to simplify this.
- In the Rig Config window click the Save button.
- OPTIONALLY - Click on Client config and re-enable reprojection to check your configuration.

- With this Arduino build you can run a VESA compatible sender to sync shutter glasses.
Required Hardware
- Arduino Leonardo or similar atmega32u4 (Micro, etc). You can probably use others also but the atmega32u4 is known to work. https://www.amazon.com/Arduino-org-A000057-Arduino-Leonardo-Headers/dp/B008A36R2Y
- Female miniDIN-3 plug for connecting to VESA sender. https://au.mouser.com/ProductDetail/Same-Sky/MD-30SP?qs=WyjlAZoYn51Euk2oG2XG7w%3D%3D
- AC to DC power adaptor, 5v 1Amp. How you adapt the wiring to the Arduino is up to you, I used a plug and socket configuration similar to this https://www.amazon.com/DONYOIE-Regulated-Switching-Replacement-Connector/dp/B0BGPJF1MM
- Wires for connecting everything together. How you do this is up to you. I usually use a prototype board and solder directly between the board and the Arduino but regular Arduino plug in wires are fine, you will need to solder wires to the miniDIN-3 however.
- Soldering iron and solder for connecting wires to the the miniDIN-3.
- USB Cable to suit the Arduino for connection to the PC.
Required Software
- Download and install Arduino IDE, you need this to install the sketch onto the Arduino - https://www.Arduino.cc/en/software
Arduino Sketch Installation
- Connect the Arduino to the pc with the USB cable, if this is the first time connecting an Arduino windows will try set it up.
- Navigate to the WibbleWobble/Arduino folder and double click the WWVESASender.ino file to load it in Arduino IDE; if this doesn't work load the file manually inside Arduino IDE.
- Select the connected Arduino in the Select Board box at the top of the window; below the board in the window is the COM port the board is connected to, make a note of this port.
- Click the Tick button on the top bar to compile the sketch, there should be no errors in the output window.
- Click the right facing arrow button -> on the top bar to upload the sketch to the Arduino.
- Once the sketch is uploaded you can close Arduino IDE.
Reading
- Familiarize yourself with the inputs for the VESA miniDIN-3 connector and it's power requirements http://www.stereoscopic.org/standard/connect.html
Hardware Connection steps
- Join the positive terminal of the DC power adapter to pin 1 of the miniDIN-3 connector.
- Join the negative terminal of the DC power adapter to pin 2 of the miniDIN-3 connector.
- Join the negative terminal of the DC power adapter to any GND pin on the Arduino.
- Join digital pin 4 of the Arduino to pin 3 of the miniDIN-3 connector
- Plug your VESA sender into the miniDIN-3 connector.
- Plug the USB cable into the Arduino and connect it to a USB port on the PC or a USB HUB.
- Plug the DC adaptor into a power socket and turn on.

Usage Steps (Be sure to save your settings)
- Run the game.
- Configure whatever you are using to output 3D content from the game. Output in either side by side or checkerboard.
- Start WibbleWobble (SHIFT + End).
- Load the WibbleWobble UI (SHIFT + End).
- Under Client Config, set Display Refresh Rate HZ to match your display refresh rate. This is very important as it effects all of the other timing values.
- Under Client Config, select the appropriate source format (side by side or checkerboard).
- Under Client Config, enable Reshade Effects if your 3D content is produced by a ReShade effect (SuperDepth3D).
- Under Client Config, (set Vsync to 1 and Optionally Enable DWM Flush) OR (enable Beam Race sync and adjust the Beam Race Scanline count; 0 is usually fine) DO NOT ENABLE BOTH VSYNC AND BEAM RACE AT THE SAME TIME.
- Under Client Config, ensure that Frame Rate Limit HZ is set to 0. Any other value here will interfere with the refresh rate at vsync.
- Under Emitter Config, set Sync Rate HZ to the rate you want to sync the glasses, this can be either the effective refresh rate, or half the effective refresh rate if you are using black frame insertion. Use the hints in Emitter Config to help choose this value.
- Under Emitter Config, press the config button appropriate to the emitter you are using, if you are using the arduino emitter select ComPort Config and set the com port. For NVIDIA select NVIDIA Config and set the options in the NVIDIA Config section following the documentation.
- Sync your glasses with the emitter following the manufacturers instructions.
- If you have a 240hz display you can set Black Frame Insertion Interval in Client Config to 1 which will insert a black frame between stereo frames thereby greatly reducing crosstalk.
- Under Emitter Config, while wearing the glasses, adjust the Sync Offset Microseconds value to offset the opening time of the shutter glasses.
- Close the WibbleWobble UI (SHIFT + End).
- OPTIONALLY If the eye order is uncomfortable for you, you can reverse it by pressing SHIFT + Comma.
These game guides assume you have already done all of the initial setup steps, have installed Reshade/WibbleWobble to the game and running OpenTrack to provide head tracking.
This guide is for those using content manager; I recommend using content manager as your AC launcher as it's just more modern.
-
Launch AC content manager.
-
Navigate to SETTINGS / ASSETTO CORSA / VIEW & UI.
-
Set the field of view setting to whatever vertical field of view you want to use; 45 degrees in this example.

-
Start a race session.
-
Press the F1 key to change camera to the second cockpit view, the first view doesn't support head tracking.
-
Press SHIFT + END to load WibbleWobble.
-
Put your head in the centre position and Press SHIFT + . to center tracking.
-
Press SHIFT + END to open the WibbleWobble UI.
-
Press the Tracking Config button in the toolbox.
-
Press the Game Config button in the toolbox.
-
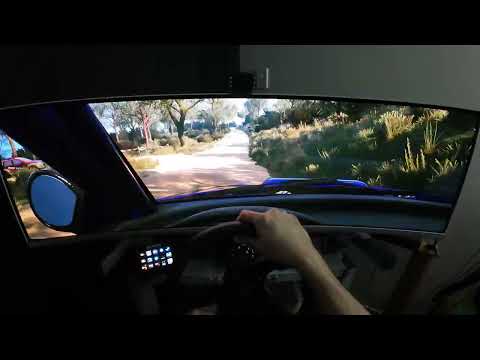
Change the settings in Tracking Config and Game Config to match the image below, taking care to ensure your vertical field of view matches what you set in content manager.
-
Window size in Game Config can be whatever you want for the game resolution.

-
Put your head in the centre position and Press SHIFT + . to center tracking again to suit the new settings.
-
Press the save button in the Tracking Config UI.
-
Press the save button in the Game Config UI.
-
Press SHIFT + END to close the WibbleWobble UI.


- GPU Tweak 3 will make WibbleWobble microstutter and cause stereoscopic to be unusable, make sure you disable it before launching.
- Any issues please raise an issue on GitHub and/or ask a question on the Discord.