High-performance message queue system built with Elixir/OTP.
![]()
![]()

Become a sponsor and get your logo on our README on GitHub with a link to your site. [Become a sponsor]
Support us with a monthly donation and help us continue our activities. [Become a backer]
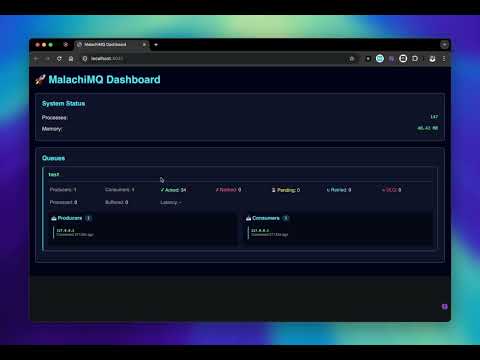
Watch MalachiMQ in action:
Multi-Architecture Support: Works on AMD64 (Intel/AMD) and ARM64 (Apple Silicon, AWS Graviton)
docker pull hectorcardoso/malachimq:latest

docker run \
  --name malachimq \
  -p 4040:4040 \
  -p 4041:4041 \
  -e MALACHIMQ_ADMIN_PASS=your_secure_password \
hectorcardoso/malachimq:latestgit clone https://github.com/HectorIFC/malachimq.git
cd malachimq
docker-compose up -dAccess the dashboard at: http://localhost:4041
# Build for your current architecture
make docker-build

# Build for multiple architectures (requires Docker Buildx)
make docker-buildx-setup
make docker-buildx

# Build and push to Docker Hub (multi-arch)
make docker-buildx-push
See Multi-Architecture Build Guide for detailed instructions.
| Port | Description |
|---|---|
| 4040 | TCP Message Queue |
| 4041 | Web Dashboard |
MalachiMQ requires authentication for all producers and consumers.
| Username | Password | Permissions |
|---|---|---|
| admin | admin123 | Full access |
| producer | producer123 | Produce only |
| consumer | consumer123 | Consume only |
| app | app123 | Produce & Consume |
⚠️ Important: Change default passwords in production!
| Variable | Default | Description |
|---|---|---|
MALACHIMQ_TCP_PORT |
4040 | TCP server port |
MALACHIMQ_DASHBOARD_PORT |
4041 | Dashboard port |
MALACHIMQ_LOCALE |
en_US | Language (en_US, pt_BR) |
MALACHIMQ_ADMIN_PASS |
admin123 | Admin password |
MALACHIMQ_PRODUCER_PASS |
producer123 | Producer password |
MALACHIMQ_CONSUMER_PASS |
consumer123 | Consumer password |
MALACHIMQ_APP_PASS |
app123 | App password |
MALACHIMQ_SESSION_TIMEOUT_MS |
3600000 | Session timeout (1h) |
MALACHIMQ_ENABLE_TLS |
false | Enable TLS encryption |
MALACHIMQ_TLS_CERTFILE |
- | TLS certificate file path |
MALACHIMQ_TLS_KEYFILE |
- | TLS private key file path |
MALACHIMQ_TLS_CACERTFILE |
- | TLS CA certificate (optional) |
docker run \
  -e MALACHIMQ_DEFAULT_USERS="user1:pass1:produce,consume;user2:pass2:admin" \
  hectorcardoso/malachimq:latest
Format: username:password:permission1,permission2;...
Permissions: admin, produce, consume
./scripts/generate-dev-certs.shdocker run \
-p 4040:4040 \
-v $(pwd)/priv/cert:/certs \
-e MALACHIMQ_ENABLE_TLS=true \
-e MALACHIMQ_TLS_CERTFILE=/certs/server.crt \
-e MALACHIMQ_TLS_KEYFILE=/certs/server.key \
hectorcardoso/malachimq:latestconst tls = require('tls');
const client = tls.connect({
host: 'localhost',
port: 4040,
rejectUnauthorized: false // For self-signed certs (dev only)
}, () => {
console.log('TLS connected');
client.write(JSON.stringify({
action: 'auth',
username: 'producer',
password: 'producer123'
}) + '\n');
});For production, use certificates from:
- Let's Encrypt (free, automated)
- DigiCert, GlobalSign (commercial CAs)
- Internal PKI (corporate environments)
See TLS Security Advisory for complete documentation.
- ✅ TLS 1.2 and 1.3 support
- ✅ Strong cipher suites (ECDHE, AES-GCM)
- ✅ Perfect Forward Secrecy
- ✅ Mutual TLS (mTLS) support
- ✅ Backward compatible (TLS is optional)
const net = require('net');

const client = net.createConnection(4040, 'localhost', () => {
  client.write(JSON.stringify({
    action: 'auth',
    username: 'producer',
    password: 'producer123'
  }) + '\n');
});

client.on('data', (data) => {
  const response = JSON.parse(data.toString().trim());

  if (response.token) {
    client.write(JSON.stringify({
      action: 'publish',
      queue_name: 'my-queue',
      payload: { hello: 'world' },
      headers: {}
    }) + '\n');
  }
});The scripts/ directory contains Node.js clients for testing and development.
cd scripts
npm installSend messages to a queue:
# Send 10 messages (default)
node producer.js

# Send 100 messages
node producer.js 100

# Send messages continuously (1/second)
node producer.js --continuous

# Send 1000 messages in parallel (fast mode)
node producer.js 1000 --fast

# Show help
node producer.js --helpReceive messages from a queue:
# Consume from 'test' queue (default)
node consumer.js

# Consume from a specific queue
node consumer.js orders

# Verbose mode (show full payload and headers)
node consumer.js --verbose

# Combine options
node consumer.js orders --verbose

# Show help
node consumer.js --help| Variable | Default | Description |
|---|---|---|
MALACHIMQ_HOST |
localhost | Server host |
MALACHIMQ_PORT |
4040 | Server port |
MALACHIMQ_QUEUE |
test | Default queue name |
MALACHIMQ_USER |
producer/consumer | Username |
MALACHIMQ_PASS |
producer123/consumer123 | Password |
MALACHIMQ_LOCALE |
pt_BR | Locale (pt_BR, en_US) |
Terminal 1 - Start the consumer:
node consumer.js --verboseTerminal 2 - Send messages:
node producer.js 10- Elixir 1.16+
- Erlang/OTP 26+
mix deps.get
mix run --no-haltmix testmake docker-build
make docker-runmake build # Install deps and compile
make run # Run locally
make test # Run tests
make release # Build production release
make docker-build # Build Docker image
make docker-run # Run Docker container
make docker-stop # Stop Docker container
make docker-push # Push to Docker Hub
make compose-up # Start with docker-compose
make compose-down # Stop docker-compose
make clean # Clean build artifacts# Format code
mix format
# Check formatting
mix format --check-formatted
# Run static analysis
mix credo --strict
# Check for security issues
mix deps.audit
# Check for unused dependencies
mix deps.unlock --check-unusedThe project uses GitHub Actions for continuous integration:
- ✅ Automated Tests - Run on every commit
- ✅ Multiple Elixir/OTP Versions - Tested on 3 versions
- ✅ Code Quality - Credo, formatting, security checks
- ✅ Docker Build - Verified on every PR
- ✅ Automatic Releases - On merge to main
See CI/CD Documentation for details. make docker-push # Push to Docker Hub make compose-up # Start with docker-compose make compose-down # Stop docker-compose make clean # Clean build artifacts
## 🌍 Internationalization (i18n)

MalachiMQ supports **Brazilian Portuguese (pt_BR)** and **American English (en_US)**.

### Configuration

```elixir
config :malachimq, locale: "pt_BR"
MalachiMQ.I18n.set_locale("en_US")
MalachiMQ.I18n.locale()MalachiMQ.Auth.list_users()
MalachiMQ.Auth.add_user("myuser", "mypass", [:produce, :consume])
MalachiMQ.Auth.remove_user("myuser")
MalachiMQ.Auth.change_password("myuser", "newpass")- ETS Tables: In-memory storage for maximum performance
- GenServer: OTP processes for reliability
- TCP Server: Custom protocol for low latency
- Partitioning: Automatic load distribution across CPU cores
MIT License
We welcome contributions! Please follow these guidelines:
- Check existing issues and PRs
- Discuss major changes in an issue first
- Read CI/CD Documentation
- Fork the repository
- Create a feature branch (
git checkout -b feat/amazing-feature) - Make your changes with tests
- Run quality checks:
mix format mix test mix credo --strict - Commit using Conventional Commits:
git commit -m "feat: add amazing feature" - Push to your fork (
git push origin feat/amazing-feature) - Open a Pull Request
- ✅ Tests - All new features must include tests
- ✅ Documentation - Update relevant docs
- ✅ CI Passing - All checks must pass
- ✅ Conventional Commits - Follow commit format
- ✅ Code Review - Address review feedback
<type>: <description>

Examples:
- feat: add TLS support
- fix: resolve authentication bug
- docs: update README
- test: add unit tests for Auth module
- chore: update dependencies
Types:
feat:- New feature (→ minor version)fix:- Bug fix (→ patch version)docs:- Documentationtest:- Testsrefactor:- Code refactoringchore:- Maintenance
Breaking Changes:
- Add
[major]to title orBREAKING CHANGE:in body
This project uses SEMVER with automated releases.
- Patch: Bug fixes → Add
patchlabel or default - Minor: New features → Add
minorlabel or usefeat:prefix - Major: Breaking changes → Add
majorlabel or use[major]in title
See VERSIONING.md for details.