Keep Coding苏易北2020-08-09T10:26:29.054Zhttps://abelsu7.top/Abel SuHexoCeph 集群修改 IP 地址https://abelsu7.top/2020/08/09/ceph-monitor-change-ip/2020-08-09T10:10:15.000Z2020-08-09T10:26:29.054Z
修改 Ceph 集群(主要是monitor)的 IP 地址
1. 背景同步
现有 Ceph 集群两台服务器idv-master和idv-node1当前接入的是192.168.140.0/24网段,现在需要通过网线连接至X机房对应的交换机,接入192.168.136.0/24网段。两个网段内部都是千兆环境,而互相之间则只有百兆,因此服务器的 IP 地址需要修改,Ceph Monitor 的 IP 地址也要对应进行修改。
[root@idv-node1 ~] ethtool bond0Settings for bond0: Supported ports: [ ] Supported link modes: Not reported Supported pause frame use: No Supports auto-negotiation: No Supported FEC modes: Not reported Advertised link modes: Not reported Advertised pause frame use: No Advertised auto-negotiation: No Advertised FEC modes: Not reported Speed: 2000Mb/s Duplex: Full Port: Other PHYAD: 0 Transceiver: internal Auto-negotiation: off Link detected: yes
> vgextend centos /dev/sdb> pvdisplay /dev/sdb --- Physical volume --- PV Name /dev/sdb VG Name centos PV Size 223.57 GiB / not usable <4.59 MiB Allocatable yes PE Size 4.00 MiB Total PE 57233 Free PE 5266 Allocated PE 51967 PV UUID d1SdU8-r927-8b0r-Q5qs-zGl9-XhZu-SE8rSw> vgdisplay centos --- Volume group --- VG Name centos System ID Format lvm2 Metadata Areas 2 Metadata Sequence No 12 VG Access read/write VG Status resizable MAX LV 0 Cur LV 3 Open LV 2 Max PV 0 Cur PV 2 Act PV 2 VG Size <326.13 GiB PE Size 4.00 MiB Total PE 83489 Alloc PE / Size 78223 / <305.56 GiB Free PE / Size 5266 / 20.57 GiB VG UUID O2IM4T-7sbU-ONuI-maTG-Zrkq-paGl-5f054x
打开网络开关,确认是否已获得动态分配的192.168.200.0/24网段内的 IP 地址,具体的地址之后进入系统可以修改。另外,左下角将主机名修改为ceph-node1并Apply
现在即可开始安装,记得设置root密码。安装完重启进入系统:
[root@ceph-node1 ~]$ lsblkNAME MAJ:MIN RM SIZE RO TYPE MOUNTPOINTsr0 11:0 1 1024M 0 rom vda 252:0 0 100G 0 disk ├─vda1 252:1 0 1G 0 part /boot└─vda2 252:2 0 99G 0 part ├─centos_ceph--node1-root 253:0 0 50G 0 lvm / ├─centos_ceph--node1-swap 253:1 0 2G 0 lvm [SWAP] └─centos_ceph--node1-home 253:2 0 47G 0 lvm /homevdb 252:16 0 2T 0 disk vdc 252:32 0 2T 0 disk
2.4 克隆前的准备
之前在安装过程中看到,eth0自动获取了分配的 IP 地址,现在我们需要将eth0的 IP 地址修改为我们计划的静态 IP 地址,即192.168.200.101。
修改网卡的配置文件:
vi /etc/sysconfig/network-scripts/ifcfg-eth0# 修改以下几个配置项BOOTPROTO="static"IPADDR=192.168.200.101NETMASK=255.255.255.0GATEWAY=192.168.200.1DNS1=192.168.200.1ONBOOT="yes"
重启网络,之后检查一下内网和外网的连通性:
[root@ceph-node1 ~]$ systemctl restart network # 重启网络[root@ceph-node1 ~]$ ip addr list eth02: eth0: <BROADCAST,MULTICAST,UP,LOWER_UP> mtu 1500 qdisc pfifo_fast state UP group default qlen 1000 link/ether 52:54:00:32:af:61 brd ff:ff:ff:ff:ff:ff inet 192.168.200.101/24 brd 192.168.200.255 scope global eth0 valid_lft forever preferred_lft forever inet6 fe80::5054:ff:fe32:af61/64 scope link valid_lft forever preferred_lft forever[root@ceph-node1 ~]$ nmclieth0: connected to eth0 "Red Hat Virtio" ethernet (virtio_net), 52:54:00:32:AF:61, hw, mtu 1500 ip4 default inet4 192.168.200.101/24 route4 192.168.200.0/24 route4 0.0.0.0/0 inet6 fe80::916d:cd1f:bb97:ca22/64 route6 fe80::/64 route6 ff00::/8lo: unmanaged "lo" loopback (unknown), 00:00:00:00:00:00, sw, mtu 65536DNS configuration: servers: 192.168.200.1 interface: eth0[root@ceph-node1 ~]$ ping 192.168.200.1 # ping 网关[root@ceph-node1 ~]$ ping baidu.com # ping 外网
> yum install -y yum-cron> yum info yum-cronLoaded plugins: fastestmirror, langpacksLoading mirror speeds from cached hostfile * epel: nrt.edge.kernel.org * rpmforge: mirror.fairway.ne.jpInstalled PackagesName : yum-cronArch : noarchVersion : 3.4.3Release : 163.el7.centosSize : 51 kRepo : installedFrom repo : baseSummary : Files needed to run yum updates as a cron jobURL : http://yum.baseurl.org/License : GPLv2+Description : These are the files needed to run yum updates as a cron job. : Install this package if you want auto yum updates nightly via : cron.
> vim /etc/yum/yum-cron.conf......# Whether a message should be emitted when updates are available,# were downloaded, or applied.update_messages = no# Whether updates should be downloaded when they are available.download_updates = no......
# 安装 epel 库,若已安装则跳过> sudo yum install epel-release# 安装 nginx> sudo yum install nginx> sudo yum info nginxLoaded plugins: fastestmirror, langpacksLoading mirror speeds from cached hostfile * epel: mirrors.njupt.edu.cnInstalled PackagesName : nginxArch : x86_64Epoch : 1Version : 1.16.1Release : 1.el7Size : 1.6 MRepo : installedFrom repo : epelSummary : A high performance web server and reverse proxy serverURL : http://nginx.org/License : BSDDescription : Nginx is a web server and a reverse proxy server for HTTP, SMTP, POP3 and : IMAP protocols, with a strong focus on high concurrency, performance and : low memory usage.> rpm -qa | grep nginxnginx-mod-mail-1.16.1-1.el7.x86_64nginx-1.16.1-1.el7.x86_64nginx-mod-http-image-filter-1.16.1-1.el7.x86_64nginx-all-modules-1.16.1-1.el7.noarchnginx-mod-stream-1.16.1-1.el7.x86_64nginx-mod-http-perl-1.16.1-1.el7.x86_64nginx-filesystem-1.16.1-1.el7.noarchnginx-mod-http-xslt-filter-1.16.1-1.el7.x86_64
# 安装 Vue CLI> npm install -g @vue/cli# 或者使用 yarn> npm i -g yarn> yarn global add @vue/cli# 验证 Node.js 与 vue-cli 版本> node -vv12.13.0> npm -v6.13.0> vue -V@vue/cli 4.0.5> vueUsage: vue <command> [options] uOptions: -V, --version output the version number -h, --help output usage informationCommands: create [options] <app-name> create a new project powered by vue-cli-service add [options] <plugin> [pluginOptions] install a plugin and invoke its generator in an already created project invoke [options] <plugin> [pluginOptions] invoke the generator of a plugin in an already created project inspect [options] [paths...] inspect the webpack config in a project with vue-cli-service serve [options] [entry] serve a .js or .vue file in development mode with zero config build [options] [entry] build a .js or .vue file in production mode with zero config ui [options] start and open the vue-cli ui init [options] <template> <app-name> generate a project from a remote template (legacy API, requires @vue/cli-init) config [options] [value] inspect and modify the config outdated [options] (experimental) check for outdated vue cli service / plugins upgrade [options] [plugin-name] (experimental) upgrade vue cli service / plugins info print debugging information about your environment Run vue <command> --help for detailed usage of given command.
// 布尔值格式化:cellValue为后台返回的值formatBoolean: function (row, column, cellValue) { var ret = ''; //你想在页面展示的值 if (cellValue) { ret = "是"; //根据自己的需求设定 } else { ret = "否"; } return ret;},
SET GLOBAL innodb_file_per_table = ON, innodb_file_format = Barracuda, innodb_large_prefix = ON;DROP DATABASE IF EXISTS gogs;CREATE DATABASE IF NOT EXISTS gogs CHARACTER SET utf8mb4 COLLATE utf8mb4_general_ci;
执行下列命令即可初始化gogs数据库:
mysql -u root -p < scripts/mysql.sql
此外还需要登录 MySQL 创建新用户gogs,并将数据库gogs的所有权限都赋予该用户:
mysql> CREATE USER 'gogs'@'localhost' identified by 'YOUR_PASSWORD';mysql> GRANT ALL PRIVILEGES ON gogs.* to 'gogs'@'localhost';mysql> FLUSH PRIVILEGES;
如需更新密码:
mysql> ALTER USER 'gogs'@'localhost' identified by 'NEW_PASSWORD';
swaggo: Automatically generate RESTful API documentation with Swagger 2.0 for Go.
// TODO: To be updated…
目录
待更新
1. 快速开始
下载swaggo:
> go get -u github.com/swaggo/swag/cmd/swag
2. swag cli
> swag init -hNAME: swag init - Create docs.goUSAGE: swag init [command options] [arguments...]OPTIONS: --generalInfo value, -g value Go file path in which 'swagger general API Info' is written (default: "main.go") --dir value, -d value Directory you want to parse (default: "./") --propertyStrategy value, -p value Property Naming Strategy like snakecase,camelcase,pascalcase (default: "camelcase") --output value, -o value Output directory for all the generated files(swagger.json, swagger.yaml and doc.go) (default: "./docs") --parseVendor Parse go files in 'vendor' folder, disabled by default --parseDependency Parse go files in outside dependency folder, disabled by default
# For MacOS> brew install upx# For CentOS/Fedora/RHEL> yum install upx> yum info upxInstalled PackagesName : upxArch : x86_64Version : 3.95Release : 4.el7Size : 1.8 MRepo : installedFrom repo : epelSummary : Ultimate Packer for eXecutablesURL : http://upx.sourceforge.net/License : GPLv2+ and Public DomainDescription : UPX is a free, portable, extendable, high-performance executable : packer for several different executable formats. It achieves an : excellent compression ratio and offers very fast decompression. Your : executables suffer no memory overhead or other drawbacks.
> go versiongo version go1.13 windows/amd64> go tool dist listaix/ppc64android/386android/amd64android/armandroid/arm64darwin/386 # Mac i386darwin/amd64 # Mac amd64darwin/armdarwin/arm64dragonfly/amd64freebsd/386freebsd/amd64freebsd/armillumos/amd64js/wasmlinux/386 # Linux i386 linux/amd64 # Linux amd64linux/armlinux/arm64linux/mipslinux/mips64linux/mips64lelinux/mipslelinux/ppc64linux/ppc64lelinux/s390xnacl/386nacl/amd64p32nacl/armnetbsd/386netbsd/amd64netbsd/armnetbsd/arm64openbsd/386openbsd/amd64openbsd/armopenbsd/arm64plan9/386plan9/amd64plan9/armsolaris/amd64windows/386 # Windows i386windows/amd64 # Windows amd64windows/arm> go envset GOHOSTARCH=amd64 # 本机的架构set GOHOSTOS=windows # 本机的系统set GOARCH=amd64 # 目标平台的架构,交叉编译时需要设置set GOOS=windows # 目标平台的系统,交叉编译时需要设置set CGO_ENABLED=0 # 是否启用 CGO...
最常用的大概是x86和amd64架构:
darwin/386:对应 Mac x86
darwin/amd64:对应 Mac amd64
linux/386:对应 Linux x86
linux/amd64:对应 Linux amd64
Windows/386:对应 Windows x86
Windows/amd64:对应 Windows amd64
2. 设置环境变量并交叉编译
2.1 Windows
在 Windows 下编译 MacOS 和 Linux 的 64 位程序:
# For MacOS/amd64set CGO_ENABLED=0set GOOS=darwinset GOARCH=amd64go build main.go# For Linux/amd64set CGO_ENABLED=0set GOOS=linuxset GOARCH=amd64go build main.go
2.2 Linux
在 Linux 下编译 MacOS 和 Windows 的 64 位程序:
# For MacOS/amd64CGO_ENABLED=0 GOOS=darwin GOARCH=amd64 go build main.go# For Windows/amd64CGO_ENABLED=0 GOOS=windows GOARCH=amd64 go build main.go
2.3 MacOS
在 MacOS 下编译 Windows 和 Linux 的 64 位程序:
# For Windows/amd64CGO_ENABLED=0 GOOS=windows GOARCH=amd64 go build main.go# For Linux/amd64CGO_ENABLED=0 GOOS=linux GOARCH=amd64 go build main.go
> yum info nfs-utilsAvailable PackagesName : nfs-utilsArch : x86_64Epoch : 1Version : 1.3.0Release : 0.65.el7Size : 412 kRepo : base/7/x86_64Summary : NFS utilities and supporting clients and daemons for the kernel NFS serverURL : http://sourceforge.net/projects/nfsLicense : MIT and GPLv2 and GPLv2+ and BSDDescription : The nfs-utils package provides a daemon for the kernel NFS server and : related tools, which provides a much higher level of performance than the : traditional Linux NFS server used by most users. : : This package also contains the showmount program. Showmount queries the : mount daemon on a remote host for information about the NFS (Network File : System) server on the remote host. For example, showmount can display the : clients which are mounted on that host. : : This package also contains the mount.nfs and umount.nfs program.> yum install nfs-utils# rpcbind 作为依赖会自动安装
> showmount -e centos-2Export list for centos-2:/mnt/kvm abelsu7-ubuntu
在客户端创建并挂载对应目录:
> mkdir -p /mnt/kvm> mount -t nfs centos-2:/mnt/kvm /mnt/kvm
最后检查一下是否挂载成功:
> df -hT /mnt/kvmFilesystem Type Size Used Avail Use% Mounted oncentos-2:/mnt/kvm nfs4 500G 119G 382G 24% /mnt/kvm> mount | grep /mnt/kvmcentos-2:/mnt/kvm on /mnt/kvm type nfs4 (rw,relatime,vers=4.2,rsize=1048576,wsize=1048576,namlen=255,hard,proto=tcp,timeo=600,retrans=2,sec=sys,clientaddr=222.xxx.xxx.xxx,local_lock=none,addr=116.xxx.xxx.xxx)
3.4 配置自动挂载
在客户端编辑/etc/fstab:
# /etc/fstab: static file system information.## Use 'blkid' to print the universally unique identifier for a# device; this may be used with UUID= as a more robust way to name devices# that works even if disks are added and removed. See fstab(5).## <file system> <mount point> <type> <options> <dump> <pass># / was on /dev/sda8 during installationUUID=26d36e85-367a-4200-87fb-0505c5837078 / ext4 errors=remount-ro 0 1# /boot/efi was on /dev/sda1 during installationUUID=000E-274F /boot/efi vfat umask=0077 0 1# swap was on /dev/sda9 during installation# UUID=ee4da9a3-0288-4f8e-a86e-ab8ac3faa6bc none swap sw 0 0# For nfscentos-2:/mnt/kvm /mnt/kvm nfs defaults 0 0
最后重新加载systemctl,即可实现重启后自动挂载:
> systemctl daemon-reload> mount | grep /mnt/kvmcentos-2:/mnt/kvm on /mnt/kvm type nfs4 (rw,relatime,vers=4.2,rsize=1048576,wsize=1048576,namlen=255,hard,proto=tcp,timeo=600,retrans=2,sec=sys,clientaddr=222.xxx.xxx.xxx,local_lock=none,addr=116.xxx.xxx.xxx)
4. NFS 读写速度测试
待更新…
> time dd if=/dev/zero of=/mnt/kvm-lun/test-nfs-speed bs=8k count=1024> time dd if=/mnt/kvm-lun/test-nfs-speed of=/dev/null bs=8k count=1024
腾讯微服务平台(Tencent Service Framework,TSF)是一个围绕应用和微服务的 PaaS 平台,提供一站式应用全生命周期管理能力和数据化运营支持,提供多维度应用和服务的监控数据,助力服务性能优化。提供基于 Spring Cloud 和 Service Mesh 两种微服务架构的商业化支持。
二、产品特性
拥抱开源社区:
拥抱 Spring Cloud 和 Istio 开源社区,提供高可用、可扩展、灵活的微服务技术中台商业版支持
最顶级的是virtio_driver,在客户机 OS 中表示前端驱动程序,在include/linux/virtio.h中定义:
/** * virtio_driver - operations for a virtio I/O driver * @driver: underlying device driver (populate name and owner). * @id_table: the ids serviced by this driver. * @feature_table: an array of feature numbers supported by this driver. * @feature_table_size: number of entries in the feature table array. * @probe: the function to call when a device is found. Returns 0 or -errno. * @remove: the function to call when a device is removed. * @config_changed: optional function to call when the device configuration * changes; may be called in interrupt context. */struct virtio_driver { struct device_driver driver; const struct virtio_device_id *id_table; const unsigned int *feature_table; unsigned int feature_table_size; int (*probe)(struct virtio_device *dev); void (*scan)(struct virtio_device *dev); void (*remove)(struct virtio_device *dev); void (*config_changed)(struct virtio_device *dev);#ifdef CONFIG_PM int (*freeze)(struct virtio_device *dev); int (*restore)(struct virtio_device *dev);#endif};
与驱动程序匹配的设备由virtio_device封装,它表示在客户机 OS 中的设备,在include/linux/virtio.h中定义:
/** * virtio_device - representation of a device using virtio * @index: unique position on the virtio bus * @dev: underlying device. * @id: the device type identification (used to match it with a driver). * @config: the configuration ops for this device. * @vringh_config: configuration ops for host vrings. * @vqs: the list of virtqueues for this device. * @features: the features supported by both driver and device. * @priv: private pointer for the driver's use. */struct virtio_device { int index; struct device dev; struct virtio_device_id id; const struct virtio_config_ops *config; const struct vringh_config_ops *vringh_config; struct list_head vqs; /* Note that this is a Linux set_bit-style bitmap. */ unsigned long features[1]; void *priv;};
/** * virtio_config_ops - operations for configuring a virtio device * @get: read the value of a configuration field * @set: write the value of a configuration field * @get_status: read the status byte * @set_status: write the status byte * @reset: reset the device * @find_vqs: find virtqueues and instantiate them. * @del_vqs: free virtqueues found by find_vqs(). * @get_features: get the array of feature bits for this device. * @finalize_features: confirm what device features we'll be using. * @bus_name: return the bus name associated with the device * @set_vq_affinity: set the affinity for a virtqueue. */struct virtio_config_ops { void (*get)(struct virtio_device *vdev, unsigned offset, void *buf, unsigned len); void (*set)(struct virtio_device *vdev, unsigned offset, const void *buf, unsigned len); u8 (*get_status)(struct virtio_device *vdev); void (*set_status)(struct virtio_device *vdev, u8 status); void (*reset)(struct virtio_device *vdev); int (*find_vqs)(struct virtio_device *, unsigned nvqs, struct virtqueue *vqs[], vq_callback_t *callbacks[], const char *names[]); void (*del_vqs)(struct virtio_device *); u32 (*get_features)(struct virtio_device *vdev); void (*finalize_features)(struct virtio_device *vdev); const char *(*bus_name)(struct virtio_device *vdev); int (*set_vq_affinity)(struct virtqueue *vq, int cpu);};
/** * virtqueue - a queue to register buffers for sending or receiving. * @list: the chain of virtqueues for this device * @callback: the function to call when buffers are consumed (can be NULL). * @name: the name of this virtqueue (mainly for debugging) * @vdev: the virtio device this queue was created for. * @priv: a pointer for the virtqueue implementation to use. * @index: the zero-based ordinal number for this queue. * @num_free: number of elements we expect to be able to fit. * * A note on @num_free: with indirect buffers, each buffer needs one * element in the queue, otherwise a buffer will need one element per * sg element. */struct virtqueue { struct list_head list; void (*callback)(struct virtqueue *vq); const char *name; struct virtio_device *vdev; unsigned int index; unsigned int num_free; void *priv;};
5. 相关数据结构
5.1 前端 Kernel
virtio_driver
在include/linux/virtio.h中定义:
/** * virtio_driver - operations for a virtio I/O driver * @driver: underlying device driver (populate name and owner). * @id_table: the ids serviced by this driver. * @feature_table: an array of feature numbers supported by this driver. * @feature_table_size: number of entries in the feature table array. * @probe: the function to call when a device is found. Returns 0 or -errno. * @remove: the function to call when a device is removed. * @config_changed: optional function to call when the device configuration * changes; may be called in interrupt context. */struct virtio_driver { struct device_driver driver; const struct virtio_device_id *id_table; const unsigned int *feature_table; unsigned int feature_table_size; int (*probe)(struct virtio_device *dev); void (*scan)(struct virtio_device *dev); void (*remove)(struct virtio_device *dev); void (*config_changed)(struct virtio_device *dev);#ifdef CONFIG_PM int (*freeze)(struct virtio_device *dev); int (*restore)(struct virtio_device *dev);#endif};
/** * virtio_device - representation of a device using virtio * @index: unique position on the virtio bus * @dev: underlying device. * @id: the device type identification (used to match it with a driver). * @config: the configuration ops for this device. * @vringh_config: configuration ops for host vrings. * @vqs: the list of virtqueues for this device. * @features: the features supported by both driver and device. * @priv: private pointer for the driver's use. */struct virtio_device { int index; struct device dev; struct virtio_device_id id; const struct virtio_config_ops *config; const struct vringh_config_ops *vringh_config; struct list_head vqs; /* Note that this is a Linux set_bit-style bitmap. */ unsigned long features[1]; void *priv;};
virtio_config_ops
在include/linux/virtio_config.h中定义:
/** * virtio_config_ops - operations for configuring a virtio device * @get: read the value of a configuration field * vdev: the virtio_device * offset: the offset of the configuration field * buf: the buffer to write the field value into. * len: the length of the buffer * @set: write the value of a configuration field * vdev: the virtio_device * offset: the offset of the configuration field * buf: the buffer to read the field value from. * len: the length of the buffer * @get_status: read the status byte * vdev: the virtio_device * Returns the status byte * @set_status: write the status byte * vdev: the virtio_device * status: the new status byte * @reset: reset the device * vdev: the virtio device * After this, status and feature negotiation must be done again * Device must not be reset from its vq/config callbacks, or in * parallel with being added/removed. * @find_vqs: find virtqueues and instantiate them. * vdev: the virtio_device * nvqs: the number of virtqueues to find * vqs: on success, includes new virtqueues * callbacks: array of callbacks, for each virtqueue * include a NULL entry for vqs that do not need a callback * names: array of virtqueue names (mainly for debugging) * include a NULL entry for vqs unused by driver * Returns 0 on success or error status * @del_vqs: free virtqueues found by find_vqs(). * @get_features: get the array of feature bits for this device. * vdev: the virtio_device * Returns the first 32 feature bits (all we currently need). * @finalize_features: confirm what device features we'll be using. * vdev: the virtio_device * This gives the final feature bits for the device: it can change * the dev->feature bits if it wants. * @bus_name: return the bus name associated with the device * vdev: the virtio_device * This returns a pointer to the bus name a la pci_name from which * the caller can then copy. * @set_vq_affinity: set the affinity for a virtqueue. */typedef void vq_callback_t(struct virtqueue *);struct virtio_config_ops { void (*get)(struct virtio_device *vdev, unsigned offset, void *buf, unsigned len); void (*set)(struct virtio_device *vdev, unsigned offset, const void *buf, unsigned len); u8 (*get_status)(struct virtio_device *vdev); void (*set_status)(struct virtio_device *vdev, u8 status); void (*reset)(struct virtio_device *vdev); int (*find_vqs)(struct virtio_device *, unsigned nvqs, struct virtqueue *vqs[], vq_callback_t *callbacks[], const char *names[]); void (*del_vqs)(struct virtio_device *); u32 (*get_features)(struct virtio_device *vdev); void (*finalize_features)(struct virtio_device *vdev); const char *(*bus_name)(struct virtio_device *vdev); int (*set_vq_affinity)(struct virtqueue *vq, int cpu);};
virtqueue
在include/linux/virtio.h中定义:
/** * virtqueue - a queue to register buffers for sending or receiving. * @list: the chain of virtqueues for this device * @callback: the function to call when buffers are consumed (can be NULL). * @name: the name of this virtqueue (mainly for debugging) * @vdev: the virtio device this queue was created for. * @priv: a pointer for the virtqueue implementation to use. * @index: the zero-based ordinal number for this queue. * @num_free: number of elements we expect to be able to fit. * * A note on @num_free: with indirect buffers, each buffer needs one * element in the queue, otherwise a buffer will need one element per * sg element. */struct virtqueue { struct list_head list; void (*callback)(struct virtqueue *vq); const char *name; struct virtio_device *vdev; unsigned int index; unsigned int num_free; void *priv;};
5.2 后端 QEMU
VirtQueue
在hw/virtio/virtio.c中定义:
struct VirtQueue{ VRing vring; /* Next head to pop */ uint16_t last_avail_idx; /* Last avail_idx read from VQ. */ uint16_t shadow_avail_idx; uint16_t used_idx; /* Last used index value we have sjjignalled on */ uint16_t signalled_used; /* Last used index value we have signalled on */ bool signalled_used_valid; /* Notification enabled? */ bool notification; uint16_t queue_index; int inuse; uint16_t vector; void (*handle_output)(VirtIODevice *vdev, VirtQueue *vq); void (*handle_aio_output)(VirtIODevice *vdev, VirtQueue *vq); VirtIODevice *vdev; EventNotifier guest_notifier; EventNotifier host_notifier; QLIST_ENTRY(VirtQueue) node;};
VRing
在hw/virtio/virtio.c中定义:
typedef struct VRing{ unsigned int num; unsigned int num_default; unsigned int align; hwaddr desc; hwaddr avail; hwaddr used;} VRing;
例如把电脑中的文件拷贝到 U 盘时,如果文件特别大,有时会出现这样的情况:明明看到文件已经拷贝完,但系统还是会提示 U 盘正在使用中。这就是 buffer 的原因:拷贝程序虽然已经把数据放到 buffer 中,但是还没有全部写入到 U 盘中
同样的,可以使用sync命令来手动flush buffer中的内容:
> sync --helpUsage: sync [OPTION] [FILE]...Synchronize cached writes to persistent storageIf one or more files are specified, sync only them,or their containing file systems. -d, --data sync only file data, no unneeded metadata -f, --file-system sync the file systems that contain the files --help display this help and exit --version output version information and exitGNU coreutils online help: <http://www.gnu.org/software/coreutils/>Full documentation at: <http://www.gnu.org/software/coreutils/sync>or available locally via: info '(coreutils) sync invocation'
sudo tcpdump -i any udp port 20112 and ip[0x1f:02]=0x4e91 -XNnvvvsudo tcpdump -i any -XNnvvvsudo tcpdump -i any udp -XNnvvvsudo tcpdump -i any udp port 20112 -XNnvvvsudo tcpdump -i any udp port 20112 and ip[0x1f:02]=0x4e91 -XNnvvv
Help for Interactive Commands - procps version 3.2.8Window 1:Def: Cumulative mode Off. System: Delay 3.0 secs; Secure mode Off. Z,B Global: 'Z' change color mappings; 'B' disable/enable bold l,t,m Toggle Summaries: 'l' load avg; 't' task/cpu stats; 'm' mem info 1,I Toggle SMP view: '1' single/separate states; 'I' Irix/Solaris mode f,o . Fields/Columns: 'f' add or remove; 'o' change display order F or O . Select sort field <,> . Move sort field: '<' next col left; '>' next col right R,H . Toggle: 'R' normal/reverse sort; 'H' show threads c,i,S . Toggle: 'c' cmd name/line; 'i' idle tasks; 'S' cumulative time x,y . Toggle highlights: 'x' sort field; 'y' running tasks z,b . Toggle: 'z' color/mono; 'b' bold/reverse (only if 'x' or 'y') u . Show specific user only n or # . Set maximum tasks displayed k,r Manipulate tasks: 'k' kill; 'r' renice d or s Set update interval W Write configuration file q Quit ( commands shown with '.' require a visible task display window ) Press 'h' or '?' for help with Windows,any other key to continue
1: 显示各个 CPU 的使用情况
c: 显示进程完整路径
H: 显示线程
P: 排序 - CPU 使用率
M: 排序 - 内存使用率
R: 倒序
Z: Change color mappings
B: Disable/enable bold
l: Toggle load avg
t: Toggle task/cpu stats
m: Toggle mem info
us - Time spent in user spacesy - Time spent in kernel spaceni - Time spent running niced user processes (User defined priority)id - Time spent in idle operationswa - Time spent on waiting on IO peripherals (eg. disk)hi - Time spent handling hardware interrupt routines. (Whenever a peripheral unit want attention form the CPU, it literally pulls a line, to signal the CPU to service it)si - Time spent handling software interrupt routines. (a piece of code, calls an interrupt routine...)st - Time spent on involuntary waits by virtual cpu while hypervisor is servicing another processor (stolen from a virtual machine)
package mainimport "fmt"func main() { var i int var f float64 var b bool var s string fmt.Printf("%v %v %v %q\n", i, f, b, s)}------0 0 false ""
1.7 类型转换
表达式T(v)将值v转换为类型T:
package mainimport ( "fmt" "math")func main() { var x, y int = 3, 4 var f float64 = math.Sqrt(float64(x*x + y*y)) var z uint = uint(f) fmt.Println(x, y, z)}------3 4 5
1.8 类型推导
package mainimport "fmt"func main() { v1 := 42 fmt.Printf("v1 is of type %T\n", v1) v2 := 3.1415926 fmt.Printf("v2 is of type %T\n", v2) v3 := 0.867 + 0.5i fmt.Printf("v3 is of type %T\n", v3)}------v1 is of type intv2 is of type float64v3 is of type complex128
1.9 常量
常量使用const关键字声明,可以是字符、字符、布尔值或数值,且不能用:=语法声明:
package mainimport "fmt"const Pi = 3.14func main() { const World = "世界" fmt.Println("Hello", World) fmt.Println("Happy", Pi, "Day") const Truth = true fmt.Println("Go rules?", Truth)}------Hello 世界Happy 3.14 DayGo rules? true
1.10 数值常量
数值常量是高精度的值,一个未指定类型的常量由上下文来决定其类型:
package mainimport "fmt"const ( // 将 1 左移 100 位来创建一个非常大的数字 // 即这个数的二进制是 1 后面跟着 100 个 0 Big = 1 << 100 // 再往右移 99 位,即 Small = 1 << 1,或者说 Small = 2 Small = Big >> 99)func needInt(x int) int { return x * 10 + 1 }func needFloat(x float64) float64 { return x * 0.1}func main() { fmt.Println(needInt(Small)) fmt.Println(needFloat(Small)) fmt.Println(needFloat(Big))}------210.21.2676506002282295e+29
2. 流程控制语句
2.1 for 循环
for i := 0; i < 10; i++ { sum += i}
省略初始语句及后置语句,可用作while:
for sum < 1000 { sum += sum}
无限循环:
for { // do something}
2.2 if else 语句
if v := math.Pow(x, n); v <lim { return v} else { fmt.Printf("%g >= %g\n", v, lim)}return lim
2.3 switch 分支
switch的case语句从上到下顺次执行,直到匹配成功时停止:
package mainimport ( "fmt" "runtime")func main() { fmt.Print("Go runs on ") switch os := runtime.GOOS; os { case "windows": fmt.Println("Windows.") case "darwin": fmt.Println("OS X.") case "linux": fmt.Println("Linux.") default: fmt.Printf("%s.\n", os) }}
没有条件的switch同switch true一样,可以将一长串的if-else写得更清晰:
package mainimport ( "fmt" "time")func main() { t := time.Now() switch { case t.Hour() < 12: fmt.Println("Good morning!") case t.Hour() < 17: fmt.Println("Good afternoon!") default: fmt.Println("Good evening!") }}
package mainimport ( "fmt" "math")type Abser interface { Abs() float64}func main() { var a Abser f := MyFloat(-math.Sqrt2) v := Vertex{3, 4} a = f // a MyFloat 实现了 Abser fmt.Println(a.Abs()) a = &v // a *Vertex 实现了 Abser fmt.Println(a.Abs())}type MyFloat float64func (f MyFloat) Abs() float64 { if f < 0 { return float64(-f) } return float64(f)}type Vertex struct { X, Y float64}func (v *Vertex) Abs() float64 { return math.Sqrt(v.X*v.X + v.Y*v.Y)}------1.41421356237309515
接口的隐式实现
在 Go 中,接口是隐式实现的,即类型通过实现一个接口的所有方法来实现该接口。
既然无需专门显式声明,也就没有implements关键字。
接口值
接口也是值,可以像其他值一样传递
接口值可以用作函数的参数或返回值
在内部,接口值可以看做包含值和具体类型的元组:(value, type)
接口值保存了一个具体底层类型的具体值
接口值调用方法时会执行其底层类型的同名方法
package mainimport ( "fmt" "math")type I interface { M()}type T struct { S string}func (t *T) M() { fmt.Println(t.S)}type F float64func (f F) M() { fmt.Println(f)}func main() { var i I i = &T{"Hello"} describe(i) i.M() i = F(math.Pi) describe(i) i.M()}func describe(i I) { fmt.Printf("(%v, %T)\n", i, i)}------(&{Hello}, *main.T)Hello(3.141592653589793, main.F)3.141592653589793
底层值为 nil 的接口值
即便接口内的具体值为nil,方法仍然会被nil接收者调用:
package mainimport "fmt"type I interface { M()}type T struct { S string}func (t *T) M() { if t == nil { fmt.Println("<nil>") return } fmt.Println(t.S)}func main() { var i I var t *T i = t describe(i) i.M() i = &T{"hello"} describe(i) i.M()}func describe(i I) { fmt.Printf("(%v, %T)\n", i, i)}------(<nil>, *main.T)<nil>(&{hello}, *main.T)hello
注意:保存了nil具体值的接口,其自身并不为nil
nil 接口值
nil接口值既不保存值也不保存具体类型
为nil接口调用方法会产生运行时错误
package mainimport "fmt"type I interface { M()}func main() { var i I describe(i) i.M()}func describe(i I) { fmt.Printf("(%v, %T)\n", i, i)}------(<nil>, <nil>)panic: runtime error: invalid memory address or nil pointer dereference[signal SIGSEGV: segmentation violation code=0xffffffff addr=0x0 pc=0xd9864]goroutine 1 [running]:main.main() /tmp/sandbox062767685/prog.go:12 +0x84
空接口
指定了零个方法的接口值被称为空接口:
interface{}
空接口可以用来保存任何类型的值,因为每个类型都至少实现了零个方法
空接口被用来处理未知类型的值
package mainimport "fmt"func main() { var i interface{} describe(i) i = 42 describe(i) i = "hello" describe(i)}func describe(i interface{}) { fmt.Printf("(%v, %T)\n", i, i)}------(<nil>, <nil>)(42, int)(hello, string)
4.3 类型断言
类型断言提供了访问接口值底层具体值的方式:
t, ok := i.(T)
若i保存了一个T,那么t将会是其底层值,而ok为true
否则,ok将为false,而t将为T类型的零值,程序并不会产生panic
package mainimport "fmt"func main() { var i interface{} = "hello" s := i.(string) fmt.Println(s) s, ok := i.(string) fmt.Println(s, ok) f, ok := i.(float64) fmt.Println(f, ok) f = i.(float64) // 报错(panic) fmt.Println(f)}------hellohello true0 falsepanic: interface conversion: interface {} is string, not float64goroutine 1 [running]:main.main() /tmp/sandbox590758285/prog.go:17 +0x220
4.4 类型选择
类型选择是一种按顺序从几个类型断言中选择分支的结构:
package mainimport "fmt"func do(i interface{}) { switch v := i.(type) { case int: fmt.Printf("Twice %v is %v\n", v, v*2) case string: fmt.Printf("%q is %v bytes long\n", v, len(v)) default: fmt.Printf("I don't know about type %T!\n", v) }}func main() { do(21) do("hello") do(true)}------Twice 21 is 42"hello" is 5 bytes longI don't know about type bool!
4.5 Stringer
fmt包中定义的Stringer接口是最普遍的接口之一:
type Stringer interface { String() string}
因此只要实现了String()方法,就可以打印结构体的信息:
package mainimport "fmt"type Person struct { Name string Age int}func (p Person) String() string { return fmt.Sprintf("%v (%v years)", p.Name, p.Age)}func main() { a := Person{"Arthur Dent", 42} z := Person{"Zaphod Beeblebrox", 9001} fmt.Println(a, z)}------Arthur Dent (42 years) Zaphod Beeblebrox (9001 years)
4.6 错误
Go 程序使用error值来表示错误状态。与fmt.Stringer类似,error类型也是一个内建接口:
type error interface { Error() string}
通常函数会返回一个error值,调用它的代码应当判断这个错误是否等于nil来进行错误处理:
package mainimport ( "fmt" "time")type MyError struct { When time.Time What string}func (e *MyError) Error() string { return fmt.Sprintf("at %v, %s", e.When, e.What)}func run() error { return &MyError{ time.Now(), "it didn't work", }}func main() { if err := run(); err != nil { fmt.Println(err) }}------at 2019-08-18 12:53:38.540727 +0800 CST m=+0.002985501, it didn't work
package mainimport ( "fmt" "time")func say(s string) { for i := 0; i < 5; i++ { time.Sleep(100 * time.Millisecond) fmt.Println(s) }}func main() { go say("world") say("hello")}------helloworldworldhelloworldhelloworldhellohello
Go 程在相同的地址空间中运行,因此在访问共享的内存时必须进行同步。sync包提供了这种能力,不过也可以利用其它方式实现。
5.2 通道 channel
信道channel是带有类型的管道,可以通过它使用信道操作符<-来发送或者接收值:
ch <- v // 将 v 发送至信道 chv := <-ch // 从 ch 接收值并赋予 v
根据箭头在信道的方向,左读右写。
和映射与切片一样,信道在使用前必须创建:
ch := make(chan int)
默认情况下是阻塞的,这使得 Go 程序可以在没有显式的锁或竞态变量的情况下进行同步:
package mainimport "fmt"func sum(s []int, c chan int) { sum := 0 for i := range s { sum += s[i] } c <- sum // 将和送入 c}func main() { s := []int{7, 2, 8, -9, 4, 0} c := make(chan int) go sum(s[:len(s)/2], c) go sum(s[len(s)/2:], c) x, y := <-c, <-c // 从 c 中接收 fmt.Println(x, y, x+y)}-------5 17 12
5.3 带缓冲的通道
信道可以是带缓冲的:
ch := make(chan int, 100)
仅当信道的缓冲区填满后,向其发送数据时才会阻塞。当缓冲区为空时,接收方会阻塞。
5.4 range 和 close
发送者可通过close关闭一个信道来表示没有需要发送的值了。
接收者可通过以下语句判断信道是否已被关闭:
v, ok := <-ch // 关闭时 v 为默认零值,ok 为 false
循环for i := range c会不断从信道接收值,直到它被关闭:
package mainimport ( "fmt")func fibonacci(n int, c chan int) { x, y := 0, 1 for i := 0; i < n; i++ { c <- x x, y = y, x+y } close(c)}func main() { c := make(chan int, 10) go fibonacci(cap(c), c) for i := range c { fmt.Println(i) } v, ok := <-c fmt.Println(v, ok)}------01123581321340 false
package mainimport ( "fmt" "math")func sqrt(x float64) float64 { z := float64(1) for { y := z - (z*z-x)/(2*z) if math.Abs(y-z) < 1e-10 { return y } z = y }}func main() { fmt.Println(sqrt(2)) fmt.Println(math.Sqrt(2))}------1.41421356237309511.4142135623730951
7.2 切片:图像灰度值
package mainimport ( "golang.org/x/tour/pic")func Pic(dx, dy int) [][]uint8 { ret := make([][]uint8, dy) for x := 0; x < dy; x++ { ret[x] = make([]uint8, dx) for y := 0; y < dx; y++ { ret[x][y] = uint8(x ^ y) // ret[x][y] = uint8((x + y) / 2) // ret[x][y] = uint8(x * y) // ret[x][y] = uint8(float64(x) * math.Log(float64(y))) // ret[x][y] = uint8(x % (y + 1)) } } return ret}func main() { pic.Show(Pic)}
7.3 映射:单词统计
package mainimport ( "strings" "golang.org/x/tour/wc")func WordCount(s string) map[string]int { count := make(map[string]int) for _, word := range strings.Fields(s) { count[word]++ } return count}func main() { wc.Test(WordCount)}
7.4 闭包:斐波那契数列
package mainimport "fmt"// 返回一个“返回int的函数”func fibonacci() func() int { one := 0 two := 1 return func() int { three := one + two one = two two = three return three }}func main() { f := fibonacci() for i := 0; i < 10; i++ { fmt.Println(f()) }}------123581321345589
package mainimport ( "fmt" "math")type ErrNegativeSqrt float64func (e ErrNegativeSqrt) Error() string { return fmt.Sprintf("cannot Sqrt negative number: %v", float64(e))}func sqrt(x float64) (float64, error) { if x < 0 { return 0, ErrNegativeSqrt(x) } z := float64(1) for { y := z - (z*z-x)/(2*z) if math.Abs(y-z) < 1e-10 { return y, nil } z = y }}func main() { fmt.Println(sqrt(2)) fmt.Println(sqrt(-2))}------1.4142135623730951 <nil>0 cannot Sqrt negative number: -2
7.7 Reader
package mainimport ( "strings" "golang.org/x/tour/reader")type MyReader struct{}func (MyReader) Read(b []byte) (int, error) { r := strings.NewReader("A") n, err := r.Read(b) return n, err}func main() { reader.Validate(MyReader{})}
7.8 rot13Reader
package mainimport ( "io" "os" "strings")type rot13Reader struct { r io.Reader}func (self rot13Reader) Read(buf []byte) (int, error) { length, err := self.r.Read(buf) if err != nil { return length, err } for i := 0; i < length; i++ { v := buf[i] switch { case 'a' <= v && v <= 'm': fallthrough case 'A' <= v && v <= 'M': buf[i] = v + 13 case 'n' <= v && v <= 'z': fallthrough case 'N' <= v && v <= 'Z': buf[i] = v - 13 } } return length, nil}func main() { s := strings.NewReader("Lbh penpxrq gur pbqr!") r := rot13Reader{s} io.Copy(os.Stdout, &r)}------You cracked the code!
7.9 图像
package mainimport ( "image" "image/color" "golang.org/x/tour/pic")type Image struct { w int h int}func (self Image) ColorModel() color.Model { return color.RGBAModel}func (self Image) Bounds() image.Rectangle { return image.Rect(0, 0, self.w, self.h)}func (self Image) At(x, y int) color.Color { r := (uint8)((float64)(x) / (float64)(self.w) * 255.0) g := (uint8)((float64)(y) / (float64)(self.h) * 255.0) b := (uint8)((float64)(x*y) / (float64)(self.w*self.h) * 255.0) return color.RGBA{r, g, b, 255}}func main() { m := Image{255, 255} pic.ShowImage(m)}
7.10 等价二叉查找树
package mainimport ( "fmt" "golang.org/x/tour/tree")// Walk 步进 tree t 将所有的值从 tree 发送到 channel ch。func Walk(t *tree.Tree, ch chan int) { if t == nil { return } Walk(t.Left, ch) ch <- t.Value Walk(t.Right, ch)}// Same 检测树 t1 和 t2 是否含有相同的值。func Same(t1, t2 *tree.Tree) bool { ch1 := make(chan int) ch2 := make(chan int) go Walk(t1, ch1) go Walk(t2, ch2) for i := 0; i < 10; i++ { x, y := <-ch1, <-ch2 fmt.Println(x, y) if x != y { return false } } return true}func main() { fmt.Println(Same(tree.New(1), tree.New(1)))}------1 12 23 34 45 56 67 78 89 910 10true
7.11 Web 爬虫
package mainimport ( "fmt" "sync")type Fetcher interface { // Fetch 返回 URL 的 body 内容,并且将在这个页面上找到的 URL 放到一个 slice 中。 Fetch(url string) (body string, urls []string, err error)}// Crawl 使用 fetcher 从某个 URL 开始递归的爬取页面,直到达到最大深度。func Crawl(url string, depth int, fetcher Fetcher, crawled Crawled, out chan string, end chan bool) { // TODO: 并行的抓取 URL。 // TODO: 不重复抓取页面。 // 下面并没有实现上面两种情况: if depth <= 0 { end <- true return } crawled.mux.Lock() if _, ok := crawled.crawled[url]; ok { crawled.mux.Unlock() end <- true return } crawled.crawled[url] = 1 crawled.mux.Unlock() _, urls, err := fetcher.Fetch(url) if err != nil { fmt.Println(err) end <- true return } out <- url //fmt.Println("found: ", url, body) for _, u := range urls { go Crawl(u, depth-1, fetcher, crawled, out, end) } for i := 0; i < len(urls); i++ { <-end } end <- true return}type Crawled struct { crawled map[string]int mux sync.Mutex}func main() { crawled := Crawled{make(map[string]int), sync.Mutex{}} out := make(chan string) end := make(chan bool) go Crawl("http://golang.org/", 4, fetcher, crawled, out, end) for { select { case url := <-out: fmt.Println("found: ", url) case <-end: return } }}// fakeFetcher 是返回若干结果的 Fetcher。type fakeFetcher map[string]*fakeResulttype fakeResult struct { body string urls []string}func (f fakeFetcher) Fetch(url string) (string, []string, error) { if res, ok := f[url]; ok { return res.body, res.urls, nil } return "", nil, fmt.Errorf("not found: %s", url)}// fetcher 是填充后的 fakeFetcher。var fetcher = fakeFetcher{ "http://golang.org/": &fakeResult{ "The Go Programming Language", []string{ "http://golang.org/pkg/", "http://golang.org/cmd/", }, }, "http://golang.org/pkg/": &fakeResult{ "Packages", []string{ "http://golang.org/", "http://golang.org/cmd/", "http://golang.org/pkg/fmt/", "http://golang.org/pkg/os/", }, }, "http://golang.org/pkg/fmt/": &fakeResult{ "Package fmt", []string{ "http://golang.org/", "http://golang.org/pkg/", }, }, "http://golang.org/pkg/os/": &fakeResult{ "Package os", []string{ "http://golang.org/", "http://golang.org/pkg/", }, },}------found: http://golang.org/found: http://golang.org/pkg/found: http://golang.org/pkg/os/found: http://golang.org/pkg/fmt/not found: http://golang.org/cmd/
// ListenAndServe listens on the TCP network address addr and then calls// Serve with handler to handle requests on incoming connections.// Accepted connections are configured to enable TCP keep-alives.//// The handler is typically nil, in which case the DefaultServeMux is used.//// ListenAndServe always returns a non-nil error.func ListenAndServe(addr string, handler Handler) error { server := &Server{Addr: addr, Handler: handler} return server.ListenAndServe()}
// ListenAndServe listens on the TCP network address srv.Addr and then// calls Serve to handle requests on incoming connections.// Accepted connections are configured to enable TCP keep-alives.//// If srv.Addr is blank, ":http" is used.//// ListenAndServe always returns a non-nil error. After Shutdown or Close,// the returned error is ErrServerClosed.func (srv *Server) ListenAndServe() error { if srv.shuttingDown() { return ErrServerClosed } addr := srv.Addr if addr == "" { addr = ":http" } ln, err := net.Listen("tcp", addr) // 监听指定的端口 if err != nil { return err } // 接收并处理客户端的请求 return srv.Serve(tcpKeepAliveListener{ln.(*net.TCPListener)})}
// Serve accepts incoming connections on the Listener l, creating a// new service goroutine for each. The service goroutines read requests and// then call srv.Handler to reply to them.//// HTTP/2 support is only enabled if the Listener returns *tls.Conn// connections and they were configured with "h2" in the TLS// Config.NextProtos.//// Serve always returns a non-nil error and closes l.// After Shutdown or Close, the returned error is ErrServerClosed.func (srv *Server) Serve(l net.Listener) error { // 省略部分代码 for { rw, e := l.Accept() // 1. 接收客户端请求 if e != nil { select { case <-srv.getDoneChan(): return ErrServerClosed default: } if ne, ok := e.(net.Error); ok && ne.Temporary() { if tempDelay == 0 { tempDelay = 5 * time.Millisecond } else { tempDelay *= 2 } if max := 1 * time.Second; tempDelay > max { tempDelay = max } srv.logf("http: Accept error: %v; retrying in %v", e, tempDelay) time.Sleep(tempDelay) continue } return e } tempDelay = 0 c := srv.newConn(rw) // 2. 创建一个新的 Conn c.setState(c.rwc, StateNew) // before Serve can return go c.serve(ctx) // 3. 为每个连接单独开一个 goroutine }}
省略部分代码,重点关注其中的for{}循环:
l.Accept():接收请求,并处理可能出现的错误
srv.newConn(rw):创建一个新的连接Conn
go c.serve(ctx):为新连接单独开一个goroutine,把请求的数据当作参数扔给这个Conn去服务
// Serve a new connection.func (c *conn) serve(ctx context.Context) { // 省略部分代码 for { // 1. 解析请求,获取 ResponseWriter 及 Request w, err := c.readRequest(ctx) // 省略部分代码 // HTTP cannot have multiple simultaneous active requests.[*] // Until the server replies to this request, it can't read another, // so we might as well run the handler in this goroutine. // [*] Not strictly true: HTTP pipelining. We could let them all process // in parallel even if their responses need to be serialized. // But we're not going to implement HTTP pipelining because it // was never deployed in the wild and the answer is HTTP/2. // 2. 进一步处理请求 serverHandler{c.server}.ServeHTTP(w, w.req) } // 省略部分代码}
type Handler interface { ServeHTTP(ResponseWriter, *Request)}
例如之前传入的参数是nil,就会使用默认的DefaultServeMux。该变量是一个路由器(或者说,HTTP 请求多路复用器),用来匹配 URL 并跳转到其相应的 handle 函数,它在 Go 源码的server.go中定义:
// ServeMux is an HTTP request multiplexer.// It matches the URL of each incoming request against a list of registered// patterns and calls the handler for the pattern that// most closely matches the URL.//// Patterns name fixed, rooted paths, like "/favicon.ico",// or rooted subtrees, like "/images/" (note the trailing slash).// Longer patterns take precedence over shorter ones, so that// if there are handlers registered for both "/images/"// and "/images/thumbnails/", the latter handler will be// called for paths beginning "/images/thumbnails/" and the// former will receive requests for any other paths in the// "/images/" subtree.//// Note that since a pattern ending in a slash names a rooted subtree,// the pattern "/" matches all paths not matched by other registered// patterns, not just the URL with Path == "/".//// If a subtree has been registered and a request is received naming the// subtree root without its trailing slash, ServeMux redirects that// request to the subtree root (adding the trailing slash). This behavior can// be overridden with a separate registration for the path without// the trailing slash. For example, registering "/images/" causes ServeMux// to redirect a request for "/images" to "/images/", unless "/images" has// been registered separately.//// Patterns may optionally begin with a host name, restricting matches to// URLs on that host only. Host-specific patterns take precedence over// general patterns, so that a handler might register for the two patterns// "/codesearch" and "codesearch.google.com/" without also taking over// requests for "http://www.google.com/".//// ServeMux also takes care of sanitizing the URL request path and the Host// header, stripping the port number and redirecting any request containing . or// .. elements or repeated slashes to an equivalent, cleaner URL.type ServeMux struct { mu sync.RWMutex m map[string]muxEntry es []muxEntry // slice of entries sorted from longest to shortest. hosts bool // whether any patterns contain hostnames}type muxEntry struct { h Handler pattern string}// NewServeMux allocates and returns a new ServeMux.func NewServeMux() *ServeMux { return new(ServeMux) }// DefaultServeMux is the default ServeMux used by Serve.var DefaultServeMux = &defaultServeMuxvar defaultServeMux ServeMux
func main() { http.HandleFunc("/", sayHelloName) // 设置访问的路由 log.Fatal(http.ListenAndServe(":8080", nil)) // 设置监听的端口}// HandleFunc registers the handler function for the given pattern// in the DefaultServeMux.// The documentation for ServeMux explains how patterns are matched.func HandleFunc(pattern string, handler func(ResponseWriter, *Request)) { DefaultServeMux.HandleFunc(pattern, handler)}
这样一来当请求的 URI 为/时,路由就会跳转到/对应的Handler,也就是sayHelloName()本身,最后把结果写入 Response 并反馈给客户端。
与其他一些语言编写的 HTTP 服务器不同,Go 为了实现高并发和高性能,使用了goroutine来处理Conn的读写事件,这样每个请求都能保持独立,相互不会阻塞,可以高效的响应网络事件,这是 Go 高效的保证。
Go 在等待客户端请求的Serve()函数里是这样写的:
func (srv *Server) Serve(l net.Listener) error { // 省略部分代码 for { rw, e := l.Accept() // 省略错误处理 c := srv.newConn(rw) c.setState(c.rwc, StateNew) // before Serve can return go c.serve(ctx) }}
// HandleFunc registers the handler function for the given pattern.func (mux *ServeMux) HandleFunc(pattern string, handler func(ResponseWriter, *Request)) { if handler == nil { panic("http: nil handler") } mux.Handle(pattern, HandlerFunc(handler))}
// The HandlerFunc type is an adapter to allow the use of// ordinary functions as HTTP handlers. If f is a function// with the appropriate signature, HandlerFunc(f) is a// Handler that calls f.type HandlerFunc func(ResponseWriter, *Request)// ServeHTTP calls f(w, r).func (f HandlerFunc) ServeHTTP(w ResponseWriter, r *Request) { f(w, r)}
func (mux *ServeMux) Handler(r *Request) (h Handler, pattern string) { // CONNECT requests are not canonicalized. if r.Method == "CONNECT" { // If r.URL.Path is /tree and its handler is not registered, // the /tree -> /tree/ redirect applies to CONNECT requests // but the path canonicalization does not. if u, ok := mux.redirectToPathSlash(r.URL.Host, r.URL.Path, r.URL); ok { return RedirectHandler(u.String(), StatusMovedPermanently), u.Path } return mux.handler(r.Host, r.URL.Path) } // 省略部分代码 return mux.handler(host, r.URL.Path)}// handler is the main implementation of Handler.// The path is known to be in canonical form, except for CONNECT methods.func (mux *ServeMux) handler(host, path string) (h Handler, pattern string) { mux.mu.RLock() defer mux.mu.RUnlock() // Host-specific pattern takes precedence over generic ones if mux.hosts { h, pattern = mux.match(host + path) } if h == nil { h, pattern = mux.match(path) } if h == nil { h, pattern = NotFoundHandler(), "" } return}
可以看到在mux.handler()中是调用mux.match()进行匹配的,函数定义如下:
// Find a handler on a handler map given a path string.// Most-specific (longest) pattern wins.func (mux *ServeMux) match(path string) (h Handler, pattern string) { // Check for exact match first. v, ok := mux.m[path] if ok { return v.h, v.pattern } // Check for longest valid match. mux.es contains all patterns // that end in / sorted from longest to shortest. for _, e := range mux.es { if strings.HasPrefix(path, e.pattern) { return e.h, e.pattern } } return nil, ""}
#include <stdio.h>#include <stdlib.h>#include <sys/types.h>#include <sys/stat.h>#include <sys/ioctl.h>#include <fcntl.h>#include <unistd.h>#include <linux/kvm.h>#define KVM_FILE "/dev/kvm"int main(){ int dev; int ret; dev = open(KVM_FILE, O_RDWR|O_NDELAY); ret = ioctl(dev, KVM_GET_API_VERSION, 0); printf("----KVM API version is %d----\n", ret); ret = ioctl(dev, KVM_CHECK_EXTENSION, KVM_CAP_NR_VCPUS); printf("----KVM supports MAX_VCPUS per guest(VM) is %d----\n", ret); ret = ioctl(dev, KVM_CHECK_EXTENSION, KVM_CAP_NR_MEMSLOTS); printf("----KVM supports MEMORY_SLOTS per guset(VM) is %d----\n", ret); ret = ioctl(dev, KVM_CHECK_EXTENSION, KVM_CAP_IOMMU); if(ret != 0) printf("----KVM supports IOMMU (i.e. Intel VT-d or AMD IOMMU).----\n"); else printf("----KVM doesn't support IOMMU (i.e. Intel VT-d or AMD IOMMU).----\n"); return 0;}
编译运行:
> vim kvm-api-test.c> gcc kvm-api-test.c -o kvm-api-test> ./kvm-api-test----KVM API version is 12--------KVM supports MAX_VCPUS per guest(VM) is 160--------KVM supports MEMORY_SLOTS per guset(VM) is 32--------KVM doesn't support IOMMU (i.e. Intel VT-d or AMD IOMMU).----
右边紫色部分即为非根模式,Guest OS 运行在非根模式下的 Ring 0,所有的敏感指令都被重新定义,以便产生相应的 EXIT_REASON 交给 KVM 处理。Guest OS 中的进程则运行在非根模式下的 Ring 3
3. pstack 打印堆栈
通过virsh启动一台 32 核 CPU 的虚拟机,使用pstack打印堆栈验证一下:
> pstack $(pidof qemu-system-x86_64)...(省略重复的堆栈)Thread 6 (Thread 0x7fdcd4dfa700 (LWP 37340)):#0 0x00007fdd46002307 in ioctl () from /lib64/libc.so.6#1 0x00000000005e4bcb in kvm_vcpu_ioctl ()#2 0x00000000005e57d8 in kvm_cpu_exec ()#3 0x00000000005a2601 in qemu_kvm_cpu_thread_fn ()#4 0x00007fdd462d8893 in start_thread () from /lib64/libpthread.so.0#5 0x00007fdd46009bfd in clone () from /lib64/libc.so.6Thread 5 (Thread 0x7fdcbbfff700 (LWP 37341)):#0 0x00007fdd46002307 in ioctl () from /lib64/libc.so.6#1 0x00000000005e4bcb in kvm_vcpu_ioctl ()#2 0x00000000005e57d8 in kvm_cpu_exec ()#3 0x00000000005a2601 in qemu_kvm_cpu_thread_fn ()#4 0x00007fdd462d8893 in start_thread () from /lib64/libpthread.so.0#5 0x00007fdd46009bfd in clone () from /lib64/libc.so.6Thread 4 (Thread 0x7fdcbb5fe700 (LWP 37342)):#0 0x00007fdd46002307 in ioctl () from /lib64/libc.so.6#1 0x00000000005e4bcb in kvm_vcpu_ioctl ()#2 0x00000000005e57d8 in kvm_cpu_exec ()#3 0x00000000005a2601 in qemu_kvm_cpu_thread_fn ()#4 0x00007fdd462d8893 in start_thread () from /lib64/libpthread.so.0#5 0x00007fdd46009bfd in clone () from /lib64/libc.so.6Thread 3 (Thread 0x7fdcbabfd700 (LWP 37343)):#0 0x00007fdd46002307 in ioctl () from /lib64/libc.so.6#1 0x00000000005e4bcb in kvm_vcpu_ioctl ()#2 0x00000000005e57d8 in kvm_cpu_exec ()#3 0x00000000005a2601 in qemu_kvm_cpu_thread_fn ()#4 0x00007fdd462d8893 in start_thread () from /lib64/libpthread.so.0#5 0x00007fdd46009bfd in clone () from /lib64/libc.so.6Thread 2 (Thread 0x7fc4a73fd700 (LWP 37451)):#0 0x00007fdd462dc115 in pthread_cond_wait@@GLIBC_2.3.2 () from /lib64/libpthread.so.0#1 0x0000000000568781 in qemu_cond_wait ()#2 0x00000000005952c3 in vnc_worker_thread_loop ()#3 0x0000000000595778 in vnc_worker_thread ()#4 0x00007fdd462d8893 in start_thread () from /lib64/libpthread.so.0#5 0x00007fdd46009bfd in clone () from /lib64/libc.so.6Thread 1 (Thread 0x7fdd47cce700 (LWP 37247)):#0 0x00007fdd460029f3 in select () from /lib64/libc.so.6#1 0x000000000053b325 in main_loop_wait ()#2 0x0000000000536ef4 in main ()
package mainimport ( "fmt")func main() { n := 0 ans := 0 cur := 0 fmt.Scan(&n) for i := 0; i < n; i++ { fmt.Scan(&cur) ans ^= cur } fmt.Println(ans)}------71 2 2 1 3 4 34
2.同构字符串:
package mainimport ( "fmt" "strings")func main() { var s, s1, s2 string fmt.Scan(&s) split := strings.Split(s, ";") s1, s2 = split[0], split[1] len1 := len(s1) len2 := len(s2) if len1 != len2 { fmt.Println("False") return } else if len1 == 1 { fmt.Println("True") return } record := make(map[byte]byte) for i := 0; i < len1; i++ { if record[s1[i]] == s2[i] { continue } else if record[s1[i]] == 0 { record[s1[i]] = s2[i] } else { fmt.Println("False") return } } fmt.Println("True") return}------ababa;ststsTrue
3.最大连续子序列的和:
package mainimport ( "fmt")func main() { array := make([]int, 0) var a int var ch byte fmt.Scan(&ch) for { n, err := fmt.Scanf("%d", &a) if n == 0 { break } if err != nil { fmt.Println(err) break } array = append(array, a) } fmt.Println(search(array))}func search(a []int) int { l := len(a) curSum := 0 maxSum := 0 for i := 0; i < l; i++ { curSum = 0 for j := i; j < l; j++ { curSum += a[j] if curSum > maxSum { maxSum = curSum } } } return maxSum}------[2, 4, -2, 5, -6]9
字节跳动 - 牛客
1.距离最近的厕所:
package mainimport ( "fmt")var ( n int s string wcDis [1000000]int)const ( maxDistance int = 1000001)// 离最近厕所的距离,O代表有厕所,保证至少有一个厕所//// [Input]// 9// XXOXOOXXX//// [Output]// 2 1 0 1 0 0 1 2 3func main() { fmt.Scan(&n) fmt.Scan(&s) for i := 0; i < 1000000; i++ { wcDis[i] = maxDistance } for i := 0; i < n; i++ { findWC(i) }}func findWC(cur int) { if s[cur] == 'O' { wcDis[cur] = 0 fmt.Printf("%d ", 0) return } curDis := min(searchLeft(cur), searchRight(cur)) wcDis[cur] = curDis fmt.Printf("%d ", curDis)}func min(a, b int) int { if a < b { return a } return b}func searchLeft(cur int) int { if cur == 0 { return maxDistance } if s[cur-1] == 'O' { return 1 } return wcDis[cur-1] + 1}func searchRight(cur int) int { disRight := 0 for i := cur + 1; i < n; i++ { disRight++ if s[i] == 'O' { return disRight } } return maxDistance}------9XXOXOOXXX2 1 0 1 0 0 1 2 3
2.考试跳过的题目:
package mainimport ( "fmt" "sort")// 第一行: 测试用例个数// 第二行: n, m, 分别代表题目总数、时间总数// 输出: 至少要跳过前面的几道题//// [Input]// 2// 5 5// 1 2 3 4 5// 4 4// 4 3 2 1//// [Output]// 0 0 1 2 4// 0 1 2 2func main() { var total int fmt.Scan(&total) for i := 0; i < total; i++ { solve() }}func solve() { var n, m int fmt.Scan(&n, &m) questions := make([]int, n) for i := 0; i < n; i++ { fmt.Scan(&questions[i]) } var curSum = 0 for i := 0; i < n-1; i++ { curSum += questions[i] printAns(questions, i, curSum, n, m) fmt.Print(" ") } curSum += questions[n-1] printAns(questions, n-1, curSum, n, m) fmt.Println()}func printAns(questions []int, curPos, curSum, n, m int) { if curSum <= m { fmt.Print(0) return } prev := make([]int, curPos) copy(prev, questions[0:curPos]) sort.Slice(prev, func(i, j int) bool { return prev[i] > prev[j] }) var curGiveup = 0 for i := 0; i < curPos; i++ { curSum -= prev[i] curGiveup++ if curSum <= m { fmt.Print(curGiveup) return } }}------25 51 2 3 4 54 44 3 2 10 0 1 2 40 1 2 2
/** * MemoryRegionSection: describes a fragment of a #MemoryRegion * * @mr: the region, or %NULL if empty * @address_space: the address space the region is mapped in * @offset_within_region: the beginning of the section, relative to @mr's start * @size: the size of the section; will not exceed @mr's boundaries * @offset_within_address_space: the address of the first byte of the section * relative to the region's address space * @readonly: writes to this section are ignored */struct MemoryRegionSection { MemoryRegion *mr; // 所属的 MemoryRegion MemoryRegion *address_space; // 关联的 AddressSpace target_phys_addr_t offset_within_region; // 在 MemoryRegion 内部的 offset uint64_t size; // Section 的大小 target_phys_addr_t offset_within_address_space; // 在 AddressSpace 内部的 offset bool readonly; // 是否为只读};
static void address_space_update_topology_pass(AddressSpace *as, FlatView old_view, FlatView new_view, bool adding){ unsigned iold, inew; FlatRange *frold, *frnew; /* Generate a symmetric difference of the old and new memory maps. * Kill ranges in the old map, and instantiate ranges in the new map. */ /* ... */ } else { /* In new */ if (adding) { MEMORY_LISTENER_UPDATE_REGION(frnew, as, Forward, region_add); } ++inew; } }}
#!/bin/bashpara1="hello world"echo "para1 is $para1"echo "para1 is ${para1}!"------para1 is hello worldpara1 is hello world!
3. 命令执行
#!/bin/bash# save command output into varhostname=`hostname`echo $hostname# call command in stringecho "Current path is $(pwd)"# use double (()) to calculate an expressionecho "36+52=$((36+52))"# command as a stringkernel="uname -r" echo "kernel is $($kernel)"# several commands as a stringcmd="ls;pwd"echo "$(eval $cmd)"------centos-2Current path is /root/GithubProjects/sh-utils36+52=88kernel is 3.10.0-862.14.4.el7.x86_6424-bit-color.shdocker-k8s-images.shexport-http-proxy.shget-wechat-cover.shssr.shstart-goland.shtest.shtmux-tools/root/GithubProjects/sh-utils
4. 条件分支
if 语句
一般来说,如果命令成功执行,则其返回值为0,因此可通过下面的方式判断上一条命令的执行结果:
if [ $? -eq 0 ]then echo "success"elif [ $? -eq 1 ]then echo "failed,code is 1"else echo "other code"fi
case 语句
case语句的使用方法如下:
name="aa"name="aa"case $name in "aa") echo "name is $name" ;; "") echo "name is empty" ;; "bb") echo "name is $name" ;; *) echo "other name" ;;esac
# Enable the go modules featureexport GO111MODULE=on# Set the GOPROXY environment variableexport GOPROXY=https://goproxy.io
2. Windows
# Enable the go modules feature$env:GO111MODULE="on"# Set the GOPROXY environment variable$env:GOPROXY="https://goproxy.io"
3. go 1.13+
go env -w GOPROXY=https://goproxy.io,direct# Set environment variable allow bypassing the proxy for selected modulesgo env -w GOPRIVATE=*.corp.example.com
// Model base model definition, including fields `ID`, `CreatedAt`, `UpdatedAt`, `DeletedAt`, which could be embedded in your models// type User struct {// gorm.Model// }type Model struct { ID uint `gorm:"primary_key"` CreatedAt time.Time UpdatedAt time.Time DeletedAt *time.Time `sql:"index"`}
可以将它嵌入你的模型,或者只写需要的字段:
// 添加字段 `ID`,`CreatedAt`,`UpdatedAt`,`DeletedAt`type User struct { gorm.Model Name string}// 只需要字段 `ID`,`CreatedAt`type User struct { ID uint CreatedAt time.Time Name string}
表名是结构体名的复数
type User struct {} // 默认表名是 `users`// 设置 User 的表名为 `profiles`func (User) TableName() string { return "profiles"}func (u User) TableName() string { if u.Role == "admin" { return "admin_users" } else { return "users" }}// 全局禁用表名负数db.SingularTable(true) // 如果设置为 true,`User` 的默认表名为 `user`,使用 `TableName` 设置的表名不受影响
type User struct { ID uint // 列名为 `id` Name string // 列名为 `name` Birthday time.Time // 列名为 `birthday` CreatedAt time.Time // 列名为 `created_at`}// 重设列名type Animal struct { AnimalID int64 `gorm:"column:beast_id"` // 设置列名为 `beast_id` Birthday time.Time `gorm:"column:day_of_the_beast"` // 设置列名为 `day_of_the_beast` Age int64 `gorm:"column:age_of_the_beast"` // 设置列名为 `age_of_the_beast`}
字段 ID 为默认主键
type User struct { ID uint // 字段 `ID` 为默认主键 Name string}// 使用 tag `primary_key` 来设置主键type Animal struct { AnimalID int64 `gorm:"primary_key"` // 设置 AnimalID 为主键 Name string Age int64}
A belongs to association sets up a one-to-one connection with another model, such that each instance of the declaring model “belongs to” one instance of the other model.
例如,如果您的应用程序包含用户和配置文件,并且可以将每个配置文件分配给一个用户:
type User struct { gorm.Model Name string}// `Profile` belongs to `User`, `UserID` is the foreign keytype Profile struct { gorm.Model UserID int User User Name string}
4. Code Snippets
// Enable Logger, show detailed logdb.LogMode(true)// Disable Logger, don't show any logdb.LogMode(false)// Debug a single operation, show detailed log for this operationdb.Debug().Where("name = ?", "jinzhu").First(&User{})
db.Exec("DROP TABLE users;")db.Exec("UPDATE orders SET shipped_at=? WHERE id IN (?)", time.Now, []int64{11,22,33})// Scantype Result struct { Name string Age int}var result Resultdb.Raw("SELECT name, age FROM users WHERE name = ?", 3).Scan(&result)
In addition, support is included for migration using RDMA, which transports the page data using RDMA, where the hardware takes care of transporting the pages, and the load on the CPU is much lower. While the internals of RDMA migration are a bit different, this isn’t really visible outside the RAM migration code.
#define IOV_MAX 1024 /* 定义在 include/qemu/osdep.h 中 */...#define IO_BUF_SIZE 32768#define MAX_IOV_SIZE MIN(IOV_MAX, 64)struct QEMUFile { const QEMUFileOps *ops; const QEMUFileHooks *hooks; void *opaque; int64_t bytes_xfer; int64_t xfer_limit; int64_t pos; /* start of buffer when writing, end of buffer when reading */ int buf_index; int buf_size; /* 0 when writing */ uint8_t buf[IO_BUF_SIZE]; DECLARE_BITMAP(may_free, MAX_IOV_SIZE); struct iovec iov[MAX_IOV_SIZE]; unsigned int iovcnt; int last_error;};
结构体QIOChannel在include/io/channel.h中的定义如下:
/** * QIOChannel: * * The QIOChannel defines the core API for a generic I/O channel * class hierarchy. It is inspired by GIOChannel, but has the * following differences * * - Use QOM to properly support arbitrary subclassing * - Support use of iovecs for efficient I/O with multiple blocks * - None of the character set translation, binary data exclusively * - Direct support for QEMU Error object reporting * - File descriptor passing * * This base class is abstract so cannot be instantiated. There * will be subclasses for dealing with sockets, files, and higher * level protocols such as TLS, WebSocket, etc. */struct QIOChannel { Object parent; unsigned int features; /* bitmask of QIOChannelFeatures */ char *name; AioContext *ctx; Coroutine *read_coroutine; Coroutine *write_coroutine;#ifdef _WIN32 HANDLE event; /* For use with GSource on Win32 */#endif};
struct VMStateDescription { const char *name; int unmigratable; int version_id; int minimum_version_id; int minimum_version_id_old; MigrationPriority priority; LoadStateHandler *load_state_old; int (*pre_load)(void *opaque); int (*post_load)(void *opaque, int version_id); int (*pre_save)(void *opaque); bool (*needed)(void *opaque); const VMStateField *fields; const VMStateDescription **subsections;};
/* TODO: Individual devices generally have very little idea about the rest of the system, so instance_id should be removed/replaced. Meanwhile pass -1 as instance_id if you do not already have a clearly distinguishing id for all instances of your device class. */int register_savevm_live(DeviceState *dev, const char *idstr, int instance_id, int version_id, SaveVMHandlers *ops, void *opaque){ SaveStateEntry *se; se = g_new0(SaveStateEntry, 1); se->version_id = version_id; se->section_id = savevm_state.global_section_id++; se->ops = ops; se->opaque = opaque; se->vmsd = NULL; /* if this is a live_savem then set is_ram */ if (ops->save_setup != NULL) { se->is_ram = 1; } if (dev) { char *id = qdev_get_dev_path(dev); if (id) { if (snprintf(se->idstr, sizeof(se->idstr), "%s/", id) >= sizeof(se->idstr)) { error_report("Path too long for VMState (%s)", id); g_free(id); g_free(se); return -1; } g_free(id); se->compat = g_new0(CompatEntry, 1); pstrcpy(se->compat->idstr, sizeof(se->compat->idstr), idstr); se->compat->instance_id = instance_id == -1 ? calculate_compat_instance_id(idstr) : instance_id; instance_id = -1; } } pstrcat(se->idstr, sizeof(se->idstr), idstr); if (instance_id == -1) { se->instance_id = calculate_new_instance_id(se->idstr); } else { se->instance_id = instance_id; } assert(!se->compat || se->instance_id == 0); savevm_state_handler_insert(se); return 0;}
typedef struct SaveVMHandlers { /* This runs inside the iothread lock. */ SaveStateHandler *save_state; void (*save_cleanup)(void *opaque); int (*save_live_complete_postcopy)(QEMUFile *f, void *opaque); int (*save_live_complete_precopy)(QEMUFile *f, void *opaque); /* This runs both outside and inside the iothread lock. */ bool (*is_active)(void *opaque); bool (*has_postcopy)(void *opaque); /* is_active_iterate * If it is not NULL then qemu_savevm_state_iterate will skip iteration if * it returns false. For example, it is needed for only-postcopy-states, * which needs to be handled by qemu_savevm_state_setup and * qemu_savevm_state_pending, but do not need iterations until not in * postcopy stage. */ bool (*is_active_iterate)(void *opaque); /* This runs outside the iothread lock in the migration case, and * within the lock in the savevm case. The callback had better only * use data that is local to the migration thread or protected * by other locks. */ int (*save_live_iterate)(QEMUFile *f, void *opaque); /* This runs outside the iothread lock! */ int (*save_setup)(QEMUFile *f, void *opaque); void (*save_live_pending)(QEMUFile *f, void *opaque, uint64_t threshold_size, uint64_t *res_precopy_only, uint64_t *res_compatible, uint64_t *res_postcopy_only); /* Note for save_live_pending: * - res_precopy_only is for data which must be migrated in precopy phase * or in stopped state, in other words - before target vm start * - res_compatible is for data which may be migrated in any phase * - res_postcopy_only is for data which must be migrated in postcopy phase * or in stopped state, in other words - after source vm stop * * Sum of res_postcopy_only, res_compatible and res_postcopy_only is the * whole amount of pending data. */ LoadStateHandler *load_state; int (*load_setup)(QEMUFile *f, void *opaque); int (*load_cleanup)(void *opaque); /* Called when postcopy migration wants to resume from failure */ int (*resume_prepare)(MigrationState *s, void *opaque);} SaveVMHandlers;
可以看到有以下两个指针对象:
typedef struct SaveVMHandlers { /* This runs inside the iothread lock. */ SaveStateHandler *save_state; ... LoadStateHandler *load_state; ...} SaveVMHandlers;
而在include/qemu/typedefs.h中:
typedef void SaveStateHandler(QEMUFile *f, void *opaque);typedef int LoadStateHandler(QEMUFile *f, void *opaque, int version_id);
Note that because the VMState macros still save the data in a raw format, in many cases it’s possible to replace legacy code with a carefully constructed VMState description that matches the byte layout of the existing code.
> pwd/kvm/qemu-src/qemu-3.1.0/target> lltotal 28Kdrwxr-xr-x 2 ibm ibm 269 Dec 12 2018 alphadrwxr-xr-x 2 ibm ibm 4.0K Dec 12 2018 armdrwxr-xr-x 2 ibm ibm 296 Dec 12 2018 crisdrwxr-xr-x 2 ibm ibm 214 Dec 12 2018 hppadrwxr-xr-x 3 ibm ibm 4.0K Dec 12 2018 i386drwxr-xr-x 2 ibm ibm 219 Dec 12 2018 lm32drwxr-xr-x 2 ibm ibm 299 Dec 12 2018 m68kdrwxr-xr-x 2 ibm ibm 210 Dec 12 2018 microblazedrwxr-xr-x 2 ibm ibm 4.0K Dec 12 2018 mipsdrwxr-xr-x 2 ibm ibm 164 Dec 12 2018 moxiedrwxr-xr-x 2 ibm ibm 166 Dec 12 2018 nios2drwxr-xr-x 2 ibm ibm 319 Dec 12 2018 openriscdrwxr-xr-x 3 ibm ibm 4.0K Dec 12 2018 ppcdrwxr-xr-x 2 ibm ibm 243 Dec 12 2018 riscvdrwxr-xr-x 2 ibm ibm 4.0K Dec 12 2018 s390xdrwxr-xr-x 2 ibm ibm 192 Dec 12 2018 sh4drwxr-xr-x 2 ibm ibm 4.0K Dec 12 2018 sparcdrwxr-xr-x 2 ibm ibm 168 Dec 12 2018 tilegxdrwxr-xr-x 2 ibm ibm 223 Dec 12 2018 tricoredrwxr-xr-x 2 ibm ibm 179 Dec 12 2018 unicore32drwxr-xr-x 8 ibm ibm 4.0K Dec 12 2018 xtensa
Host (TCG) 定义
在tcg目录下:
> pwd/kvm/qemu-src/qemu-3.1.0/tcg> lltotal 576Kdrwxr-xr-x 2 ibm ibm 74 Dec 12 2018 aarch64drwxr-xr-x 2 ibm ibm 50 Dec 12 2018 armdrwxr-xr-x 2 ibm ibm 74 Dec 12 2018 i386-rw-r--r-- 1 ibm ibm 146 Dec 12 2018 LICENSEdrwxr-xr-x 2 ibm ibm 50 Dec 12 2018 mips-rw-r--r-- 1 ibm ibm 48K Dec 12 2018 optimize.cdrwxr-xr-x 2 ibm ibm 50 Dec 12 2018 ppc-rw-r--r-- 1 ibm ibm 22K Dec 12 2018 READMEdrwxr-xr-x 2 ibm ibm 50 Dec 12 2018 s390drwxr-xr-x 2 ibm ibm 50 Dec 12 2018 sparc-rw-r--r-- 1 ibm ibm 122K Dec 12 2018 tcg.c-rw-r--r-- 1 ibm ibm 1.6K Dec 12 2018 tcg-common.c-rw-r--r-- 1 ibm ibm 1.8K Dec 12 2018 tcg-gvec-desc.h-rw-r--r-- 1 ibm ibm 47K Dec 12 2018 tcg.h-rw-r--r-- 1 ibm ibm 3.0K Dec 12 2018 tcg-ldst.inc.c-rw-r--r-- 1 ibm ibm 2.0K Dec 12 2018 tcg-mo.h-rw-r--r-- 1 ibm ibm 94K Dec 12 2018 tcg-op.c-rw-r--r-- 1 ibm ibm 11K Dec 12 2018 tcg-opc.h-rw-r--r-- 1 ibm ibm 72K Dec 12 2018 tcg-op-gvec.c-rw-r--r-- 1 ibm ibm 15K Dec 12 2018 tcg-op-gvec.h-rw-r--r-- 1 ibm ibm 49K Dec 12 2018 tcg-op.h-rw-r--r-- 1 ibm ibm 11K Dec 12 2018 tcg-op-vec.c-rw-r--r-- 1 ibm ibm 5.2K Dec 12 2018 tcg-pool.inc.cdrwxr-xr-x 2 ibm ibm 64 Dec 12 2018 tci-rw-r--r-- 1 ibm ibm 39K Dec 12 2018 tci.c-rw-r--r-- 1 ibm ibm 394 Dec 12 2018 TODO
ETEXI { .name = "migrate", .args_type = "detach:-d,blk:-b,inc:-i,resume:-r,uri:s", .params = "[-d] [-b] [-i] [-r] uri", .help = "migrate to URI (using -d to not wait for completion)" "\n\t\t\t -b for migration without shared storage with" " full copy of disk\n\t\t\t -i for migration without " "shared storage with incremental copy of disk " "(base image shared between src and destination)" "\n\t\t\t -r to resume a paused migration", .cmd = hmp_migrate, },STEXI@item migrate [-d] [-b] [-i] @var{uri}@findex migrateMigrate to @var{uri} (using -d to not wait for completion). -b for migration with full copy of disk -i for migration with incremental copy of disk (base image is shared)ETEXI
-- ------------------------- Create OrderItems table-- -----------------------CREATE TABLE OrderItems( order_num int NOT NULL, -- 订单号,主键,外键 order_item int NOT NULL, -- 订单物品号 prod_id char(10) NOT NULL, -- 产品 ID,外键 quantity int NOT NULL, -- 物品数量 item_price decimal(8, 2) NOT NULL -- 物品价格);
-- ------------------------ Populate Vendors table-- ----------------------INSERT INTO Vendors(vend_id, vend_name, vend_address, vend_city, vend_state, vend_zip, vend_country)VALUES('BRS01','Bears R Us','123 Main Street','Bear Town','MI','44444', 'USA');INSERT INTO Vendors(vend_id, vend_name, vend_address, vend_city, vend_state, vend_zip, vend_country)VALUES('BRE02','Bear Emporium','500 Park Street','Anytown','OH','44333', 'USA');INSERT INTO Vendors(vend_id, vend_name, vend_address, vend_city, vend_state, vend_zip, vend_country)VALUES('DLL01','Doll House Inc.','555 High Street','Dollsville','CA','99999', 'USA');INSERT INTO Vendors(vend_id, vend_name, vend_address, vend_city, vend_state, vend_zip, vend_country)VALUES('FRB01','Furball Inc.','1000 5th Avenue','New York','NY','11111', 'USA');INSERT INTO Vendors(vend_id, vend_name, vend_address, vend_city, vend_state, vend_zip, vend_country)VALUES('FNG01','Fun and Games','42 Galaxy Road','London', NULL,'N16 6PS', 'England');INSERT INTO Vendors(vend_id, vend_name, vend_address, vend_city, vend_state, vend_zip, vend_country)VALUES('JTS01','Jouets et ours','1 Rue Amusement','Paris', NULL,'45678', 'France');
Products表:
-- ------------------------- Populate Products table-- -----------------------INSERT INTO Products (prod_id, vend_id, prod_name, prod_price, prod_desc)VALUES ('BR01', 'BRS01', '8 inch teddy bear', 5.99, '8 inch teddy bear, comes with cap and jacket');INSERT INTO Products (prod_id, vend_id, prod_name, prod_price, prod_desc)VALUES ('BR02', 'BRS01', '12 inch teddy bear', 8.99, '12 inch teddy bear, comes with cap and jacket');INSERT INTO Products (prod_id, vend_id, prod_name, prod_price, prod_desc)VALUES ('BR03', 'BRS01', '18 inch teddy bear', 11.99, '18 inch teddy bear, comes with cap and jacket');INSERT INTO Products (prod_id, vend_id, prod_name, prod_price, prod_desc)VALUES ('BNBG01', 'DLL01', 'Fish bean bag toy', 3.49, 'Fish bean bag toy, complete with bean bag worms with which to feed it');INSERT INTO Products (prod_id, vend_id, prod_name, prod_price, prod_desc)VALUES ('BNBG02', 'DLL01', 'Bird bean bag toy', 3.49, 'Bird bean bag toy, eggs are not included');INSERT INTO Products (prod_id, vend_id, prod_name, prod_price, prod_desc)VALUES ('BNBG03', 'DLL01', 'Rabbit bean bag toy', 3.49, 'Rabbit bean bag toy, comes with bean bag carrots');INSERT INTO Products (prod_id, vend_id, prod_name, prod_price, prod_desc)VALUES ('RGAN01', 'DLL01', 'Raggedy Ann', 4.99, '18 inch Raggedy Ann doll');INSERT INTO Products (prod_id, vend_id, prod_name, prod_price, prod_desc)VALUES ('RYL01', 'FNG01', 'King doll', 9.49, '12 inch king doll with royal garments and crown');INSERT INTO Products (prod_id, vend_id, prod_name, prod_price, prod_desc)VALUES ('RYL02', 'FNG01', 'Queen doll', 9.49, '12 inch queen doll with royal garments and crown');
Orders表:
-- ----------------------- Populate Orders table-- ---------------------INSERT INTO Orders (order_num, order_date, cust_id)VALUES (20005, '2012-05-01', '1000000001');INSERT INTO Orders (order_num, order_date, cust_id)VALUES (20006, '2012-01-12', '1000000003');INSERT INTO Orders (order_num, order_date, cust_id)VALUES (20007, '2012-01-30', '1000000004');INSERT INTO Orders (order_num, order_date, cust_id)VALUES (20008, '2012-02-03', '1000000005');INSERT INTO Orders (order_num, order_date, cust_id)VALUES (20009, '2012-02-08', '1000000001');
mysql> describe Vendors;+--------------+----------+------+-----+---------+-------+| Field | Type | Null | Key | Default | Extra |+--------------+----------+------+-----+---------+-------+| vend_id | char(10) | NO | PRI | NULL | || vend_name | char(50) | NO | | NULL | || vend_address | char(50) | YES | | NULL | || vend_city | char(50) | YES | | NULL | || vend_state | char(5) | YES | | NULL | || vend_zip | char(10) | YES | | NULL | || vend_country | char(50) | YES | | NULL | |+--------------+----------+------+-----+---------+-------+7 rows in set (0.00 sec)mysql> select * from Vendors;+---------+-----------------+-----------------+------------+------------+----------+--------------+| vend_id | vend_name | vend_address | vend_city | vend_state | vend_zip | vend_country |+---------+-----------------+-----------------+------------+------------+----------+--------------+| BRE02 | Bear Emporium | 500 Park Street | Anytown | OH | 44333 | USA || BRS01 | Bears R Us | 123 Main Street | Bear Town | MI | 44444 | USA || DLL01 | Doll House Inc. | 555 High Street | Dollsville | CA | 99999 | USA || FNG01 | Fun and Games | 42 Galaxy Road | London | NULL | N16 6PS | England || FRB01 | Furball Inc. | 1000 5th Avenue | New York | NY | 11111 | USA || JTS01 | Jouets et ours | 1 Rue Amusement | Paris | NULL | 45678 | France |+---------+-----------------+-----------------+------------+------------+----------+--------------+6 rows in set (0.00 sec)
Products表:
mysql> describe Products;+------------+--------------+------+-----+---------+-------+| Field | Type | Null | Key | Default | Extra |+------------+--------------+------+-----+---------+-------+| prod_id | char(10) | NO | PRI | NULL | || vend_id | char(10) | NO | MUL | NULL | || prod_name | char(255) | NO | | NULL | || prod_price | decimal(8,2) | NO | | NULL | || prod_desc | text | YES | | NULL | |+------------+--------------+------+-----+---------+-------+5 rows in set (0.00 sec)mysql> select * from Products;+---------+---------+---------------------+------------+-----------------------------------------------------------------------+| prod_id | vend_id | prod_name | prod_price | prod_desc |+---------+---------+---------------------+------------+-----------------------------------------------------------------------+| BNBG01 | DLL01 | Fish bean bag toy | 3.49 | Fish bean bag toy, complete with bean bag worms with which to feed it || BNBG02 | DLL01 | Bird bean bag toy | 3.49 | Bird bean bag toy, eggs are not included || BNBG03 | DLL01 | Rabbit bean bag toy | 3.49 | Rabbit bean bag toy, comes with bean bag carrots || BR01 | BRS01 | 8 inch teddy bear | 5.99 | 8 inch teddy bear, comes with cap and jacket || BR02 | BRS01 | 12 inch teddy bear | 8.99 | 12 inch teddy bear, comes with cap and jacket || BR03 | BRS01 | 18 inch teddy bear | 11.99 | 18 inch teddy bear, comes with cap and jacket || RGAN01 | DLL01 | Raggedy Ann | 4.99 | 18 inch Raggedy Ann doll || RYL01 | FNG01 | King doll | 9.49 | 12 inch king doll with royal garments and crown || RYL02 | FNG01 | Queen doll | 9.49 | 12 inch queen doll with royal garments and crown |+---------+---------+---------------------+------------+-----------------------------------------------------------------------+9 rows in set (0.00 sec)
Customers表:
mysql> describe Customers;+--------------+-----------+------+-----+---------+-------+| Field | Type | Null | Key | Default | Extra |+--------------+-----------+------+-----+---------+-------+| cust_id | char(10) | NO | PRI | NULL | || cust_name | char(50) | NO | | NULL | || cust_address | char(50) | YES | | NULL | || cust_city | char(50) | YES | | NULL | || cust_state | char(5) | YES | | NULL | || cust_zip | char(10) | YES | | NULL | || cust_country | char(50) | YES | | NULL | || cust_contact | char(50) | YES | | NULL | || cust_email | char(255) | YES | | NULL | |+--------------+-----------+------+-----+---------+-------+9 rows in set (0.00 sec)mysql> select * from Customers;+------------+---------------+----------------------+-----------+------------+----------+--------------+--------------------+-----------------------+| cust_id | cust_name | cust_address | cust_city | cust_state | cust_zip | cust_country | cust_contact | cust_email |+------------+---------------+----------------------+-----------+------------+----------+--------------+--------------------+-----------------------+| 1000000001 | Village Toys | 200 Maple Lane | Detroit | MI | 44444 | USA | John Smith | sales@villagetoys.com || 1000000002 | Kids Place | 333 South Lake Drive | Columbus | OH | 43333 | USA | Michelle Green | NULL || 1000000003 | Fun4All | 1 Sunny Place | Muncie | IN | 42222 | USA | Jim Jones | jjones@fun4all.com || 1000000004 | Fun4All | 829 Riverside Drive | Phoenix | AZ | 88888 | USA | Denise L. Stephens | dstephens@fun4all.com || 1000000005 | The Toy Store | 4545 53rd Street | Chicago | IL | 54545 | USA | Kim Howard | NULL |+------------+---------------+----------------------+-----------+------------+----------+--------------+--------------------+-----------------------+5 rows in set (0.00 sec)
Orders表:
mysql> describe Orders;+------------+----------+------+-----+---------+-------+| Field | Type | Null | Key | Default | Extra |+------------+----------+------+-----+---------+-------+| order_num | int(11) | NO | PRI | NULL | || order_date | datetime | NO | | NULL | || cust_id | char(10) | NO | MUL | NULL | |+------------+----------+------+-----+---------+-------+3 rows in set (0.00 sec)mysql> select * from Orders;+-----------+---------------------+------------+| order_num | order_date | cust_id |+-----------+---------------------+------------+| 20005 | 2012-05-01 00:00:00 | 1000000001 || 20006 | 2012-01-12 00:00:00 | 1000000003 || 20007 | 2012-01-30 00:00:00 | 1000000004 || 20008 | 2012-02-03 00:00:00 | 1000000005 || 20009 | 2012-02-08 00:00:00 | 1000000001 |+-----------+---------------------+------------+5 rows in set (0.00 sec)
# 检索单个列SELECT prod_name FROM Products;# 检索多个列SELECT prod_id, prod_name, prod_price FROM Products;# 检索所有列SELECT *FROM Products;
2.2 DISTINCT
mysql> SELECT vend_id -> FROM Products;+---------+| vend_id |+---------+| BRS01 || BRS01 || BRS01 || DLL01 || DLL01 || DLL01 || DLL01 || FNG01 || FNG01 |+---------+9 rows in set (0.00 sec)mysql> SELECT DISTINCT vend_id -> FROM Products;+---------+| vend_id |+---------+| BRS01 || DLL01 || FNG01 |+---------+3 rows in set (0.00 sec)
2.3 LIMIT/OFFSET
mysql> SELECT prod_name -> FROM Products;+---------------------+| prod_name |+---------------------+| Fish bean bag toy || Bird bean bag toy || Rabbit bean bag toy || 8 inch teddy bear || 12 inch teddy bear || 18 inch teddy bear || Raggedy Ann || King doll || Queen doll |+---------------------+# 返回前 5 行mysql> SELECT prod_name -> FROM Products -> LIMIT 5;+---------------------+| prod_name |+---------------------+| Fish bean bag toy || Bird bean bag toy || Rabbit bean bag toy || 8 inch teddy bear || 12 inch teddy bear |+---------------------+# 返回从第 3 行 (1+2) 开始,不超过 4 行的数据mysql> SELECT prod_name -> FROM Products -> LIMIT 4 OFFSET 2;+---------------------+| prod_name |+---------------------+| Rabbit bean bag toy || 8 inch teddy bear || 12 inch teddy bear || 18 inch teddy bear |+---------------------+# 返回第 3~6 行mysql> SELECT prod_name -> FROM Products -> LIMIT 2, 4;+---------------------+| prod_name |+---------------------+| Rabbit bean bag toy || 8 inch teddy bear || 12 inch teddy bear || 18 inch teddy bear |+---------------------+4 rows in set (0.00 sec)
3. 排序检索数据
3.1 ORDER BY
注意:确保ORDER BY是SELECT语句中最后一条子句,否则会报错
# 通过选择的列进行排序SELECT prod_nameFROM ProductsORDER BY prod_name;# 通过非选择列进行排序SELECT prod_nameFROM ProductsORDER BY prod_id;# 按多个列排序SELECT prod_id, prod_price, prod_nameFROM ProductsORDER BY prod_price, prod_name;-- 或者ORDER BY 2, 3;
3.2 DESC/ASC
默认升序ASC,使用DESC关键字降序排序
SELECT prod_id, prod_price, prod_nameFROM ProductsORDER BY prod_price DESC, prod_name;
4. 过滤数据
4.1 WHERE
mysql> SELECT prod_name, prod_price -> FROM Products -> WHERE prod_price = 3.49 -> ORDER BY prod_name;+---------------------+------------+| prod_name | prod_price |+---------------------+------------+| Bird bean bag toy | 3.49 || Fish bean bag toy | 3.49 || Rabbit bean bag toy | 3.49 |+---------------------+------------+
4.2 WHERE 子句操作符
操作符
说明
=
等于
<>
不等于
!=
不等于
<
小于
<=
小于等于
!<
不小于
>
大于
>=
大于等于
!>
不大于
BETWEEN
在两个值之间
IS NULL
为 NULL 值
# 范围值检查SELECT prod_name, prod_priceFROM ProductsWHERE prod_price BETWEEN 5 AND 10;# 空值检查SELECT cust_nameFROM CustomersWHERE cust_email IS NULL;
> libvirtd --helpUsage: libvirtd [options]Options: -h | --help Display program help: -v | --verbose Verbose messages. -d | --daemon Run as a daemon & write PID file. -l | --listen Listen for TCP/IP connections. -t | --timeout <secs> Exit after timeout period. -f | --config <file> Configuration file. -V | --version Display version information. -p | --pid-file <file> Change name of PID file.libvirt management daemon: Default paths: Configuration file (unless overridden by -f): /etc/libvirt/libvirtd.conf Sockets: /var/run/libvirt/libvirt-sock /var/run/libvirt/libvirt-sock-ro TLS: CA certificate: /etc/pki/CA/cacert.pem Server certificate: /etc/pki/libvirt/servercert.pem Server private key: /etc/pki/libvirt/private/serverkey.pem PID file (unless overridden by -p): /var/run/libvirtd.pid
以CentOS 7.5为例,libvirt 的相关配置文件都在/etc/libvirt/目录中:
/etc/libvirt > ls -hltotal 80K-rw-r--r-- 1 root root 450 Mar 14 18:25 libvirt-admin.conf-rw-r--r-- 1 root root 547 Mar 14 18:25 libvirt.conf-rw-r--r-- 1 root root 17K Mar 14 18:25 libvirtd.conf-rw-r--r-- 1 root root 1.2K Mar 14 18:25 lxc.confdrwx------. 2 root root 4.0K Apr 24 16:29 nwfilterdrwx------. 3 root root 55 May 30 11:18 qemu-rw-r--r-- 1 root root 30K Mar 14 18:25 qemu.conf-rw-r--r-- 1 root root 2.2K Mar 14 18:25 qemu-lockd.confdrwx------. 2 root root 6 Nov 13 2018 secretsdrwxr-xr-x 3 root root 116 Apr 25 09:22 storage-rw-r--r-- 1 root root 3.2K Mar 14 18:25 virtlockd.conf-rw-r--r-- 1 root root 3.2K Mar 14 18:25 virtlogd.conf/etc/libvirt > cd qemu/etc/libvirt/qemu > ls -hltotal 16Kdrwx------. 3 root root 42 Apr 25 10:23 networks-rw------- 1 root root 4.1K May 30 11:18 win10.xml-rw------- 1 root root 4.5K Apr 25 10:21 win7.xml
其中几个重要的配置文件和目录介绍如下:
(1) /etc/libvirt/libvirt.conf
libvirt.conf文件用于配置本地默认的URI连接以及一些常用libvirt远程连接的别名:
## This can be used to setup URI aliases for frequently# used connection URIs. Aliases may contain only the# characters a-Z, 0-9, _, -.## Following the '=' may be any valid libvirt connection# URI, including arbitrary parameters#uri_aliases = [# "hail=qemu+ssh://root@hail.cloud.example.com/system",# "sleet=qemu+ssh://root@sleet.cloud.example.com/system",#]## These can be used in cases when no URI is supplied by the application# (@uri_default also prevents probing of the hypervisor driver).##uri_default = "qemu:///system"uri_aliases = [ "abelsu7-ubuntu=qemu+ssh://root@abelsu7-ubuntu/system", "centos-1=qemu+ssh://root@centos-1/system"]
> systemctl reload libvirtd # 重启 libvirtd> virsh -c abelsu7-ubuntu # 使用别名连接至远程 libvirtWelcome to virsh, the virtualization interactive terminal.Type: 'help' for help with commands 'quit' to quitvirsh # hostnameabelsu7-ubuntuvirsh #
>>> name = 'Abel'>>> name'Abel'>>> name = 'Yuki''Yuki'
1.5 变量名
只能是一个词
只能包含字母、数字、下划线
不能以数字开头
1.6 常用函数
#!/usr/local/bin/python3print('Hello Python!')print("What's your name?") # waiting for inputname = input()print('The length of your name is: ' + str(len(name)))
print():打印
input():读取输入
len():返回长度
str():转换为字符串
int():截断取整
float():转换为浮点数
2. 控制流
2.1 布尔值
首字母大写:
True
False
2.2 操作符
# 比较操作符==!=<><=>=# 布尔操作符andornot
2.3 if / else / elif
#!/usr/local/bin/python3if name == 'Alice': print('Hi, Alice.')elif age < 12: print('You are not Alice, kiddo.')elif age > 2000: print('Unlike you, Alice is not an undead, immortal vampire.')elif age > 100: print('You are not Alice, grannie.')else: print('You are neither Alice nor a little kid')
2.4 while / break / continue
#!/usr/local/bin/python3name = ''while name != 'your name': print('Please type your name') name = input()print('Thank you!')
也可以用break跳出当前循环:
#!/usr/local/bin/python3name = ''while True: print('Please type your name') name = input() if name == 'your name': breakprint('Thank you!')
还可以用continue跳过之后的语句,进入下一次循环:
#!/usr/local/bin/python3while True: print('Who are you?') name = input() if name != 'Joe': continue print('Hello, Joe. What is the password?') password = input() if password == 'swordfish': breakprint('Access granted.')
2.5 for / range
range()的三个参数分别为:起始、停止、步长
#!/usr/local/bin/python3for i in range(0, 10, 2): print(i)
2.6 import / from import
#!/usr/local/bin/python3import randomfor i in range(5): print(random.randint(1, 10))
或者使用from import语句,此时调用randint函数不需要random.前缀:
#!/usr/local/bin/python3from random import *for i in range(5): print(randint(1, 10))
int totalCash = 0;bool isLampOn = false;char userInput = 'Y';short int gradesInMath = -5;int moneyInBank = -7'0000;long populationChange = -8'5000;long long countryGDPChange = -700'0000;unsigned short int numColorsInRainbow = 7;unsigned int unmEggsInBasket = 24;unsigned long numCarsInNewYork = 70'0000;unsigned long long countryMedicareExpense = 7'0000'0000;float pi = 3.14;double morePrecisePi = 22.0 / 7;
sizeof 确定变量长度
cout << "Size of an int: " << sizeof(int);
列表初始化/缩窄转换
C++11引入了列表初始化来禁止缩窄转换:
int largeNum = 700'0000;short smallNum{largeNum};
auto 自动推断
C++11或更高版本可不显式指定变量的类型,而使用关键字auto:
auto coinFlippedHeads = true;
注意:如果将变量类型声明为auto,但不对其进行初始化,将出现编译错误
typedef 定义变量类型
使用关键字typedef定义变量类型:
typedef unsigned int STRICTLY_POSITIVE_INTEGER;STRICTLY_POSITIVE_INTEGER numEggsInBasket = 4532;
#include <iostream>#include <vector>using namespace std;int main(){ vector<int> dynArray(3); // dynamic array of int dynArray[0] = 365; dynArray[1] = -421; dynArray[2] = 789; cout << "Number of integers in array: " << dynArray.size() << endl; cout << "Enter another element to insert: "; int newValue = 0; cin >> newValue; dynArray.push_back(newValue); cout << "Number of integers in array: " << dynArray.size() << endl; cout << "Last element in array: "; cout << dynArray[dynArray.size() - 1] << endl; return 0;}------Number of integers in array: 3Enter another element to insert: 4Number of integers in array: 4Last element in array: 4
#include <iostream>#include <string>using namespace std;int main(){ string greetStr("Hello std::string!"); cout << greetStr << endl; cout << "Enter a line of text:" << endl; string firstLine; getline(cin, firstLine); cout << "Enter another:" << endl; string secondLine; getline(cin, secondLine); cout << "Result of concatenation:" << endl; string concatStr = firstLine + " " + secondLine; cout << concatStr << endl; cout << "Copy of concatenated string:" << endl; string aCopy; aCopy = concatStr; cout << aCopy << endl; cout << "Length of concat string: " << concatStr.length() << endl; return 0;}------Hello std::string!Enter a line of text:this is the first lineEnter another:this is the second lineResult of concatenation:this is the first line this is the second lineCopy of concatenated string:this is the first line this is the second lineLength of concat string: 46
5. 语句与运算符
5.1 语句
当编译器注意到有两个相邻的字符串字面量后,会将其拼接成一个:
cout << "The first line of content" "The second line of content" "The third line of content" << endl;
for (VarType varName : sequence){ do something...}
可以使用关键字auto自动推断变量的类型:
for (auto anElement : elements)
6.8 continue 和 break
continue:跳转到循环开头,跳过本次循环之后的代码,进入下一次循环
break:退出循环块,结束当前循环
7. 函数
7.1 函数原型与函数定义
函数原型:指出了函数的名称、接受的参数列表以及返回值的类型
函数定义:也即函数的实现代码
#include <iostream>using namespace std;const double Pi = 3.14159265;// Function Declarations (Prototypes)double Area(double radius);double Circumference(double radius);int main(int argc, char const *argv[]){ cout << "Enter radius: "; double radius = 0; cin >> radius; // Call function "Area" cout << "Area is: " << Area(radius) << endl; // Call function "Circumference" cout << "Circumference is: " << Circumference(radius) << endl; return 0;}// Function definitions (Implementations)double Area(double radius){ return Pi * radius * radius;}double Circumference(double radius){ return 2 * Pi * radius;}------Enter radius: 10Area is: 314.159Circumference is: 62.8319
在函数原型中可以添加函数参数的默认值:
double Area(double radius, double Pi = 3.14);
7.2 函数重载
// for circledouble Area(double radius){ return Pi * radius * radius;}// overloaded for cylinderdouble Area(double radius, double height){ // reuse the area of circle return 2 * Area(radius) + 2 * Pi * radius * height;}
7.3 按引用传递参数
当希望函数修改的变量在其外部中也可用时,可将形参的类型声明为引用:
#include <iostream>using namespace std;const double Pi = 3.14159265;// output parameter result by referencevoid Area(double radius, double &result){ result = Pi * radius * radius;}int main(int argc, char const *argv[]){ cout << "Enter radius: "; double radius = 0; cin >> radius; double areaFetched = 0; Area(radius, areaFetched); cout << "The area is: " << areaFetched << endl; return 0;}------Enter radius: 10The area is: 314.159
#include <iostream>using namespace std;int main(int argc, char const *argv[]){ int dogsAge = 30; cout << "Initialize dogsAge = " << dogsAge << endl; int *pointsToAnAge = &dogsAge; cout << "pointsToAnAge points to dogsAge" << endl; cout << "Enter an age for your dog: "; // store input at the memory pointed to by pointsToAnAge cin >> *pointsToAnAge; // Displaying the address where age is stored cout << "Integer stored at " << hex << pointsToAnAge << endl; cout << "Integer dogsAge = " << dec << dogsAge << endl; return 0;}------Initialize dogsAge = 30pointsToAnAge points to dogsAgeEnter an age for your dog: 14Integer stored at 0x60fe88Integer dogsAge = 14
8.2 动态内存分配
new 和 delete 运算符
使用new来分配新的内存块,最终都需使用对应的delete进行释放:
int *pNum = new int; // get a pointer to an integerint *pNums = new int[10]; // pointer to a block of 10 integersdelete pNum;delete[] pNums;
#include <iostream>using namespace std;int main(int argc, char const *argv[]){ // Request for memory space for an int int *pointsToAnAge = new int; // Use the allocated memory to store a number cout << "Enter your dog's age: "; cin >> *pointsToAnAge; // Use indirection operator* to access value cout << "Age " << *pointsToAnAge << " is stored at " << hex << pointsToAnAge << endl; // Release memory delete pointsToAnAge; return 0;}------Enter your dog's age: 14Age 14 is stored at 0xf518c0
而对于使用new[...]分配的内存,应使用delete[]来释放:
int *myNumbers = new int[numEntries];...// de-allocate before existingdelete[] myNumbers;
指针递增或递减
将指针递增或递减时,其包含的地址将增加或减少sizeof(Type)。
例如声明了如下指针:
Type *pType = Address;
则执行++pType后,pType将指向Address + sizeof(Type)。
将++用于该指针,相当于告诉编译器,希望它指向下一个int
#include <iostream>using namespace std;int main(int argc, char const *argv[]){ cout << "How many integers you wish to enter? "; int numEntries = 0; cin >> numEntries; int *pointsToInts = new int[numEntries]; cout << "Allocated for " << numEntries << " integers" << endl; for (int counter = 0; counter < numEntries; ++counter) { cout << "Enter number " << counter << ": "; cin >> *(pointsToInts + counter); } cout << "Displaying all numbers entered: " << endl; for (int counter = 0; counter < numEntries; ++counter) { cout << *(pointsToInts++) << " "; } cout << endl; // return pointer to initial position pointsToInts -= numEntries; cout << *pointsToInts; // done with using memory? release delete[] pointsToInts; return 0;}------How many integers you wish to enter? 5Allocated for 5 integersEnter number 0: 10Enter number 1: 29Enter number 2: 35Enter number 3: -3Enter number 4: 918Displaying all numbers entered:10 29 35 -3 91810
> go get -u github.com/gpmgo/gopm> gopmNAME: Gopm - Go Package ManagerUSAGE: Gopm [global options] command [command options] [arguments...]VERSION: 0.8.8.0307 BetaCOMMANDS: list list all dependencies of current project gen generate a gopmfile for current Go project get fetch remote package(s) and dependencies bin download and link dependencies and build binary config configure gopm settings run link dependencies and go run test link dependencies and go test build link dependencies and go build install link dependencies and go install clean clean all temporary files update check and update gopm resources including itself help, h Shows a list of commands or help for one commandGLOBAL OPTIONS: --noterm, -n disable color output --strict, -s strict mode --debug, -d debug mode --help, -h show help --version, -v print the version
]]>
<blockquote>
<p><strong><em>The only thing you need is just a termimal.</em></strong></p>
</blockquote>
<figure class="image-bubble">
<div class="img-lightbox">
<div class="overlay"></div>
<img src="/2019/05/21/terminal-ide-using-zsh-nvim-tmux/cover.jpg" alt title>
</div>
<div class="image-caption"></div>
</figure>
RSSHub + Awesome TTRSS 搭建 RSS 阅读器https://abelsu7.top/2019/05/21/rsshub-and-ttrss/2019-05-21T02:58:51.000Z2019-09-01T13:04:11.666Z
> yum info imagemagickInstalled PackagesName : ImageMagickArch : x86_64Version : 6.7.8.9Release : 16.el7_6Size : 7.6 MRepo : installedFrom repo : updatesSummary : An X application for displaying and manipulating imagesURL : http://www.imagemagick.org/License : ImageMagickDescription : ImageMagick is an image display and manipulation tool for the X : Window System. ImageMagick can read and write JPEG, TIFF, PNM, GIF, : and Photo CD image formats. It can resize, rotate, sharpen, color : reduce, or add special effects to an image, and when finished you can : either save the completed work in the original format or a different : one. ImageMagick also includes command line programs for creating : animated or transparent .gifs, creating composite images, creating : thumbnail images, and more. : : ImageMagick is one of your choices if you need a program to manipulate : and display images. If you want to develop your own applications : which use ImageMagick code or APIs, you need to install : ImageMagick-devel as well.> yum info imagemagick-develAvailable PackagesName : ImageMagick-develArch : i686Version : 6.7.8.9Release : 16.el7_6Size : 100 kRepo : updates/7/x86_64Summary : Library links and header files for ImageMagick app developmentURL : http://www.imagemagick.org/License : ImageMagickDescription : ImageMagick-devel contains the library links and header files you'll : need to develop ImageMagick applications. ImageMagick is an image : manipulation program. : : If you want to create applications that will use ImageMagick code or : APIs, you need to install ImageMagick-devel as well as ImageMagick. : You do not need to install it if you just want to use ImageMagick, : however.> yum install imagemagick imagemagick-devel
2. 查看使用手册
> man imagemagick # 查看使用手册NAME ImageMagick - is a free software suite for the creation, modification and display of bitmap images.SYNOPSIS convert input-file [options] output-fileOVERVIEW convert identify mogrify composite montage compare stream display animate import clojure> man convert # 查看各命令对应的使用手册
> pip3 search pingtoppingtop (0.2.8) - Ping multiple servers and show the result in a top like terminal UI. INSTALLED: 0.2.8 (latest)> pip3 install pingtop
package mainimport "fmt"const limit = 5func main() { fact := MakeFactFunc() for i := 0; i < limit; i++ { fmt.Println(fact(i)) }}// 阶乘计算的实体func FactCalc(in <-chan int, out chan<- int) { var subIn, subOut chan int for { n := <-in if n == 0 { out <- 1 } else { if subIn == nil { subIn, subOut = make(chan int), make(chan int) go FactCalc(subIn, subOut) } subIn <- n - 1 r := <-subOut out <- n * r } }}// 包装一个阶乘计算函数func MakeFactFunc() func(int) int { in, out := make(chan int), make(chan int) go FactCalc(in, out) return func(x int) int { in <- x return <-out }}------112624Process finished with exit code 0
2. 筛法求素数
package mainimport "fmt"func main() { primes := make(chan int) go PrimeSieve(primes) for i := 0; i < 5; i++ { fmt.Println(<-primes) }}func Counter(out chan<- int) { for i := 2; ; i++ { out <- i }}func PrimeFilter(prime int, in <-chan int, out chan<- int) { for { i := <-in if i%prime != 0 { out <- i } }}func PrimeSieve(out chan<- int) { c := make(chan int) go Counter(c) for { prime := <-c out <- prime newC := make(chan int) go PrimeFilter(prime, c, newC) c = newC }}------235711Process finished with exit code 0
> dnf info nemoAvailable PackagesName : nemoVersion : 4.0.6Release : 2.fc30Architecture : i686Size : 1.5 MSource : nemo-4.0.6-2.fc30.src.rpmRepository : fedoraSummary : File manager for CinnamonURL : https://github.com/linuxmint/nemoLicense : GPLv2+ and LGPLv2+Description : Nemo is the file manager and graphical shell for the Cinnamon desktop : that makes it easy to manage your files and the rest of your system. : It allows to browse directories on local and remote filesystems, preview : files and launch applications associated with them. : It is also responsible for handling the icons on the Cinnamon desktop.> dnf install nemo
> yum info trackerInstalled PackagesName : trackerArch : x86_64Version : 1.10.5Release : 6.el7Size : 5.6 MRepo : installedFrom repo : anacondaSummary : Desktop-neutral search tool and indexerURL : https://wiki.gnome.org/Projects/TrackerLicense : GPLv2+Description : Tracker is a powerful desktop-neutral first class object database, : tag/metadata database, search tool and indexer. : : It consists of a common object database that allows entities to have an : almost infinite number of properties, metadata (both embedded/harvested as : well as user definable), a comprehensive database of keywords/tags and : links to other entities. : : It provides additional features for file based objects including context : linking and audit trails for a file object. : : It has the ability to index, store, harvest metadata. retrieve and search : all types of files and other first class objects
> yum info trackerInstalled PackagesName : trackerArch : x86_64Version : 1.10.5Release : 6.el7Size : 5.6 MRepo : installedFrom repo : anacondaSummary : Desktop-neutral search tool and indexerURL : https://wiki.gnome.org/Projects/TrackerLicense : GPLv2+Description : Tracker is a powerful desktop-neutral first class object database, : tag/metadata database, search tool and indexer. : : It consists of a common object database that allows entities to have an : almost infinite number of properties, metadata (both embedded/harvested as : well as user definable), a comprehensive database of keywords/tags and : links to other entities. : : It provides additional features for file based objects including context : linking and audit trails for a file object. : : It has the ability to index, store, harvest metadata. retrieve and search : all types of files and other first class objects> yum remove trackerDependencies Resolved================================================================================= Package Arch Version Repository Size=================================================================================Removing: tracker x86_64 1.10.5-6.el7 @anaconda 5.6 MRemoving for dependencies: brasero x86_64 3.12.1-2.el7 @anaconda 11 M brasero-nautilus x86_64 3.12.1-2.el7 @anaconda 47 k evince-nautilus x86_64 3.22.1-7.el7 @anaconda 19 k gnome-boxes x86_64 3.22.4-4.el7 @anaconda 5.0 M gnome-classic-session noarch 3.26.2-3.el7 @anaconda 199 k grilo-plugins x86_64 0.3.4-3.el7 @anaconda 2.1 M nautilus x86_64 3.22.3-5.el7 @anaconda 15 M totem x86_64 1:3.22.1-1.el7 @anaconda 6.3 M totem-nautilus x86_64 1:3.22.1-1.el7 @anaconda 36 k tracker-preferences x86_64 1.10.5-6.el7 @base 248 kTransaction Summary=================================================================================Remove 1 Package (+10 Dependent packages)Installed size: 45 MIs this ok [y/N]: n
2. tracker daemon -k(暂时性)
暂时性的方法,调用tracker daemon -k杀死所有tracker相关进程:
> trackerusage: tracker [--version] [--help] <command> [<args>]Available tracker commands are: daemon Start, stop, pause and list processes responsible for indexing content extract Extract information from a file info Show information known about local files or items indexed index Backup, restore, import and (re)index by MIME type or file name reset Reset or remove index and revert configurations to defaults search Search for content indexed or show content by type sparql Query and update the index using SPARQL or search, list and tree the ontology sql Query the database at the lowest level using SQL status Show the indexing progress, content statistics and index state tag Create, list or delete tags for indexed contentSee 'tracker help <command>' to read about a specific subcommand.> tracker daemon -k allFound 10 PIDs… Killed process 2390 - 'tracker-miner-user-guides' Killed process 2395 - 'tracker-store' Killed process 2656 - 'tracker-miner-apps' Killed process 2705 - 'tracker-miner-fs' Killed process 2952 - 'tracker-miner-user-guides' Killed process 2962 - 'tracker-extract' Killed process 2963 - 'tracker-miner-apps' Killed process 2964 - 'tracker-miner-fs' Killed process 2987 - 'tracker-store' Killed process 13666 - 'tracker-extract'
> ls ~/.ssh/id_*/root/.ssh/id_rsa /root/.ssh/id_rsa.pub
3. 将公钥复制到其他主机
使用ssh-copy-id命令将本机的公钥复制到指定主机的authorized_keys文件中:
> ssh-copy-id remote_username@server_ip_address
例如现在我有三台 Linux 主机,均已生成 SSH 密钥,主机名如下所示:
abelsu7-ubuntu
centos-1
centos-2
以abelsu7-ubuntu为例,执行以下命令:
> ssh-copy-id root@centos-1/usr/bin/ssh-copy-id: INFO: Source of key(s) to be installed: "/root/.ssh/id_rsa.pub"/usr/bin/ssh-copy-id: INFO: attempting to log in with the new key(s), to filter out any that are already installed/usr/bin/ssh-copy-id: INFO: 1 key(s) remain to be installed -- if you are prompted now it is to install the new keysroot@centos-1 password: Number of key(s) added: 1Now try logging into the machine, with: "ssh 'root@centos-1'"and check to make sure that only the key(s) you wanted were added.> ssh-copy-id root@centos-2/usr/bin/ssh-copy-id: INFO: Source of key(s) to be installed: "/root/.ssh/id_rsa.pub"/usr/bin/ssh-copy-id: INFO: attempting to log in with the new key(s), to filter out any that are already installed/usr/bin/ssh-copy-id: INFO: 1 key(s) remain to be installed -- if you are prompted now it is to install the new keysroot@centos-2 password: Number of key(s) added: 1Now try logging into the machine, with: "ssh 'root@centos-2'"and check to make sure that only the key(s) you wanted were added.
]]>
<blockquote>
<p><strong><em>译自 <a href="https://linuxize.com/post/how-to-check-disk-space-in-linux-using-the-df-command/" target="_blank" rel="noopener">How to Check Disk Space in Linux Using the df Command</a>,补充整理来源于网络</em></strong></p>
</blockquote>
<figure class="image-bubble">
<div class="img-lightbox">
<div class="overlay"></div>
<img src="/2019/04/18/linux-df-command/cover.jpg" alt title>
</div>
<div class="image-caption"></div>
</figure>
Vim 入坑不完全指北https://abelsu7.top/2019/04/18/vim-quick-guide/2019-04-18T12:53:20.000Z2019-09-01T13:04:11.762Z
^ k Hint: The h key is at the left and moves left. < h l > The l key is at the right and moves right. j The j key looks like a down arrow. v
文件保存与退出
待补充
:w
:wq
:q!
:qa
删除字符
x:删除光标选中的字符
插入字符
i:进入编辑模式
行末添加新字符
A:可在当前光标行末添加新字符
2. 删除/撤销
d 命令及其参数
Many commands that change text are made from an operator and a motion.The format for a delete command with the d delete operator is as follows: d motionWhere: d - is the delete operator. motion - is what the operator will operate on (listed below).A short list of motions: w - until the start of the next word, EXCLUDING its first character. e - to the end of the current word, INCLUDING the last character. $ - to the end of the line, INCLUDING the last character.
]]>
<blockquote>
<p><strong><em>译自 <a href="https://linuxize.com/post/how-get-size-of-file-directory-linux/" target="_blank" rel="noopener">How to Get the Size of a Directory in Linux</a>,补充整理来源于网络</em></strong></p>
</blockquote>
<figure class="image-bubble">
<div class="img-lightbox">
<div class="overlay"></div>
<img src="/2019/04/17/linux-du-command/cover.jpg" alt title>
</div>
<div class="image-caption"></div>
</figure>
浅谈 CI/CD:持续集成、持续交付https://abelsu7.top/2019/04/17/ci-cd-intro/2019-04-17T07:05:48.000Z2019-09-01T13:04:11.040Z
KVM 是作为 Linux 内核中的一个 module 而存在的,而kvm.git是一个包含了最新的 KVM 模块开发中代码的完整的 Linux 内核源码仓库。它的配置方式与普通的 Linux 内核配置完全一样,只是需要注意将 KVM 相关的配置选择为编译进内核或者编译为模块。
make 常用命令
在kvm.git目录下,运行make help查看关于如何配置和编译 kernel 的帮助说明:
> make helpCleaning targets: clean - Remove most generated files but keep the config and enough build support to build external modules mrproper - Remove all generated files + config + various backup files distclean - mrproper + remove editor backup and patch filesConfiguration targets: config - Update current config utilising a line-oriented program nconfig - Update current config utilising a ncurses menu based program menuconfig - Update current config utilising a menu based program xconfig - Update current config utilising a Qt based front-end gconfig - Update current config utilising a GTK+ based front-end oldconfig - Update current config utilising a provided .config as base localmodconfig - Update current config disabling modules not loaded localyesconfig - Update current config converting local mods to core defconfig - New config with default from ARCH supplied defconfig savedefconfig - Save current config as ./defconfig (minimal config) allnoconfig - New config where all options are answered with no allyesconfig - New config where all options are accepted with yes allmodconfig - New config selecting modules when possible alldefconfig - New config with all symbols set to default randconfig - New config with random answer to all options listnewconfig - List new options olddefconfig - Same as oldconfig but sets new symbols to their default value without prompting kvmconfig - Enable additional options for kvm guest kernel support xenconfig - Enable additional options for xen dom0 and guest kernel support tinyconfig - Configure the tiniest possible kernel testconfig - Run Kconfig unit tests (requires python3 and pytest)Other generic targets: all - Build all targets marked with [*]* vmlinux - Build the bare kernel* modules - Build all modules modules_install - Install all modules to INSTALL_MOD_PATH (default: /) dir/ - Build all files in dir and below dir/file.[ois] - Build specified target only dir/file.ll - Build the LLVM assembly file (requires compiler support for LLVM assembly generation) dir/file.lst - Build specified mixed source/assembly target only (requires a recent binutils and recent build (System.map)) dir/file.ko - Build module including final link modules_prepare - Set up for building external modules tags/TAGS - Generate tags file for editors cscope - Generate cscope index gtags - Generate GNU GLOBAL index kernelrelease - Output the release version string (use with make -s) kernelversion - Output the version stored in Makefile (use with make -s) image_name - Output the image name (use with make -s) headers_install - Install sanitised kernel headers to INSTALL_HDR_PATH (default: ./usr)Static analysers: checkstack - Generate a list of stack hogs namespacecheck - Name space analysis on compiled kernel versioncheck - Sanity check on version.h usage includecheck - Check for duplicate included header files export_report - List the usages of all exported symbols headers_check - Sanity check on exported headers headerdep - Detect inclusion cycles in headers coccicheck - Check with CoccinelleKernel selftest: kselftest - Build and run kernel selftest (run as root) Build, install, and boot kernel before running kselftest on it kselftest-clean - Remove all generated kselftest files kselftest-merge - Merge all the config dependencies of kselftest to existing .config.Userspace tools targets: use "make tools/help" or "cd tools; make help"Kernel packaging: rpm-pkg - Build both source and binary RPM kernel packages binrpm-pkg - Build only the binary kernel RPM package deb-pkg - Build both source and binary deb kernel packages bindeb-pkg - Build only the binary kernel deb package snap-pkg - Build only the binary kernel snap package (will connect to external hosts) tar-pkg - Build the kernel as an uncompressed tarball targz-pkg - Build the kernel as a gzip compressed tarball tarbz2-pkg - Build the kernel as a bzip2 compressed tarball tarxz-pkg - Build the kernel as a xz compressed tarball perf-tar-src-pkg - Build perf-4.20.0-rc6.tar source tarball perf-targz-src-pkg - Build perf-4.20.0-rc6.tar.gz source tarball perf-tarbz2-src-pkg - Build perf-4.20.0-rc6.tar.bz2 source tarball perf-tarxz-src-pkg - Build perf-4.20.0-rc6.tar.xz source tarballDocumentation targets: Linux kernel internal documentation in different formats from ReST: htmldocs - HTML latexdocs - LaTeX pdfdocs - PDF epubdocs - EPUB xmldocs - XML linkcheckdocs - check for broken external links (will connect to external hosts) refcheckdocs - check for references to non-existing files under Documentation cleandocs - clean all generated files make SPHINXDIRS="s1 s2" [target] Generate only docs of folder s1, s2 valid values for SPHINXDIRS are: driver-api networking input core-api userspace-api media gpu process sound crypto vm maintainer sh dev-tools doc-guide filesystems kernel-hacking admin-guide make SPHINX_CONF={conf-file} [target] use *additional* sphinx-build configuration. This is e.g. useful to build with nit-picking config. Default location for the generated documents is Documentation/outputArchitecture specific targets (x86):* bzImage - Compressed kernel image (arch/x86/boot/bzImage) install - Install kernel using (your) ~/bin/installkernel or (distribution) /sbin/installkernel or install to $(INSTALL_PATH) and run lilo fdimage - Create 1.4MB boot floppy image (arch/x86/boot/fdimage) fdimage144 - Create 1.4MB boot floppy image (arch/x86/boot/fdimage) fdimage288 - Create 2.8MB boot floppy image (arch/x86/boot/fdimage) isoimage - Create a boot CD-ROM image (arch/x86/boot/image.iso) bzdisk/fdimage*/isoimage also accept: FDARGS="..." arguments for the booted kernel FDINITRD=file initrd for the booted kernel i386_defconfig - Build for i386 x86_64_defconfig - Build for x86_64 make V=0|1 [targets] 0 => quiet build (default), 1 => verbose build make V=2 [targets] 2 => give reason for rebuild of target make O=dir [targets] Locate all output files in "dir", including .config make C=1 [targets] Check re-compiled c source with $CHECK (sparse by default) make C=2 [targets] Force check of all c source with $CHECK make RECORDMCOUNT_WARN=1 [targets] Warn about ignored mcount sections make W=n [targets] Enable extra gcc checks, n=1,2,3 where 1: warnings which may be relevant and do not occur too often 2: warnings which occur quite often but may still be relevant 3: more obscure warnings, can most likely be ignored Multiple levels can be combined with W=12 or W=123Execute "make" or "make all" to build all targets marked with [*] For further info see the ./README file
对 KVM 进行内核配置常用的一些配置命令如下:
make config:基于文本的最为传统也是最为枯燥的一种配置方式,适用于任何情况
make oldconfig:在现有的内核设置文件基础上建立一个新的设置文件,只会向用户提供有关新内核特性的问题
make silentoldconfig:和上面的make oldconfig一样,只是额外会静默更新选项的依赖关系
make olddefconfig:和上面的make silentoldconfig一样,但不需要手动交互,而是对新选项以其默认值配置
make menuconfig:基于终端的一种配置方式,提供了文本模式的图形用户界面,用户可以通过移动光标来浏览所支持的各种特性,要求系统中安装ncurses库
make xconfig:基于 X Window 的一种配置方式,只能在 X Server 上运行 X 桌面应用程序时使用,并且依赖于 QT 库
> cp /boot/config-3.10.0-862.14.4.el7.x86_64 .configcp: overwrite ‘.config’? y> make olddefconfig HOSTCC scripts/basic/fixdep HOSTCC scripts/kconfig/conf.o HOSTCC scripts/kconfig/confdata.o HOSTCC scripts/kconfig/expr.o LEX scripts/kconfig/lexer.lex.c YACC scripts/kconfig/parser.tab.h HOSTCC scripts/kconfig/lexer.lex.o YACC scripts/kconfig/parser.tab.c HOSTCC scripts/kconfig/parser.tab.o HOSTCC scripts/kconfig/preprocess.o HOSTCC scripts/kconfig/symbol.o HOSTLD scripts/kconfig/confscripts/kconfig/conf --olddefconfig Kconfig.config:676:warning: symbol value 'm' invalid for CPU_FREQ_STAT.config:755:warning: symbol value 'm' invalid for HOTPLUG_PCI_SHPC.config:918:warning: symbol value 'm' invalid for NF_CT_PROTO_GRE.config:946:warning: symbol value 'm' invalid for NF_NAT_REDIRECT.config:949:warning: symbol value 'm' invalid for NF_TABLES_INET.config:1111:warning: symbol value 'm' invalid for NF_TABLES_IPV4.config:1115:warning: symbol value 'm' invalid for NF_TABLES_ARP.config:1156:warning: symbol value 'm' invalid for NF_TABLES_IPV6.config:1188:warning: symbol value 'm' invalid for NF_TABLES_BRIDGE.config:1532:warning: symbol value 'm' invalid for NET_DEVLINK.config:2958:warning: symbol value 'm' invalid for HW_RANDOM_TPM.config:3554:warning: symbol value 'm' invalid for LIRC.config:4104:warning: symbol value 'm' invalid for HSA_AMD.config:4460:warning: symbol value 'm' invalid for SND_X86## configuration written to .config#> cat .config | grep KVMCONFIG_KVM_GUEST=yCONFIG_KVM_DEBUG_FS=yCONFIG_HAVE_KVM=yCONFIG_HAVE_KVM_IRQCHIP=yCONFIG_HAVE_KVM_IRQFD=yCONFIG_HAVE_KVM_IRQ_ROUTING=yCONFIG_HAVE_KVM_EVENTFD=yCONFIG_KVM_MMIO=yCONFIG_KVM_ASYNC_PF=yCONFIG_HAVE_KVM_MSI=yCONFIG_HAVE_KVM_CPU_RELAX_INTERCEPT=yCONFIG_KVM_VFIO=yCONFIG_KVM_GENERIC_DIRTYLOG_READ_PROTECT=yCONFIG_KVM_COMPAT=yCONFIG_HAVE_KVM_IRQ_BYPASS=yCONFIG_KVM=mCONFIG_KVM_INTEL=mCONFIG_KVM_AMD=mCONFIG_KVM_AMD_SEV=yCONFIG_KVM_MMU_AUDIT=yCONFIG_PTP_1588_CLOCK_KVM=mCONFIG_DRM_I915_GVT_KVMGT=m
make menuconfig
之后使用make menuconfig进行定制化配置,首先需要安装以下依赖项:
> yum install -y ncurses-devel flex bison
之后启动make menuconfig:
> make menuconfig HOSTCC scripts/kconfig/mconf.o HOSTCC scripts/kconfig/lxdialog/checklist.o HOSTCC scripts/kconfig/lxdialog/inputbox.o HOSTCC scripts/kconfig/lxdialog/menubox.o HOSTCC scripts/kconfig/lxdialog/textbox.o HOSTCC scripts/kconfig/lxdialog/util.o HOSTCC scripts/kconfig/lxdialog/yesno.o HOSTLD scripts/kconfig/mconfscripts/kconfig/mconf Kconfig*** End of the configuration.*** Execute 'make' to start the build or try 'make help'.
> cat .config | grep KVMCONFIG_KVM_GUEST=yCONFIG_KVM_DEBUG_FS=yCONFIG_HAVE_KVM=yCONFIG_HAVE_KVM_IRQCHIP=yCONFIG_HAVE_KVM_IRQFD=yCONFIG_HAVE_KVM_IRQ_ROUTING=yCONFIG_HAVE_KVM_EVENTFD=yCONFIG_KVM_MMIO=yCONFIG_KVM_ASYNC_PF=yCONFIG_HAVE_KVM_MSI=yCONFIG_HAVE_KVM_CPU_RELAX_INTERCEPT=yCONFIG_KVM_VFIO=yCONFIG_KVM_GENERIC_DIRTYLOG_READ_PROTECT=yCONFIG_KVM_COMPAT=yCONFIG_HAVE_KVM_IRQ_BYPASS=yCONFIG_KVM=mCONFIG_KVM_INTEL=m# CONFIG_KVM_AMD is not setCONFIG_KVM_MMU_AUDIT=yCONFIG_PTP_1588_CLOCK_KVM=mCONFIG_DRM_I915_GVT_KVMGT=m
3.3 编译 KVM
在对 KVM 源代码进行配置之后,编译 KVM 就比较容易了。它的编译过程就是一个普通的 Linux 内核编译过程,包括以下三个步骤:
编译 kernel
编译 bzImage
编译 内核模块 modules
编译 kernel
> make vmlinux -j 10error: Cannot generate ORC metadata for CONFIG_UNWINDER_ORC=y, please install libelf-dev, libelf-devel or elfutils-libelf-devel> yum install -y elfutils-libelf-devel> make vmlinux -j 10# 此处省略部分编译时的输出信息 GEN .version CHK include/generated/compile.h UPD include/generated/compile.h CC init/version.o AR init/built-in.a LD vmlinux.o MODPOST vmlinux.o KSYM .tmp_kallsyms1.o KSYM .tmp_kallsyms2.o LD vmlinux # 这里就是编译、链接后生成的启动所需的 Linux Kernel 文件 SORTEX vmlinux SYSMAP System.map
其中,编译命令中的-j参数不是必需的,他是允许 make 工具用多任务(job)来进行编译。例如上面的-j 10,表示 make 工具最多可以创建 20 个 GCC 进程,同时来进行编译任务。
在一个比较空闲的系统上,-j参数的推荐值大约为 2 倍于系统上的 CPU core。
如果-j后面不跟数字,则 make 会根据现在系统中的 CPU core 的数量自动安排任务数,通常比 core 的数量略多一点
> make bzImage CALL scripts/checksyscalls.sh CALL scripts/atomic/check-atomics.sh DESCEND objtool CHK include/generated/compile.h HOSTCC arch/x86/tools/insn_decoder_test HOSTCC arch/x86/tools/insn_sanity TEST posttestarch/x86/tools/insn_decoder_test: success: Decoded and checked 6299855 instructions TEST posttestarch/x86/tools/insn_sanity: Success: decoded and checked 1000000 random instructions with 0 errors (seed:0x7ffcb19) CC arch/x86/boot/a20.o AS arch/x86/boot/bioscall.o CC arch/x86/boot/cmdline.o AS arch/x86/boot/copy.o HOSTCC arch/x86/boot/mkcpustr CPUSTR arch/x86/boot/cpustr.h CC arch/x86/boot/cpu.o CC arch/x86/boot/cpuflags.o CC arch/x86/boot/cpucheck.o CC arch/x86/boot/early_serial_console.o CC arch/x86/boot/edd.o LDS arch/x86/boot/compressed/vmlinux.lds AS arch/x86/boot/compressed/head_64.o VOFFSET arch/x86/boot/compressed/../voffset.h CC arch/x86/boot/compressed/misc.o CC arch/x86/boot/compressed/string.o CC arch/x86/boot/compressed/cmdline.o CC arch/x86/boot/compressed/error.o OBJCOPY arch/x86/boot/compressed/vmlinux.bin RELOCS arch/x86/boot/compressed/vmlinux.relocs GZIP arch/x86/boot/compressed/vmlinux.bin.gz HOSTCC arch/x86/boot/compressed/mkpiggy MKPIGGY arch/x86/boot/compressed/piggy.S AS arch/x86/boot/compressed/piggy.o CC arch/x86/boot/compressed/cpuflags.o CC arch/x86/boot/compressed/early_serial_console.o CC arch/x86/boot/compressed/kaslr.o CC arch/x86/boot/compressed/kaslr_64.o AS arch/x86/boot/compressed/mem_encrypt.o CC arch/x86/boot/compressed/pgtable_64.o CC arch/x86/boot/compressed/acpi.o CC arch/x86/boot/compressed/eboot.o AS arch/x86/boot/compressed/efi_stub_64.o AS arch/x86/boot/compressed/efi_thunk_64.o LD arch/x86/boot/compressed/vmlinux ZOFFSET arch/x86/boot/zoffset.h AS arch/x86/boot/header.o CC arch/x86/boot/main.o CC arch/x86/boot/memory.o CC arch/x86/boot/pm.o AS arch/x86/boot/pmjump.o CC arch/x86/boot/printf.o CC arch/x86/boot/regs.o CC arch/x86/boot/string.o CC arch/x86/boot/tty.o CC arch/x86/boot/video.o CC arch/x86/boot/video-mode.o CC arch/x86/boot/version.o CC arch/x86/boot/video-vga.o CC arch/x86/boot/video-vesa.o CC arch/x86/boot/video-bios.o LD arch/x86/boot/setup.elf OBJCOPY arch/x86/boot/setup.bin OBJCOPY arch/x86/boot/vmlinux.bin HOSTCC arch/x86/boot/tools/build BUILD arch/x86/boot/bzImageSetup is 17340 bytes (padded to 17408 bytes).System is 7661 kBCRC 93bcb672Kernel: arch/x86/boot/bzImage is ready (#2)
qemu-4.0.50 > ./configure --helpUsage: configure [options]Options: [defaults in brackets after descriptions]Standard options: --help print this message --prefix=PREFIX install in PREFIX [/usr/local] --interp-prefix=PREFIX where to find shared libraries, etc. use %M for cpu name [/usr/gnemul/qemu-%M] --target-list=LIST set target list (default: build everything) Available targets: aarch64-softmmu alpha-softmmu arm-softmmu cris-softmmu hppa-softmmu i386-softmmu lm32-softmmu m68k-softmmu microblaze-softmmu microblazeel-softmmu mips-softmmu mips64-softmmu mips64el-softmmu mipsel-softmmu moxie-softmmu nios2-softmmu or1k-softmmu ppc-softmmu ppc64-softmmu riscv32-softmmu riscv64-softmmu s390x-softmmu sh4-softmmu sh4eb-softmmu sparc-softmmu sparc64-softmmu tricore-softmmu unicore32-softmmu x86_64-softmmu xtensa-softmmu xtensaeb-softmmu aarch64-linux-user aarch64_be-linux-user alpha-linux-user arm-linux-user armeb-linux-user cris-linux-user hppa-linux-user i386-linux-user m68k-linux-user microblaze-linux-user microblazeel-linux-user mips-linux-user mips64-linux-user mips64el-linux-user mipsel-linux-user mipsn32-linux-user mipsn32el-linux-user nios2-linux-user or1k-linux-user ppc-linux-user ppc64-linux-user ppc64abi32-linux-user ppc64le-linux-user riscv32-linux-user riscv64-linux-user s390x-linux-user sh4-linux-user sh4eb-linux-user sparc-linux-user sparc32plus-linux-user sparc64-linux-user tilegx-linux-user x86_64-linux-user xtensa-linux-user xtensaeb-linux-user --target-list-exclude=LIST exclude a set of targets from the default target-listAdvanced options (experts only): --source-path=PATH path of source code [/kvm/qemu_src/qemu-4.0.0] --cross-prefix=PREFIX use PREFIX for compile tools [] --cc=CC use C compiler CC [cc] --iasl=IASL use ACPI compiler IASL [iasl] --host-cc=CC use C compiler CC [cc] for code run at build time --cxx=CXX use C++ compiler CXX [c++] --objcc=OBJCC use Objective-C compiler OBJCC [cc] --extra-cflags=CFLAGS append extra C compiler flags QEMU_CFLAGS --extra-cxxflags=CXXFLAGS append extra C++ compiler flags QEMU_CXXFLAGS --extra-ldflags=LDFLAGS append extra linker flags LDFLAGS --cross-cc-ARCH=CC use compiler when building ARCH guest test cases --cross-cc-flags-ARCH= use compiler flags when building ARCH guest tests --make=MAKE use specified make [make] --install=INSTALL use specified install [install] --python=PYTHON use specified python [python] --smbd=SMBD use specified smbd [/usr/sbin/smbd] --with-git=GIT use specified git [git] --static enable static build [no] --mandir=PATH install man pages in PATH --datadir=PATH install firmware in PATH/qemu --docdir=PATH install documentation in PATH/qemu --bindir=PATH install binaries in PATH --libdir=PATH install libraries in PATH --libexecdir=PATH install helper binaries in PATH --sysconfdir=PATH install config in PATH/qemu --localstatedir=PATH install local state in PATH (set at runtime on win32) --firmwarepath=PATH search PATH for firmware files --with-confsuffix=SUFFIX suffix for QEMU data inside datadir/libdir/sysconfdir [/qemu] --with-pkgversion=VERS use specified string as sub-version of the package --enable-debug enable common debug build options --enable-sanitizers enable default sanitizers --disable-strip disable stripping binaries --disable-werror disable compilation abort on warning --disable-stack-protector disable compiler-provided stack protection --audio-drv-list=LIST set audio drivers list: Available drivers: oss alsa sdl pa --block-drv-whitelist=L Same as --block-drv-rw-whitelist=L --block-drv-rw-whitelist=L set block driver read-write whitelist (affects only QEMU, not qemu-img) --block-drv-ro-whitelist=L set block driver read-only whitelist (affects only QEMU, not qemu-img) --enable-trace-backends=B Set trace backend Available backends: dtrace ftrace log simple syslog ust --with-trace-file=NAME Full PATH,NAME of file to store traces Default:trace- --disable-slirp disable SLIRP userspace network connectivity --enable-tcg-interpreter enable TCG with bytecode interpreter (TCI) --enable-malloc-trim enable libc malloc_trim() for memory optimization --oss-lib path to OSS library --cpu=CPU Build for host CPU [x86_64] --with-coroutine=BACKEND coroutine backend. Supported options: ucontext, sigaltstack, windows --enable-gcov enable test coverage analysis with gcov --gcov=GCOV use specified gcov [gcov] --disable-blobs disable installing provided firmware blobs --with-vss-sdk=SDK-path enable Windows VSS support in QEMU Guest Agent --with-win-sdk=SDK-path path to Windows Platform SDK (to build VSS .tlb) --tls-priority default TLS protocol/cipher priority string --enable-gprof QEMU profiling with gprof --enable-profiler profiler support --enable-debug-stack-usage track the maximum stack usage of stacks created by qemu_alloc_stackOptional features, enabled with --enable-FEATURE anddisabled with --disable-FEATURE, default is enabled if available: system all system emulation targets user supported user emulation targets linux-user all linux usermode emulation targets bsd-user all BSD usermode emulation targets docs build documentation guest-agent build the QEMU Guest Agent guest-agent-msi build guest agent Windows MSI installation package pie Position Independent Executables modules modules support debug-tcg TCG debugging (default is disabled) debug-info debugging information sparse sparse checker gnutls GNUTLS cryptography support nettle nettle cryptography support gcrypt libgcrypt cryptography support auth-pam PAM access control sdl SDL UI sdl_image SDL Image support for icons gtk gtk UI vte vte support for the gtk UI curses curses UI iconv font glyph conversion support vnc VNC UI support vnc-sasl SASL encryption for VNC server vnc-jpeg JPEG lossy compression for VNC server vnc-png PNG compression for VNC server cocoa Cocoa UI (Mac OS X only) virtfs VirtFS mpath Multipath persistent reservation passthrough xen xen backend driver support xen-pci-passthrough PCI passthrough support for Xen brlapi BrlAPI (Braile) curl curl connectivity membarrier membarrier system call (for Linux 4.14+ or Windows) fdt fdt device tree bluez bluez stack connectivity kvm KVM acceleration support hax HAX acceleration support hvf Hypervisor.framework acceleration support whpx Windows Hypervisor Platform acceleration support rdma Enable RDMA-based migration pvrdma Enable PVRDMA support vde support for vde network netmap support for netmap network linux-aio Linux AIO support cap-ng libcap-ng support attr attr and xattr support vhost-net vhost-net kernel acceleration support vhost-vsock virtio sockets device support vhost-scsi vhost-scsi kernel target support vhost-crypto vhost-user-crypto backend support vhost-kernel vhost kernel backend support vhost-user vhost-user backend support spice spice rbd rados block device (rbd) libiscsi iscsi support libnfs nfs support smartcard smartcard support (libcacard) libusb libusb (for usb passthrough) live-block-migration Block migration in the main migration stream usb-redir usb network redirection support lzo support of lzo compression library snappy support of snappy compression library bzip2 support of bzip2 compression library (for reading bzip2-compressed dmg images) lzfse support of lzfse compression library (for reading lzfse-compressed dmg images) seccomp seccomp support coroutine-pool coroutine freelist (better performance) glusterfs GlusterFS backend tpm TPM support libssh2 ssh block device support numa libnuma support libxml2 for Parallels image format tcmalloc tcmalloc support jemalloc jemalloc support avx2 AVX2 optimization support replication replication support opengl opengl support virglrenderer virgl rendering support xfsctl xfsctl support qom-cast-debug cast debugging support tools build qemu-io, qemu-nbd and qemu-img tools vxhs Veritas HyperScale vDisk backend support bochs bochs image format support cloop cloop image format support dmg dmg image format support qcow1 qcow v1 image format support vdi vdi image format support vvfat vvfat image format support qed qed image format support parallels parallels image format support sheepdog sheepdog block driver support crypto-afalg Linux AF_ALG crypto backend driver capstone capstone disassembler support debug-mutex mutex debugging support libpmem libpmem supportNOTE: The object files are built at the place where configure is launched
Install prefix /usrBIOS directory /usr/share/qemufirmware path /usr/share/qemu-firmwarebinary directory /usr/binlibrary directory /usr/libmodule directory /usr/lib/qemulibexec directory /usr/libexecinclude directory /usr/includeconfig directory /usr/etclocal state directory /usr/varManual directory /usr/share/manELF interp prefix /usr/gnemul/qemu-%MSource path /kvm/qemu_src/qemu-4.0.50GIT binary gitGIT submodules ui/keycodemapdb tests/fp/berkeley-testfloat-3 tests/fp/berkeley-softfloat-3 dtc capstoneC compiler ccHost C compiler ccC++ compiler c++Objective-C compiler ccARFLAGS rvCFLAGS -g QEMU_CFLAGS -I/usr/include/pixman-1 -I$(SRC_PATH)/dtc/libfdt -Werror -pthread -I/usr/include/glib-2.0 -I/usr/lib/x86_64-linux-gnu/glib-2.0/include -fPIE -DPIE -m64 -mcx16 -D_GNU_SOURCE -D_FILE_OFFSET_BITS=64 -D_LARGEFILE_SOURCE -Wstrict-prototypes -Wredundant-decls -Wall -Wundef -Wwrite-strings -Wmissing-prototypes -fno-strict-aliasing -fno-common -fwrapv -std=gnu99 -Wexpansion-to-defined -Wendif-labels -Wno-shift-negative-value -Wno-missing-include-dirs -Wempty-body -Wnested-externs -Wformat-security -Wformat-y2k -Winit-self -Wignored-qualifiers -Wold-style-declaration -Wold-style-definition -Wtype-limits -fstack-protector-strong -I/usr/include/libpng16 -I/usr/include/spice-server -I/usr/include/spice-1 -I$(SRC_PATH)/capstone/includeLDFLAGS -Wl,--warn-common -Wl,-z,relro -Wl,-z,now -pie -m64 -g QEMU_LDFLAGS -L$(BUILD_DIR)/dtc/libfdt make makeinstall installpython python -B (2.7.15rc1)slirp support internal smbd /usr/sbin/smbdmodule support nohost CPU x86_64host big endian notarget list x86_64-softmmugprof enabled nosparse enabled nostrip binaries noprofiler nostatic build noSDL support yes (2.0.8)SDL image support noGTK support yes (3.22.30)GTK GL support yesVTE support no TLS priority NORMALGNUTLS support nolibgcrypt nonettle no libtasn1 noPAM noiconv support yescurses support novirgl support no curl support yesmingw32 support noAudio drivers pa ossBlock whitelist (rw) Block whitelist (ro) VirtFS support noMultipath support noVNC support yesVNC SASL support noVNC JPEG support noVNC PNG support yesxen support nobrlapi support nobluez support noDocumentation noPIE yesvde support nonetmap support noLinux AIO support yesATTR/XATTR support yesInstall blobs yesKVM support yesHAX support noHVF support noWHPX support noTCG support yesTCG debug enabled yesTCG interpreter nomalloc trim support yesRDMA support noPVRDMA support nofdt support gitmembarrier nopreadv support yesfdatasync yesmadvise yesposix_madvise yesposix_memalign yeslibcap-ng support novhost-net support yesvhost-crypto support yesvhost-scsi support yesvhost-vsock support yesvhost-user support yesTrace backends logspice support yes (0.12.13/0.14.0)rbd support noxfsctl support nosmartcard support nolibusb yesusb net redir yesOpenGL support yesOpenGL dmabufs yeslibiscsi support nolibnfs support nobuild guest agent yesQGA VSS support noQGA w32 disk info noQGA MSI support noseccomp support nocoroutine backend ucontextcoroutine pool yesdebug stack usage nomutex debugging yescrypto afalg noGlusterFS support nogcov gcovgcov enabled noTPM support yeslibssh2 support noTPM passthrough TPM emulator QOM debugging yesLive block migration yeslzo support nosnappy support nobzip2 support nolzfse support noNUMA host support nolibxml2 yestcmalloc support nojemalloc support noavx2 optimization yesreplication support yesVxHS block device nobochs support yescloop support yesdmg support yesqcow v1 support yesvdi support yesvvfat support yesqed support yesparallels support yessheepdog support yescapstone gitdocker yeslibpmem support nolibudev yesdefault devices yesNOTE: cross-compilers enabled: 'cc'
> yum info zshAvailable PackagesName : zshArch : x86_64Version : 5.0.2Release : 31.el7Size : 2.4 MRepo : base/7/x86_64Summary : Powerful interactive shellURL : http://zsh.sourceforge.net/License : MITDescription : The zsh shell is a command interpreter usable as an interactive : login shell and as a shell script command processor. Zsh resembles : the ksh shell (the Korn shell), but includes many enhancements. : Zsh supports command line editing, built-in spelling correction, : programmable command completion, shell functions (with : autoloading), a history mechanism, and more.> yum install -y zsh> cat /etc/shells/bin/sh/bin/bash/sbin/nologin/usr/bin/sh/usr/bin/bash/usr/sbin/nologin/bin/tcsh/bin/csh/usr/bin/tmux/bin/zsh
3. 切换默认 Shell 为 zsh
请在root用户下切换 Shell
> chsh -s /bin/zshChanging shell for root.Shell changed.
提示终端切换完成,但还需重启方能生效。之后继续安装oh-my-zsh。
4. 安装 oh-my-zsh
Via curl
sh -c "$(curl -fsSL https://raw.github.com/robbyrussell/oh-my-zsh/master/tools/install.sh)"
Via wget
sh -c "$(wget https://raw.github.com/robbyrussell/oh-my-zsh/master/tools/install.sh -O -)"
提示oh-my-zsh安装成功:
__ __ ____ / /_ ____ ___ __ __ ____ _____/ /_ / __ \/ __ \ / __ `__ \/ / / / /_ / / ___/ __ \ / /_/ / / / / / / / / / / /_/ / / /_(__ ) / / / \____/_/ /_/ /_/ /_/ /_/\__, / /___/____/_/ /_/ /____/ ....is now installed!Please look over the ~/.zshrc file to select plugins, themes, and options.p.s. Follow us at https://twitter.com/ohmyzsh.p.p.s. Get stickers, shirts, and coffee mugs at https://shop.planetargon.com/collections/oh-my-zsh.
# Set name of the theme to load --- if set to "random", it will# load a random theme each time oh-my-zsh is loaded, in which case,# to know which specific one was loaded, run: echo $RANDOM_THEME# See https://github.com/robbyrussell/oh-my-zsh/wiki/ThemesZSH_THEME="agnoster"
> vim ~/.zshrc# If you come from bash you might have to change your $PATH.# export PATH=$HOME/bin:/usr/local/bin:$PATHexport GOLANDPATH=$HOME/GoLand-2018.3.5/export GOPATH=$HOME/goexport PATH="$PATH:$GOPATH/bin:$GOLANDPATH:bin"# Path to your oh-my-zsh installation.export ZSH="/root/.oh-my-zsh"# Set name of the theme to load --- if set to "random", it will# load a random theme each time oh-my-zsh is loaded, in which case,ZSH_THEME="agnoster"......# Set list of themes to pick from when loading at random# If set to an empty array, this variable will have no effect.# ZSH_THEME_RANDOM_CANDIDATES=( "robbyrussell" "agnoster" )# Set personal aliases, overriding those provided by oh-my-zsh libs,# plugins, and themes. Aliases can be placed here, though oh-my-zsh# users are encouraged to define aliases within the ZSH_CUSTOM folder.# For a full list of active aliases, run `alias`.## Example aliases# alias zshconfig="mate ~/.zshrc"# alias ohmyzsh="mate ~/.oh-my-zsh"alias rm='rm -i'alias cp='cp -i'alias mv='mv -i'alias vi='vim'alias pc='proxychains4'
]]>
<blockquote>
<p><strong><em>Your terminal never felt this good before.</em></strong></p>
</blockquote>
<figure class="image-bubble">
<div class="img-lightbox">
<div class="overlay"></div>
<img src="/2019/04/11/centos7-install-ohmyzsh/cover.png" alt title>
</div>
<div class="image-caption"></div>
</figure>
腾讯暑期实习常规批笔试 Golang 题解https://abelsu7.top/2019/04/06/tencent-2019-spring-test/2019-04-06T09:33:47.000Z2019-09-01T13:04:11.697Z
云计算开发,2019.4.5
1. 0/1 String
package mainimport ( "fmt" "strings")func main() { var n int var s string fmt.Scanln(&n) fmt.Scanln(&s) bitsOf1 := strings.Count(s, "1") bitsOf0 := n - bitsOf1 if bitsOf1 >= bitsOf0 { fmt.Println(bitsOf1 - bitsOf0) } else { fmt.Println(bitsOf0 - bitsOf1) }}------1010010001012Process finished with exit code 0
2. 零钱组合
package mainimport ( "fmt" "sort")func main() { var m, n int fmt.Scanf("%d %d", &m, &n) coinValues := make([]int, n) for i := 0; i < n; i++ { fmt.Scanln(&coinValues[i]) } sort.Slice(coinValues, func(i, j int) bool { return coinValues[i] > coinValues[j] }) fmt.Println(minCoins(m, n, coinValues))}func minCoins(target, n int, coinValues []int) int { if coinValues[n-1] != 1 { // 若没有 1 元硬币,则此题无解 return -1 } coinNum := 0 // 当前硬币总数 maxValue := 0 // 当前硬币总金额 coinNums := make([]int, target+1) // 记录每个硬币的数量 coinNums[0] = 0 for i := 1; i <= target; i++ { if i > maxValue { // 目标金额比 maxValue 大 for _, coinValue := range coinValues { if i >= coinValue { // 取可凑成该金额的最大硬币 coinNum++ maxValue += coinValue break } } coinNums[i] = coinNum } else { coinNums[i] = coinNums[i-1] } } return coinNums[target]}------20 4152105Process finished with exit code 0
3. 怪兽过关
package mainimport "fmt"func main() { var n int // 怪兽数量 fmt.Scanln(&n) boss := make([]int, n) coins := make([]int, n) for i := 0; i < n; i++ { fmt.Scan(&boss[i]) } for i := 0; i < n; i++ { fmt.Scan(&coins[i]) } curValue := boss[0] curCoins := coins[0] fmt.Println(challenge(boss, coins, 1, n, curValue, curCoins))}func challenge(boss []int, coins []int, curIndex, n int, curValue, curCoins int) int { if curIndex == n { return curCoins } if boss[curIndex] > curValue { return challenge(boss, coins, curIndex+1, n, curValue+boss[curIndex], curCoins+coins[curIndex]) } else { return min(challenge(boss, coins, curIndex+1, n, curValue, curCoins), challenge(boss, coins, curIndex+1, n, curValue+boss[curIndex], curCoins+coins[curIndex])) }}func min(a, b int) int { if a < b { return a } else { return b }}------58 1 1 10 132 1 1 3 45Process finished with exit code 0
// Parameters:// numbers: an array of integers// length: the length of array numbers// duplication: (Output) the duplicated number in the array number,length of duplication array is 1,so using duplication[0] = ? in implementation;// Here duplication like pointor in C/C++, duplication[0] equal *duplication in C/C++// 这里要特别注意~返回任意重复的一个,赋值duplication[0]// Return value: true if the input is valid, and there are some duplications in the array number// otherwise falsefunc duplicate(numbers []int, length int, duplication []int) bool { if numbers == nil || length <= 0 { return false } for i := 0; i < length; i++ { for numbers[i] != i { if numbers[i] == numbers[numbers[i]] { duplication[0] = numbers[i] return true } numbers[i], numbers[numbers[i]] = numbers[numbers[i]], numbers[i] } } return false}
func Fibonacci(n int) int { if n == 0 || n == 1 { return n } fn1, fn2, cur := 0, 1, 0 for i := 2; i <= n; i++ { cur = fn1 + fn2 fn1, fn2 = fn2, cur } return cur}
// Copyright 2017 The Go Authors. All rights reserved.// Use of this source code is governed by a BSD-style// license that can be found in the LICENSE file.// +build !compiler_bootstrap go1.8package sortimport "reflect"// Slice sorts the provided slice given the provided less function.//// The sort is not guaranteed to be stable. For a stable sort, use// SliceStable.//// The function panics if the provided interface is not a slice.func Slice(slice interface{}, less func(i, j int) bool) { rv := reflect.ValueOf(slice) swap := reflect.Swapper(slice) length := rv.Len() quickSort_func(lessSwap{less, swap}, 0, length, maxDepth(length))}// SliceStable sorts the provided slice given the provided less// function while keeping the original order of equal elements.//// The function panics if the provided interface is not a slice.func SliceStable(slice interface{}, less func(i, j int) bool) { rv := reflect.ValueOf(slice) swap := reflect.Swapper(slice) stable_func(lessSwap{less, swap}, rv.Len())}// SliceIsSorted tests whether a slice is sorted.//// The function panics if the provided interface is not a slice.func SliceIsSorted(slice interface{}, less func(i, j int) bool) bool { rv := reflect.ValueOf(slice) n := rv.Len() for i := n - 1; i > 0; i-- { if less(i, i-1) { return false } } return true}
func stable(data Interface, n int) { blockSize := 20 // must be > 0 a, b := 0, blockSize for b <= n { insertionSort(data, a, b) a = b b += blockSize } insertionSort(data, a, n) for blockSize < n { a, b = 0, 2*blockSize for b <= n { symMerge(data, a, a+blockSize, b) a = b b += 2 * blockSize } if m := a + blockSize; m < n { symMerge(data, a, m, n) } blockSize *= 2 }}
// Insertion sortfunc insertionSort(data Interface, a, b int) { for i := a + 1; i < b; i++ { for j := i; j > a && data.Less(j, j-1); j-- { data.Swap(j, j-1) } }}
// SymMerge merges the two sorted subsequences data[a:m] and data[m:b] using// the SymMerge algorithm from Pok-Son Kim and Arne Kutzner, "Stable Minimum// Storage Merging by Symmetric Comparisons", in Susanne Albers and Tomasz// Radzik, editors, Algorithms - ESA 2004, volume 3221 of Lecture Notes in// Computer Science, pages 714-723. Springer, 2004.//// Let M = m-a and N = b-n. Wolog M < N.// The recursion depth is bound by ceil(log(N+M)).// The algorithm needs O(M*log(N/M + 1)) calls to data.Less.// The algorithm needs O((M+N)*log(M)) calls to data.Swap.//// The paper gives O((M+N)*log(M)) as the number of assignments assuming a// rotation algorithm which uses O(M+N+gcd(M+N)) assignments. The argumentation// in the paper carries through for Swap operations, especially as the block// swapping rotate uses only O(M+N) Swaps.//// symMerge assumes non-degenerate arguments: a < m && m < b.// Having the caller check this condition eliminates many leaf recursion calls,// which improves performance.func symMerge(data Interface, a, m, b int) { // Avoid unnecessary recursions of symMerge // by direct insertion of data[a] into data[m:b] // if data[a:m] only contains one element. if m-a == 1 { // Use binary search to find the lowest index i // such that data[i] >= data[a] for m <= i < b. // Exit the search loop with i == b in case no such index exists. i := m j := b for i < j { h := int(uint(i+j) >> 1) if data.Less(h, a) { i = h + 1 } else { j = h } } // Swap values until data[a] reaches the position before i. for k := a; k < i-1; k++ { data.Swap(k, k+1) } return } // Avoid unnecessary recursions of symMerge // by direct insertion of data[m] into data[a:m] // if data[m:b] only contains one element. if b-m == 1 { // Use binary search to find the lowest index i // such that data[i] > data[m] for a <= i < m. // Exit the search loop with i == m in case no such index exists. i := a j := m for i < j { h := int(uint(i+j) >> 1) if !data.Less(m, h) { i = h + 1 } else { j = h } } // Swap values until data[m] reaches the position i. for k := m; k > i; k-- { data.Swap(k, k-1) } return } mid := int(uint(a+b) >> 1) n := mid + m var start, r int if m > mid { start = n - b r = mid } else { start = a r = m } p := n - 1 for start < r { c := int(uint(start+r) >> 1) if !data.Less(p-c, c) { start = c + 1 } else { r = c } } end := n - start if start < m && m < end { rotate(data, start, m, end) } if a < start && start < mid { symMerge(data, a, start, mid) } if mid < end && end < b { symMerge(data, mid, end, b) }}// Rotate two consecutive blocks u = data[a:m] and v = data[m:b] in data:// Data of the form 'x u v y' is changed to 'x v u y'.// Rotate performs at most b-a many calls to data.Swap.// Rotate assumes non-degenerate arguments: a < m && m < b.func rotate(data Interface, a, m, b int) { i := m - a j := b - m for i != j { if i > j { swapRange(data, m-i, m, j) i -= j } else { swapRange(data, m-i, m+j-i, i) j -= i } } // i == j swapRange(data, m-i, m, i)}/*Complexity of Stable SortingComplexity of block swapping rotationEach Swap puts one new element into its correct, final position.Elements which reach their final position are no longer moved.Thus block swapping rotation needs |u|+|v| calls to Swaps.This is best possible as each element might need a move.Pay attention when comparing to other optimal algorithms whichtypically count the number of assignments instead of swaps:E.g. the optimal algorithm of Dudzinski and Dydek for in-placerotations uses O(u + v + gcd(u,v)) assignments which isbetter than our O(3 * (u+v)) as gcd(u,v) <= u.Stable sorting by SymMerge and BlockSwap rotationsSymMerg complexity for same size input M = N:Calls to Less: O(M*log(N/M+1)) = O(N*log(2)) = O(N)Calls to Swap: O((M+N)*log(M)) = O(2*N*log(N)) = O(N*log(N))(The following argument does not fuzz over a missing -1 orother stuff which does not impact the final result).Let n = data.Len(). Assume n = 2^k.Plain merge sort performs log(n) = k iterations.On iteration i the algorithm merges 2^(k-i) blocks, each of size 2^i.Thus iteration i of merge sort performs:Calls to Less O(2^(k-i) * 2^i) = O(2^k) = O(2^log(n)) = O(n)Calls to Swap O(2^(k-i) * 2^i * log(2^i)) = O(2^k * i) = O(n*i)In total k = log(n) iterations are performed; so in total:Calls to Less O(log(n) * n)Calls to Swap O(n + 2*n + 3*n + ... + (k-1)*n + k*n) = O((k/2) * k * n) = O(n * k^2) = O(n * log^2(n))Above results should generalize to arbitrary n = 2^k + pand should not be influenced by the initial insertion sort phase:Insertion sort is O(n^2) on Swap and Less, thus O(bs^2) per block ofsize bs at n/bs blocks: O(bs*n) Swaps and Less during insertion sort.Merge sort iterations start at i = log(bs). With t = log(bs) constant:Calls to Less O((log(n)-t) * n + bs*n) = O(log(n)*n + (bs-t)*n) = O(n * log(n))Calls to Swap O(n * log^2(n) - (t^2+t)/2*n) = O(n * log^2(n))*/
package mainimport ( "fmt")func main() { n := 0 // total number of test cases part := 0 // how many elements to calculate fmt.Scan(&n) for i := 0; i < n; i++ { fmt.Scan(&part) fmt.Printf("%.4f", partSum(part)) }}func partSum(n int) float64 { sum := 0.0 for i := 1; i <= n; i++ { sum += float64(fibonacci(i+1)) / float64(fibonacci(i)) } return sum}func fibonacci(n int) int { f1, f2 := 1, 2 var f3 int switch n { case 1: return f1 case 2: return f2 default: for i := 3; i <= n; i++ { f3 = f1 + f2 f1, f2 = f2, f3 } return f3 }}
//冒泡排序,a是数组,n表示数组大小func BubbleSort(a []int, n int) { if n <= 1 { return } for i := 0; i < n; i++ { // 提前退出标志 flag := false for j := 0; j < n-i-1; j++ { if a[j] > a[j+1] { a[j], a[j+1] = a[j+1], a[j] //此次冒泡有数据交换 flag = true } } // 如果没有交换数据,提前退出 if !flag { break } }}
2. 插入排序
// 插入排序,a表示数组,n表示数组大小func InsertionSort(a []int, n int) { if n <= 1 { return } for i := 1; i < n; i++ { value := a[i] j := i - 1 //查找要插入的位置并移动数据 for ; j >= 0; j-- { if a[j] > value { a[j+1] = a[j] } else { break } } a[j+1] = value }}
3. 选择排序
// 选择排序,a表示数组,n表示数组大小func SelectionSort(a []int, n int) { if n <= 1 { return } for i := 0; i < n; i++ { // 查找最小值 minIndex := i for j := i + 1; j < n; j++ { if a[j] < a[minIndex] { minIndex = j } } // 交换 a[i], a[minIndex] = a[minIndex], a[i] }}
4. 归并排序
// 归并排序func MergeSort(a []int, n int) { if n <= 1 { return } mergeSort(a, 0, n-1)}func mergeSort(a []int, start, end int) { if start >= end { return } mid := (start + end) / 2 mergeSort(a, start, mid) mergeSort(a, mid+1, end) merge(a, start, mid, end)}func merge(a []int, start, mid, end int) { tmpArr := make([]int, end-start+1) i := start j := mid + 1 k := 0 for ; i <= mid && j <= end; k++ { if a[i] < a[j] { tmpArr[k] = a[i] i++ } else { tmpArr[k] = a[j] j++ } } for ; i <= mid; i++ { tmpArr[k] = a[i] k++ } for ; j <= end; j++ { tmpArr[k] = a[j] j++ } copy(a[start:end+1], tmpArr)}
5. 快速排序
func QuickSort(a []int, n int) { separateSort(a, 0, n-1)}func separateSort(a []int, start, end int) { if start >= end { return } i := partition(a, start, end) separateSort(a, start, i-1) separateSort(a, i+1, end)}func partition(a []int, start, end int) int { // 选取最后一位当对比数字 pivot := a[end] i := start for j := start; j < end; j++ { if a[j] < pivot { if !(i == j) { // 交换位置 a[i], a[j] = a[j], a[i] } i++ } } a[i], a[end] = a[end], a[i] return i}
6. 计数排序
func CountingSort(a []int, n int) { if n <= 1 { return } var max = math.MinInt32 for i := range a { if a[i] > max { max = a[i] } } c := make([]int, max+1) for i := range a { c[a[i]]++ } for i := 1; i <= max; i++ { c[i] += c[i-1] } r := make([]int, n) for i := range a { index := c[a[i]] - 1 r[index] = a[i] c[a[i]]-- } copy(a, r)}
7. 堆排序
父节点:(x-1)/2
左子节点:2x+1
右子节点:2x+2
堆中最后一个父节点:(n/2)-1
func HeapSort(arr []int, n int) { // 1. 建立一个大顶堆 buildMaxHeap(arr, n) length := n // 2. 交换堆顶元素与堆尾,并对剩余的元素重新建堆 for i := n - 1; i > 0; i-- { swap(arr, 0, i) length-- heapify(arr, 0, length) } // 3. 返回堆排序后的数组 return}func buildMaxHeap(arr []int, n int) { for i := n/2 - 1; i >= 0; i-- { heapify(arr, i, n) }}// 从上至下堆化func heapify(arr []int, i int, n int) { left := 2*i + 1 right := 2*i + 2 largest := i if left < n && arr[left] > arr[largest] { largest = left } if right < n && arr[right] > arr[largest] { largest = right } if largest != i { swap(arr, i, largest) heapify(arr, largest, n) }}func swap(arr []int, i int, j int) { arr[i], arr[j] = arr[j], arr[i]}
二、二分查找
func BinarySearch(a []int, v int) int { n := len(a) if n == 0 { return -1 } low := 0 high := n - 1 for low <= high { mid := (low + high) / 2 if a[mid] == v { return mid } else if a[mid] > v { high = mid - 1 } else { low = mid + 1 } } return -1}// 递归写法func BinarySearchRecursive(a []int, v int) int { n := len(a) if n == 0 { return -1 } return bs(a, v, 0, n-1)}func bs(a []int, v int, low, high int) int { if low > high { return -1 } mid := (low + high) / 2 if a[mid] == v { return mid } else if a[mid] > v { return bs(a, v, low, mid-1) } else { return bs(a, v, mid+1, high) }}// 查找第一个等于给定值的元素func BinarySearchFirst(a []int, v int) int { n := len(a) if n == 0 { return -1 } low := 0 high := n - 1 for low <= high { mid := low + (high-low)>>1 if a[mid] > v { high = mid - 1 } else if a[mid] < v { low = mid + 1 } else { if mid == 0 || a[mid-1] != v { return mid } else { high = mid - 1 } } } return -1}// 查找最后一个值等于给定值的元素func BinarySearchLast(a []int, v int) int { n := len(a) if n == 0 { return -1 } low := 0 high := n - 1 for low <= high { mid := low + (high-low)>>1 if a[mid] > v { high = mid - 1 } else if a[mid] < v { low = mid + 1 } else { if mid == n-1 || a[mid+1] != v { return mid } else { low = mid + 1 } } } return -1}// 查找第一个大于等于给定值的元素func BinarySearchFirstGT(a []int, v int) int { n := len(a) if n == 0 { return -1 } low := 0 high := n - 1 for low <= high { mid := (high + low) >> 1 if a[mid] > v { high = mid - 1 } else if a[mid] < v { low = mid + 1 } else { if mid != n-1 && a[mid+1] > v { return mid + 1 } else { low = mid + 1 } } } return -1}// 查找最后一个小于等于给定值的元素func BinarySearchLastLT(a []int, v int) int { n := len(a) if n == 0 { return -1 } low := 0 high := n - 1 for low <= high { mid := (low + high) >> 1 if a[mid] > v { high = mid - 1 } else if a[mid] < v { low = mid + 1 } else { if mid == 0 || a[mid-1] < v { return mid - 1 } else { high = mid - 1 } } } return -1}
三、数据结构
1. 二叉树
type Node struct { data interface{} left *Node right *Node}func NewNode(data interface{}) *Node { return &Node{data: data}}func (this *Node) String() string { return fmt.Sprintf("v:%+v, left:%+v, right:%+v", this.data, this.left, this.right)}
2. 链表
单链表
package _6_linkedlistimport "fmt"/*单链表基本操作author:leo*/type ListNode struct { next *ListNode value interface{}}type LinkedList struct { head *ListNode length uint}func NewListNode(v interface{}) *ListNode { return &ListNode{nil, v}}func (this *ListNode) GetNext() *ListNode { return this.next}func (this *ListNode) GetValue() interface{} { return this.value}func NewLinkedList() *LinkedList { return &LinkedList{NewListNode(0), 0}}//在某个节点后面插入节点func (this *LinkedList) InsertAfter(p *ListNode, v interface{}) bool { if nil == p { return false } newNode := NewListNode(v) oldNext := p.next p.next = newNode newNode.next = oldNext this.length++ return true}//在某个节点前面插入节点func (this *LinkedList) InsertBefore(p *ListNode, v interface{}) bool { if nil == p || p == this.head { return false } cur := this.head.next pre := this.head for nil != cur { if cur == p { break } pre = cur cur = cur.next } if nil == cur { return false } newNode := NewListNode(v) pre.next = newNode newNode.next = cur this.length++ return true}//在链表头部插入节点func (this *LinkedList) InsertToHead(v interface{}) bool { return this.InsertAfter(this.head, v)}//在链表尾部插入节点func (this *LinkedList) InsertToTail(v interface{}) bool { cur := this.head for nil != cur.next { cur = cur.next } return this.InsertAfter(cur, v)}//通过索引查找节点func (this *LinkedList) FindByIndex(index uint) *ListNode { if index >= this.length { return nil } cur := this.head.next var i uint = 0 for ; i < index; i++ { cur = cur.next } return cur}//删除传入的节点func (this *LinkedList) DeleteNode(p *ListNode) bool { if nil == p { return false } cur := this.head.next pre := this.head for nil != cur { if cur == p { break } pre = cur cur = cur.next } if nil == cur { return false } pre.next = p.next p = nil this.length-- return true}//打印链表func (this *LinkedList) Print() { cur := this.head.next format := "" for nil != cur { format += fmt.Sprintf("%+v", cur.GetValue()) cur = cur.next if nil != cur { format += "->" } } fmt.Println(format)}
链表常用操作
package _7_linkedlistimport "fmt"//单链表节点type ListNode struct { next *ListNode value interface{}}//单链表type LinkedList struct { head *ListNode}//打印链表func (this *LinkedList) Print() { cur := this.head.next format := "" for nil != cur { format += fmt.Sprintf("%+v", cur.value) cur = cur.next if nil != cur { format += "->" } } fmt.Println(format)}/*单链表反转时间复杂度:O(N)*/func (this *LinkedList) Reverse() { if nil == this.head || nil == this.head.next || nil == this.head.next.next { return } var pre *ListNode = nil cur := this.head.next for nil != cur { tmp := cur.next cur.next = pre pre = cur cur = tmp } this.head.next = pre}/*判断单链表是否有环*/func (this *LinkedList) HasCycle() bool { if nil != this.head { slow := this.head fast := this.head for nil != fast && nil != fast.next { slow = slow.next fast = fast.next.next if slow == fast { return true } } } return false}/*两个有序单链表合并*/func MergeSortedList(l1, l2 *LinkedList) *LinkedList { if nil == l1 || nil == l1.head || nil == l1.head.next { return l2 } if nil == l2 || nil == l2.head || nil == l2.head.next { return l1 } l := &LinkedList{head: &ListNode{}} cur := l.head curl1 := l1.head.next curl2 := l2.head.next for nil != curl1 && nil != curl2 { if curl1.value.(int) > curl2.value.(int) { cur.next = curl2 curl2 = curl2.next } else { cur.next = curl1 curl1 = curl1.next } cur = cur.next } if nil != curl1 { cur.next = curl1 } else if nil != curl2 { cur.next = curl2 } return l}/*删除倒数第N个节点*/func (this *LinkedList) DeleteBottomN(n int) { if n <= 0 || nil == this.head || nil == this.head.next { return } fast := this.head for i := 1; i <= n && fast != nil; i++ { fast = fast.next } if nil == fast { return } slow := this.head for nil != fast.next { slow = slow.next fast = fast.next } slow.next = slow.next.next}/*获取中间节点*/func (this *LinkedList) FindMiddleNode() *ListNode { if nil == this.head || nil == this.head.next { return nil } if nil == this.head.next.next { return this.head.next } slow, fast := this.head, this.head for nil != fast && nil != fast.next { slow = slow.next fast = fast.next.next } return slow}
]]>
<blockquote>
<p><strong><em>Hold on just a little while longer…</em></strong></p>
</blockquote>
<figure class="image-bubble">
<div class="img-lightbox">
<div class="overlay"></div>
<img src="/2019/03/19/recent-review/cover.jpg" alt title>
</div>
<div class="image-caption"></div>
</figure>
Linux 内核笔记 1:绪论https://abelsu7.top/2019/03/18/understanding-linux-kernel/2019-03-18T03:30:42.000Z2020-01-13T03:40:45.737Z
> kubectlkubectl controls the Kubernetes cluster manager. Find more information at: https://kubernetes.io/docs/reference/kubectl/overview/Basic Commands (Beginner): create Create a resource from a file or from stdin. expose Take a replication controller, service, deployment or pod and expose it as a new Kubernetes Service run Run a particular image on the cluster set Set specific features on objectsBasic Commands (Intermediate): explain Documentation of resources get Display one or many resources edit Edit a resource on the server delete Delete resources by filenames, stdin, resources and names, or by resources and label selectorDeploy Commands: rollout Manage the rollout of a resource scale Set a new size for a Deployment, ReplicaSet, Replication Controller, or Job autoscale Auto-scale a Deployment, ReplicaSet, or ReplicationControllerCluster Management Commands: certificate Modify certificate resources. cluster-info Display cluster info top Display Resource (CPU/Memory/Storage) usage. cordon Mark node as unschedulable uncordon Mark node as schedulable drain Drain node in preparation for maintenance taint Update the taints on one or more nodesTroubleshooting and Debugging Commands: describe Show details of a specific resource or group of resources logs Print the logs for a container in a pod attach Attach to a running container exec Execute a command in a container port-forward Forward one or more local ports to a pod proxy Run a proxy to the Kubernetes API server cp Copy files and directories to and from containers. auth Inspect authorizationAdvanced Commands: diff Diff live version against would-be applied version apply Apply a configuration to a resource by filename or stdin patch Update field(s) of a resource using strategic merge patch replace Replace a resource by filename or stdin wait Experimental: Wait for a specific condition on one or many resources. convert Convert config files between different API versionsSettings Commands: label Update the labels on a resource annotate Update the annotations on a resource completion Output shell completion code for the specified shell (bash or zsh)Other Commands: api-resources Print the supported API resources on the server api-versions Print the supported API versions on the server, in the form of "group/version" config Modify kubeconfig files plugin Provides utilities for interacting with plugins. version Print the client and server version informationUsage: kubectl [flags] [options]Use "kubectl <command> --help" for more information about a given command.Use "kubectl options" for a list of global command-line options (applies to all commands).
> kubectl --client-key='/home/tao/.minikube/client.key' --client-certificate='/home/tao/.minikube/client.crt' --server='https://192.168.99.101:8443' get nodesNAME STATUS ROLES AGE VERSIONminikube Ready master 2d v1.11.3
kubectl get
使用kubectl get nodes命令查看集群中的所有节点:
> kubectl get nodesNAME STATUS ROLES AGE VERSIONabelsu7-ubuntu Ready master 20d v1.13.3centos-1 Ready <none> 20d v1.13.3centos-2 Ready <none> 20d v1.13.3
传递-o wide/yaml/json可以得到不同格式的输出:
> kubectl get nodes -o wideNAME STATUS ROLES AGE VERSION INTERNAL-IP EXTERNAL-IP OS-IMAGE KERNEL-VERSION CONTAINER-RUNTIMEabelsu7-ubuntu Ready master 20d v1.13.3 xxx.xxx.xxx.xxx <none> Ubuntu 18.04.1 LTS 4.15.0-38-generic docker://18.6.1centos-1 Ready <none> 20d v1.13.3 xxx.xxx.xxx.xxx <none> CentOS Linux 7 (Core) 3.10.0-862.14.4.el7.x86_64 docker://18.9.2centos-2 Ready <none> 20d v1.13.3 xxx.xxx.xxx.xxx <none> CentOS Linux 7 (Core) 3.10.0-862.14.4.el7.x86_64 docker://18.9.1
> kubectl explain nodesKIND: NodeVERSION: v1DESCRIPTION: Node is a worker node in Kubernetes. Each node will have a unique identifier in the cache (i.e. in etcd).FIELDS: apiVersion <string> APIVersion defines the versioned schema of this representation of an object. Servers should convert recognized schemas to the latest internal value, and may reject unrecognized values. More info: https://git.k8s.io/community/contributors/devel/api-conventions.md#resources kind <string> Kind is a string value representing the REST resource this object represents. Servers may infer this from the endpoint the client submits requests to. Cannot be updated. In CamelCase. More info: https://git.k8s.io/community/contributors/devel/api-conventions.md#types-kinds metadata <Object> Standard object's metadata. More info: https://git.k8s.io/community/contributors/devel/api-conventions.md#metadata spec <Object> Spec defines the behavior of a node. https://git.k8s.io/community/contributors/devel/api-conventions.md#spec-and-status status <Object> Most recently observed status of the node. Populated by the system. Read-only. More info: https://git.k8s.io/community/contributors/devel/api-conventions.md#spec-and-status
kubectl run
之前提到,Pod 是 K8s 中最小的调度单元,所以我们无法直接在 K8s 中运行一个 container,但是可以运行一个只包含一个 container 的 Pod
kubectl run的基础用法如下:
Usage: kubectl run NAME --image=image [--env="key=value"] [--port=port] [--replicas=replicas] [--dry-run=bool] [--overrides=inline-json] [--command] -- [COMMAND] [args...] [options]
A container is launched by running an image. An image is an executable package that includes everything needed to run an application—the code, a runtime, libraries, environment variables, and configuration files.
A container is a runtime instance of an image—what the image becomes in memory when executed (that is, an image with state, or a user process). You can see a list of your running containers with the command, docker ps, just as you would in Linux.
> docker psCONTAINER ID IMAGE COMMAND CREATED STATUS PORTS NAMES89f2b769498a nginx:1.12 "nginx -g 'daemon of…" About an hour ago Up About an hour 80/tcp nginx
添加-a或--al选项查看所有状态下的容器:
> docker ps -aCONTAINER ID IMAGE COMMAND CREATED STATUS PORTS NAMES425a0d3cd18b redis:3.2 "docker-entrypoint.s…" 2 minutes ago Created redis89f2b769498a nginx:1.12 "nginx -g 'daemon of…" About an hour ago Up About an hour 80/tcp nginx
> docker psCONTAINER ID IMAGE COMMAND CREATED STATUS PORTS NAMES95507bc88082 mysql:5.7 "docker-entrypoint.s…" 17 seconds ago Up 16 seconds 3306/tcp, 33060/tcp mysql
暴露端口可以通过 Docker 镜像定义,也可以在容器创建时通过--expose选项进行定义:
> docker run -d --name mysql -e MYSQL_RANDOM_ROOT_PASSWORD=yes --expose 13306 --expose 23306 mysql:5.7
可以看到13306和23306这两个端口已经成功的打开:
> docker psCONTAINER ID IMAGE COMMAND CREATED STATUS PORTS NAMES3c4e645f21d7 mysql:5.7 "docker-entrypoint.s…" 4 seconds ago Up 3 seconds 3306/tcp, 13306/tcp, 23306/tcp, 33060/tcp mysql
通过别名连接
Docker 还支持连接时使用别名来摆脱容器名的限制:
> docker run -d -name webapp --link mysql:database webapp:latest
这里使用了--link <name>:<alias>的形式连接到 MySQL 容器,并设置它的别名为database。这样当我们要在 Web 应用中使用 MySQL 连接时,就可以用database替代连接地址:
> docker psCONTAINER ID IMAGE COMMAND CREATED STATUS PORTS NAMESbc79fc5d42a6 nginx:1.12 "nginx -g 'daemon of…" 4 seconds ago Up 2 seconds 0.0.0.0:80->80/tcp, 0.0.0.0:443->443/tcp nginx
> docker commit -m "Configured" webappsha256:0bc42f7ff218029c6c4199ab5c75ab83aeaaed3b5c731f715a3e807dda61d19e> docker imagesREPOSITORY TAG IMAGE ID CREATED SIZE<none> <none> 0bc42f7ff218 3 seconds ago 372MB## ......
> docker imagesREPOSITORY TAG IMAGE ID CREATED SIZEwebapp 1.0 0bc42f7ff218 29 minutes ago 372MBwebapp latest 0bc42f7ff218 29 minutes ago 372MB## ......
#!/bin/shset -e# first arg is `-f` or `--some-option`# or first arg is `something.conf`if [ "${1#-}" != "$1" ] || [ "${1%.conf}" != "$1" ]; then set -- redis-server "$@"fi# allow the container to be started with `--user`if [ "$1" = 'redis-server' -a "$(id -u)" = '0' ]; then find . \! -user redis -exec chown redis '{}' + exec gosu redis "$0" "$@"fiexec "$@"
go run demo1.go -name="abelsu7"------Hello, abelsu7!
查看参数说明:
go run demo1.go --help------Usage of C:\Users\abel1\AppData\Local\Temp\go-build617189518\b001\exe\demo1.exe: -name string The greeting object (default "everyone")exit status 2
var err errorn, err := io.WriteString(os.Stdout, "Hello, everyone!\n")
这里使用短变量声明对新变量n和旧变量err进行了声明并赋值,同时也是对旧变量err的重声明。
3.3 Go 语言基础类型大全
package mainimport "fmt"func main() { // 有符号整数,可以表示正负 var a int8 = 1 // 1 字节 var b int16 = 2 // 2 字节 var c int32 = 3 // 4 字节 var d int64 = 4 // 8 字节 fmt.Println(a, b, c, d) // 无符号整数,只能表示非负数 var ua uint8 = 1 var ub uint16 = 2 var uc uint32 = 3 var ud uint64 = 4 fmt.Println(ua, ub, uc, ud) // int 类型,在32位机器上占4个字节,在64位机器上占8个字节 var e int = 5 var ue uint = 5 fmt.Println(e, ue) // bool 类型 var f bool = true fmt.Println(f) // 字节类型 var j byte = 'a' fmt.Println(j) // 字符串类型 var g string = "abcdefg" fmt.Println(g) // 浮点数 var h float32 = 3.14 var i float64 = 3.141592653 fmt.Println(h, i)}-------------1 2 3 41 2 3 45 5trueabcdefg3.14 3.14159265397
package mainimport "fmt"var container = []string{"zero", "one", "two"}func main() { container := map[int]string{0: "zero", 1: "one", 2: "two"} value, ok := interface{}(container).(map[int]string) if ok { fmt.Println(value[1]) } fmt.Printf("The element is %q.\n", container[1])}------oneThe element is "one".Process finished with exit code 0
Go 语言的运行时(runtime)系统会帮助我们自动的创建和销毁系统级的线程,而用户级的线程需要用户自己手动创建和销毁
11.2 调度器
Go 语言不但有独特的并发编程模型,以及用户级线程goroutine,还有提供了一个用于调度goroutine、对接系统级线程的调度器。这个调度器是 Go 语言 runtime 的重要组成部分,它主要负责统筹调配 Go 并发编程模型中的三个主要元素:G(goroutine)、P(processor)、M(machine)。
M、P、G 之间的关系
例如以下代码:
package mainimport ( "fmt" "time")func main() { for i := 0; i < 10; i++ { time.Sleep(time.Millisecond) go func() { fmt.Println(i) }() } time.Sleep(time.Second)}------12345678910Process finished with exit code 0
确切的说,struct{}{}这个值在整个 Go 程序中永远都只会存在一份。虽然我们可以无数次的使用这个值字面量,但用到的却都是同一个值
package mainimport ( "fmt" //"time")func main() { num := 10 sign := make(chan struct{}, num) for i := 0; i < num; i++ { go func() { fmt.Println(i) sign <- struct{}{} }() } // 办法 1 //time.Sleep(time.Millisecond * 500) // 办法 2 for j := 0; j < num; j++ { <-sign }}------// 结果不唯一10631081010101010Process finished with exit code 0
使用sync.WaitGroup会比使用通道更加优雅,之后再来看
11.4 让多个协程按照既定的顺序运行
package mainimport ( "fmt" "sync/atomic" "time")func main() { var count uint32 trigger := func(i uint32, fn func()) { for { if n := atomic.LoadUint32(&count); n == i { fn() atomic.AddUint32(&count, 1) break } time.Sleep(time.Nanosecond) } } for i := uint32(0); i < 10; i++ { go func(i uint32) { fn := func() { fmt.Println(i) } trigger(i, fn) }(i) } trigger(10, func() { fmt.Println("End in main goroutine") })}------0123456789End in main goroutineProcess finished with exit code 0
package mainimport ( "fmt" "os" "os/exec" "runtime")// underlyingError 会返回已知的操作系统相关错误的潜在错误值。func underlyingError(err error) error { switch err := err.(type) { case *os.PathError: return err.Err case *os.LinkError: return err.Err case *os.SyscallError: return err.Err case *exec.Error: return err.Err } return err}func main() { // 示例1。 r, w, err := os.Pipe() if err != nil { fmt.Printf("unexpected error: %s\n", err) return } // 人为制造 *os.PathError 类型的错误。 r.Close() _, err = w.Write([]byte("hi")) uError := underlyingError(err) fmt.Printf("underlying error: %s (type: %T)\n", uError, uError) fmt.Println() // 示例2。 paths := []string{ os.Args[0], // 当前的源码文件或可执行文件。 "/it/must/not/exist", // 肯定不存在的目录。 os.DevNull, // 肯定存在的目录。 } printError := func(i int, err error) { if err == nil { fmt.Println("nil error") return } err = underlyingError(err) switch err { case os.ErrClosed: fmt.Printf("error(closed)[%d]: %s\n", i, err) case os.ErrInvalid: fmt.Printf("error(invalid)[%d]: %s\n", i, err) case os.ErrPermission: fmt.Printf("error(permission)[%d]: %s\n", i, err) } } var f *os.File var index int { index = 0 f, err = os.Open(paths[index]) if err != nil { fmt.Printf("unexpected error: %s\n", err) return } // 人为制造潜在错误为 os.ErrClosed 的错误。 f.Close() _, err = f.Read([]byte{}) printError(index, err) } { index = 1 // 人为制造 os.ErrInvalid 错误。 f, _ = os.Open(paths[index]) _, err = f.Stat() printError(index, err) } { index = 2 // 人为制造潜在错误为 os.ErrPermission 的错误。 _, err = exec.LookPath(paths[index]) printError(index, err) } if f != nil { f.Close() } fmt.Println() // 示例3。 paths2 := []string{ runtime.GOROOT(), // 当前环境下的Go语言根目录。 "/it/must/not/exist", // 肯定不存在的目录。 os.DevNull, // 肯定存在的目录。 } printError2 := func(i int, err error) { if err == nil { fmt.Println("nil error") return } err = underlyingError(err) if os.IsExist(err) { fmt.Printf("error(exist)[%d]: %s\n", i, err) } else if os.IsNotExist(err) { fmt.Printf("error(not exist)[%d]: %s\n", i, err) } else if os.IsPermission(err) { fmt.Printf("error(permission)[%d]: %s\n", i, err) } else { fmt.Printf("error(other)[%d]: %s\n", i, err) } } { index = 0 err = os.Mkdir(paths2[index], 0700) printError2(index, err) } { index = 1 f, err = os.Open(paths[index]) printError2(index, err) } { index = 2 _, err = exec.LookPath(paths[index]) printError2(index, err) } if f != nil { f.Close() }}------underlying error: The pipe is being closed. (type: syscall.Errno)error(closed)[0]: file already closederror(invalid)[1]: invalid argumentnil errorerror(exist)[0]: Cannot create a file when that file already exists.error(not exist)[1]: The system cannot find the path specified.nil errorProcess finished with exit code 0
14. 异常处理
14.1 panic
一个panic的示例如下(在运行时抛出):
panic: runtime error: index out of rangegoroutine 1 [running]:main.main() /Users/haolin/GeekTime/Golang_Puzzlers/src/puzzlers/article19/q0/demo47.go:5 +0x3dexit status 2
问题:从panic被引发到程序终止运行的大致过程是什么?
package mainimport ( "fmt")func main() { fmt.Println("Enter function main.") caller1() fmt.Println("Exit function main.")}func caller1() { fmt.Println("Enter function caller1.") caller2() fmt.Println("Exit function caller1.")}func caller2() { fmt.Println("Enter function caller2.") s1 := []int{0, 1, 2, 3, 4} e5 := s1[5] _ = e5 fmt.Println("Exit function caller2.")}------Enter function main.Enter function caller1.Enter function caller2.panic: runtime error: index out of rangegoroutine 1 [running]:main.caller2() C:/Users/abel1/go/src/github.com/abelsu7/hello/main.go:22 +0x69main.caller1() C:/Users/abel1/go/src/github.com/abelsu7/hello/main.go:15 +0x6dmain.main() C:/Users/abel1/go/src/github.com/abelsu7/hello/main.go:9 +0x6dProcess finished with exit code 2
package linkedList;import java.util.*;/** * This program demonstrates operations on linked lists. * * @author Cay Horstmann * @version 1.11 2012-01-26 */public class LinkedListTest { public static void main(String[] args) { List<String> a = new LinkedList<>(); a.add("Amy"); a.add("Carl"); a.add("Erica"); List<String> b = new LinkedList<>(); b.add("Bob"); b.add("Doug"); b.add("Frances"); b.add("Gloria"); // merge the words from b into a ListIterator<String> aIter = a.listIterator(); Iterator<String> bIter = b.iterator(); while (bIter.hasNext()) { if (aIter.hasNext()) aIter.next(); aIter.add(bIter.next()); } System.out.println(a); // remove every second word from b bIter = b.iterator(); while (bIter.hasNext()) { bIter.next(); // skip one element if (bIter.hasNext()) { bIter.next(); // skip next element bIter.remove(); // remove that element } } System.out.println(b); // bulk operation: remove all words in b from a a.removeAll(b); System.out.println(a); }}------[Amy, Bob, Carl, Doug, Erica, Frances, Gloria][Bob, Frances][Amy, Carl, Doug, Erica, Gloria]Process finished with exit code 0
package set;import java.util.*;/** * This program uses a set to print all unique words in System.in. * * @author Cay Horstmann * @version 1.12 2015-06-21 */public class SetTest { public static void main(String[] args) { Set<String> words = new HashSet<>(); // HashSet implements Set long totalTime = 0; try (Scanner in = new Scanner(System.in)) { while (in.hasNext()) { String word = in.next(); long callTime = System.currentTimeMillis(); words.add(word); callTime = System.currentTimeMillis() - callTime; totalTime += callTime; } } Iterator<String> iter = words.iterator(); for (int i = 1; i <= 20 && iter.hasNext(); i++) System.out.println(iter.next()); System.out.println(". . ."); System.out.println(words.size() + " distinct words. " + totalTime + " milliseconds."); }}
import java.time.LocalDate;import java.util.PriorityQueue;public class Main { public static void main(String[] args) { PriorityQueue<LocalDate> pq = new PriorityQueue<>(); pq.add(LocalDate.of(1906, 12, 9)); // G. Hopper pq.add(LocalDate.of(1815, 12, 10)); // A. Lovelace pq.add(LocalDate.of(1903, 12, 3)); // J. von Neumann pq.add(LocalDate.of(1910, 6, 22)); // K. Zuse System.out.println("Iterating over elements..."); for (LocalDate date : pq) { System.out.println(date); } System.out.println("Removing elements..."); while (!pq.isEmpty()) { System.out.println(pq.remove()); } }}
scores.forEach((k, v) -> System.out.println("key=" + k + "value=" + v));
如下的示例代码显示了映射的操作过程:
package map;import java.util.*;/** * This program demonstrates the use of a map with key type String and value type Employee. * @version 1.12 2015-06-21 * @author Cay Horstmann */public class MapTest{ public static void main(String[] args) { Map<String, Employee> staff = new HashMap<>(); staff.put("144-25-5464", new Employee("Amy Lee")); staff.put("567-24-2546", new Employee("Harry Hacker")); staff.put("157-62-7935", new Employee("Gary Cooper")); staff.put("456-62-5527", new Employee("Francesca Cruz")); // print all entries System.out.println(staff); // remove an entry staff.remove("567-24-2546"); // replace an entry staff.put("456-62-5527", new Employee("Francesca Miller")); // look up a value System.out.println(staff.get("157-62-7935")); // iterate through all entries staff.forEach((k, v) -> System.out.println("key=" + k + ", value=" + v)); }}
public static <T extends Comparable> T max(Collection<T> c) { if (c.isEmpty()) throw new NoSuchElementException(); Iterator<T> iter = c.iterator(); T largest = iter.next(); while (iter.hasNext()) { T next = iter.next(); if (largest.compareTo(next) < 0) largest = next; } return largest;}
5.1 排序与混排
Collections 类中的sort方法可以对实现了List接口的集合进行排序:
List<String> staff = new LinkedList<>();// fill collectionCollections.sort(staff);
bucketOfBits.get(i); // 如果第 i 位有设置过,则返回 truebucketOfBits.set(i); // 将第 i 位设置为 “开” 状态bucketOfBits.clear(i); // 清除第 i 位
筛法求质数:
package sieve;import java.util.*;/** * This program runs the Sieve of Erathostenes benchmark. It computes all primes up to 2,000,000. * @version 1.21 2004-08-03 * @author Cay Horstmann */public class Sieve{ public static void main(String[] s) { int n = 2000000; long start = System.currentTimeMillis(); BitSet b = new BitSet(n + 1); int count = 0; int i; for (i = 2; i <= n; i++) b.set(i); i = 2; while (i * i <= n) { if (b.get(i)) { count++; int k = 2 * i; while (k <= n) { b.clear(k); k += i; } } i++; } while (i <= n) { if (b.get(i)) count++; i++; } long end = System.currentTimeMillis(); System.out.println(count + " primes"); System.out.println((end - start) + " milliseconds"); }}------148933 primes61 millisecondsProcess finished with exit code 0
try { code more code} catch (Exception e) { handler for this type}
如果在try语句块中的任何代码抛出了一个在catch子句中说明的异常类,那么:
程序将跳过try语句块的其余代码
程序将执行catch子句中的handler代码
如果在try语句块中的代码没有抛出任何异常,那么程序将跳过catch子句。
如果方法中的任何代码抛出了一个在catch子句中没有声明的异常类型,那么这个方法就会立刻退出。
public void read(String filename) { try { InputStream in = new FileInputStream(filename); int b; while ((b = in.read()) != -1) { // process input } } catch (IOException e) { e.printStackTrace(); }}
还可以什么都不做,将异常传递给调用者,这样就必须声明这个方法可能会抛出一个IOException:
public void read(String filename) throws IOException { InputStream in = new FileInputStream(filename); int b; while ((b = in.read()) != -1) { // process input }}
// 插入排序,a 表示数组,n 表示数组大小public void insertionSort(int[] a, int n) { if (n <= 1) return; for (int i = 1; i < n; ++i) { int value = a[i]; int j = i - 1; // 查找插入的位置 for (; j >= 0; --j) { if (a[j] > value) { a[j+1] = a[j]; // 数据移动 } else { break; } } a[j+1] = value; // 插入数据 }}
3.4 Go 实现
// 插入排序,a 表示数组,n 表示数组大小func InsertionSort(a []int, n int) { if n <= 1 { return } for i := 1; i < n; i++ { value := a[i] j := i - 1 // 查找要插入的位置并移动数据 for ; j >= 0; j-- { if a[j] > value { a[j+1] = a[j] } else { break } } a[j+1] = value }}
A 收到 B 的ACK后,就进入FIN_WAIT_2状态。这时如果 B 直接跑路,则 A 将永远停留在这个状态。可以在 Linux 中调整tcp_fin_timeout这个参数,设置一个超时时间
如果 B 没有跑路,发送 “B 也不玩了” 的请求到达 A 时,A 发送 “知道 B 也不玩了” 的ACK后,从FIN_WAIT_2状态结束,进入TIME_WAIT状态,等待时间为2MSL(Maximum Segment Lifetime,报文最大生存时间)
最后还有一个异常情况就是,B 超过了2MSL的时间,仍然没有收到它发的FIN的ACK,按照 TCP 的原理,B 就会重发这个FIN,只不过当 A 再收到这个包之后,A 就直接发送RST回复给 B,这时候 B 就会知道 A 早就跑了
4. TCP 状态机
令人头秃的 TCP 状态机
5. TCP 如何保证传输可靠
TCP 协议为了保证包的顺序性,每一个包都有一个 ID。在建立连接的时候,会商定起始的 ID 是什么,然后按照 ID 一个个发送。为了保证不丢包,对于发送的包都要进行应答,但这个应答并不是一个一个来的,而是会应答某个之前的 ID,表示都收到了,这种模式称为累计确认或者累计应答(cumulative acknowledgment)。
为了记录所有发送的包和接收的包,TCP 也需要发送端和接收端分别都有缓存来保存这些记录。发送端里的缓存是按照包的 ID 一个个排列的,根据处理的情况分成四个部分:
ARP(Address Resolution Protocol,地址解析协议)是通过吼的方式来寻找目标 MAC 地址的,吼完之后记住一段时间,这个叫做缓存
交换机是有 MAC 学习能力的,学完就知道谁在哪儿,不用广播了
一个局域网里有多个交换机时,ARP 广播的模式容易产生广播风暴:ARP 广播时,交换机会将一个端口收到的包转发到其他所有的端口上。比如数据包经过交换机 A 到达交换机 B,交换机 B 又将包复制为多分广播出去。如果整个局域网存在一个环路,使得数据包又重新回到了最开始的交换机 A,这个包又会被 A 再次复制多份广播出去。如此循环,数据包会不停的转发,而且越来越多,最终占满带宽,或者使解析协议的硬件过载,形成广播风暴
2. 交换机与 VLAN
2.1 有两台交换机的拓扑结构
两台交换机连接三个局域网
2.2 环路问题
当两个交换机将两个局域网同时连接起来的时候,就会出现环路问题:
局域网的环路问题
此时就会出现之前提到的广播风暴。
2.3 STP 协议的基本概念
在数据结构中,有一个方法叫做最小生成树。在计算机网络中,生成树的算法叫做 STP(Spanning Tree Protocol)。
然后,由 ICMP 协议将这个数据包连同地址192.168.1.2一起交给 IP 层。IP 层将以192.168.1.2作为目的地址,本机 IP 地址作为源地址,加上一些其他控制信息,构建一个 IP 数据包。
接下来,需要加入 MAC 头。可在 ARP 映射表中查找 IP 地址对应的 MAC 地址,如果没有,则需要发送 ARP 协议查询 MAC 地址。获得 MAC 地址后,由数据链路层构建一个数据帧,目的地址是 IP 层传过来的 MAC 地址,源地址则是本机的 MAC 地址,附加上一些控制信息,最后将它们传送出去。
主机 B 收到这个数据帧后,先检查它的目的 MAC 地址,符合本机则接收,否则就丢弃。接收后检查该数据帧,将 IP 数据包从帧中提取出来,交给本机的 IP 层。同样,IP 层检查后,将有用的信息提取后交给 ICMP 协议。
主机 B 会构建一个 ICMP 应答包,应答数据包的类型字段为 0,顺序号为接收到的请求数据包中的顺序号,然后再发送出去给主机 A。
DHCP Discover:当一台新机器新加入一个网络的时候,只知道自己的 MAC 地址。这时需要在本地网络先吼一句“我来啦”,即向广播地址发送请求包
DHCP Offer:如果网络管理员在网络里面配置了 DHCP Server 的话,它就相当于这些 IP 的管理员。只有 MAC 唯一,IP 管理员才能知道这是一个新人,需要租给它一个 IP 地址。同时,DHCP Server 为此客户端保留为它提供的 IP 地址,从而不会为其他 DHCP 客户分配此 IP。DHCP Server 仍然使用广播地址作为目的地址,除此之外还发送了子网掩码、网关和 IP 地址租用期 等信息
DHCP Request:如果有多个 DHCP Server,新来的机器一般会选择最先到达的那个,并且会向网络发送一个 DHCP Request 广播数据包,包中包含客户端的 MAC 地址、接受的租约中的 IP 地址、提供此租约的 DHCP 服务器地址 等,并告诉所有 DHCP Server 它将接受哪一台服务器提供的 IP 地址
DHCP ACK:当 DHCP Server 接收到客户机的 DHCP Request 后,会广播返回给客户机一个 DHCP ACK 消息包,表明已经接受客户机的选择,并将这一 IP 地址的合法租用信息和其他的配置信息 都放入该广播包,发给客户机
最终租约达成的时候,还需要广播通知网络内的所有机器。
11. IP 地址的收回和续租
客户机会在租期过去 50% 的时候,直接向为其提供 IP 地址的 DHCP Server 发送 DHCP Request 消息包。客户机接收到服务器回应的 DHCP ACK 消息包,会根据包中所提供的新的租期以及其他已经更新的 TCP/IP 参数,更新自己的配置。这样,IP 租用更新就完成了。
继续来看四个复杂度分析方面的知识点:最好情况时间复杂度 (Best Case Time Complexity)、最坏情况时间复杂度 (Worst Case Time Complexity)、平均情况时间复杂度 (Average Case Time Complexity)、均摊时间复杂度 (Amortized Time Complexity)。
1. 最好、最坏情况时间复杂度
例如在一个无序数组array中查找变量x出现的位置:
// n 表示数组 array 的长度int find(int[] array, int n, int x) { int i = 0; int pos = -1; for (; i < n; ++i) { if (array[i] == x) { pos = i; break; } } return pos;}
int cal(int n) { int sum = 0; // 1 int i = 1; // 1 int j = 1; // 1 for (; i <= n; ++i) { // n j = 1; // n for (; j <= n; ++j) { // n^2 sum = sum + i * j; // n^2 } }}
整段代码的执行时间为T(n) = (2n^2 + 2n + 3) * unit_time。
可以看到,所有代码的执行时间T(n)与每行代码的执行次数成正比。
其中,
T(n):表示代码的执行时间
n:表示数据规模的大小
f(n):表示每行代码执行的次数总和
O:表示代码的执行时间T(n)与f(n)表达式成正比
大 O 时间复杂度实际上并不具体表示代码真正的执行时间,而是表示代码执行时间随数据规模增长的变化趋势,所以也叫做渐进时间复杂度 (Asymptotic Time Complexity),简称时间复杂度。
int cal(int m, int n) { int sum_1 = 0; int i = 1; for (; i < m; ++i) { sum_1 = sum_1 + i; } int sum_2 = 0; int j = 1; for (; j < n; ++j) { sum_2 = sum_2 + j; } return sum_1 + sum_2;}
~> vim /etc/fstab## /etc/fstab# Created by anaconda on Tue Nov 13 11:26:56 2018## Accessible filesystems, by reference, are maintained under '/dev/disk'# See man pages fstab(5), findfs(8), mount(8) and/or blkid(8) for more info#/dev/mapper/centos-root / xfs defaults 0 0UUID=aadb6c2e-8a99-46e5-b208-1eaee9944490 /boot xfs defaults 0 0UUID=4797-AB7E /boot/efi vfat umask=0077,shortname=winnt 0 0/dev/mapper/centos-home /home xfs defaults 0 0# /dev/mapper/centos-swap swap swap defaults 0 0
[Unit]Description=kubelet: The Kubernetes Node AgentDocumentation=https://kubernetes.io/docs/[Service]ExecStart=/usr/bin/kubeletRestart=alwaysStartLimitInterval=0RestartSec=10[Install]WantedBy=multi-user.target
# Note: This dropin only works with kubeadm and kubelet v1.11+[Service]Environment="KUBELET_KUBECONFIG_ARGS=--bootstrap-kubeconfig=/etc/kubernetes/bootstrap-kubelet.conf --kubeconfig=/etc/kubernetes/kubelet.conf"Environment="KUBELET_CONFIG_ARGS=--config=/var/lib/kubelet/config.yaml"# This is a file that "kubeadm init" and "kubeadm join" generates at runtime, populating the KUBELET_KUBEADM_ARGS variable dynamicallyEnvironmentFile=-/var/lib/kubelet/kubeadm-flags.env# This is a file that the user can use for overrides of the kubelet args as a last resort. Preferably, the user should use# the .NodeRegistration.KubeletExtraArgs object in the configuration files instead. KUBELET_EXTRA_ARGS should be sourced from this file.EnvironmentFile=-/etc/sysconfig/kubeletExecStart=ExecStart=/usr/bin/kubelet $KUBELET_KUBECONFIG_ARGS $KUBELET_CONFIG_ARGS $KUBELET_KUBEADM_ARGS $KUBELET_EXTRA_ARGS
最后使用systemctl enable kubelet启用服务:
~> systemctl enable kubeletCreated symlink from /etc/systemd/system/multi-user.target.wants/kubelet.service to /etc/systemd/system/kubelet.service.
Notes: Set/proc/sys/net/bridge/bridge-nf-call-iptablesto1by runningsysctl net.bridge.bridge-nf-call-iptables=1to pass bridged IPv4 traffic to iptables’ chains. This is a requirement for some CNI plugins to work, for more information please see here.
首先使用kubeadm init初始化集群,并传递--pod-network-cidr=10.244.0.0/16参数以指定 Pod 网络方案为flannel:
~> kubeadm init --pod-network-cidr=10.244.0.0/16[init] Using Kubernetes version: v1.13.3[preflight] Running pre-flight checks[preflight] Pulling images required for setting up a Kubernetes cluster[preflight] This might take a minute or two, depending on the speed of your internet connection[preflight] You can also perform this action in beforehand using 'kubeadm config images pull'[kubelet-start] Writing kubelet environment file with flags to file "/var/lib/kubelet/kubeadm-flags.env"[kubelet-start] Writing kubelet configuration to file "/var/lib/kubelet/config.yaml"[kubelet-start] Activating the kubelet service[certs] Using certificateDir folder "/etc/kubernetes/pki"[certs] Generating "front-proxy-ca" certificate and key[certs] Generating "front-proxy-client" certificate and key[certs] Generating "etcd/ca" certificate and key[certs] Generating "etcd/healthcheck-client" certificate and key[certs] Generating "apiserver-etcd-client" certificate and key[certs] Generating "etcd/server" certificate and key[certs] etcd/server serving cert is signed for DNS names [abelsu7-ubuntu localhost] and IPs [222.201.139.151 127.0.0.1 ::1][certs] Generating "etcd/peer" certificate and key[certs] etcd/peer serving cert is signed for DNS names [abelsu7-ubuntu localhost] and IPs [222.201.139.151 127.0.0.1 ::1][certs] Generating "ca" certificate and key[certs] Generating "apiserver" certificate and key[certs] apiserver serving cert is signed for DNS names [abelsu7-ubuntu kubernetes kubernetes.default kubernetes.default.svc kubernetes.default.svc.cluster.local] and IPs [10.96.0.1 222.201.139.151][certs] Generating "apiserver-kubelet-client" certificate and key[certs] Generating "sa" key and public key[kubeconfig] Using kubeconfig folder "/etc/kubernetes"[kubeconfig] Writing "admin.conf" kubeconfig file[kubeconfig] Writing "kubelet.conf" kubeconfig file[kubeconfig] Writing "controller-manager.conf" kubeconfig file[kubeconfig] Writing "scheduler.conf" kubeconfig file[control-plane] Using manifest folder "/etc/kubernetes/manifests"[control-plane] Creating static Pod manifest for "kube-apiserver"[control-plane] Creating static Pod manifest for "kube-controller-manager"[control-plane] Creating static Pod manifest for "kube-scheduler"[etcd] Creating static Pod manifest for local etcd in "/etc/kubernetes/manifests"[wait-control-plane] Waiting for the kubelet to boot up the control plane as static Pods from directory "/etc/kubernetes/manifests". This can take up to 4m0s[apiclient] All control plane components are healthy after 23.002540 seconds[uploadconfig] storing the configuration used in ConfigMap "kubeadm-config" in the "kube-system" Namespace[kubelet] Creating a ConfigMap "kubelet-config-1.13" in namespace kube-system with the configuration for the kubelets in the cluster[patchnode] Uploading the CRI Socket information "/var/run/dockershim.sock" to the Node API object "abelsu7-ubuntu" as an annotation[mark-control-plane] Marking the node abelsu7-ubuntu as control-plane by adding the label "node-role.kubernetes.io/master=''"[mark-control-plane] Marking the node abelsu7-ubuntu as control-plane by adding the taints [node-role.kubernetes.io/master:NoSchedule][bootstrap-token] Using token: ar8quq.bx68gpg2ktjzagk8[bootstrap-token] Configuring bootstrap tokens, cluster-info ConfigMap, RBAC Roles[bootstraptoken] configured RBAC rules to allow Node Bootstrap tokens to post CSRs in order for nodes to get long term certificate credentials[bootstraptoken] configured RBAC rules to allow the csrapprover controller automatically approve CSRs from a Node Bootstrap Token[bootstraptoken] configured RBAC rules to allow certificate rotation for all node client certificates in the cluster[bootstraptoken] creating the "cluster-info" ConfigMap in the "kube-public" namespace[addons] Applied essential addon: CoreDNS[addons] Applied essential addon: kube-proxyYour Kubernetes master has initialized successfully!To start using your cluster, you need to run the following as a regular user: mkdir -p $HOME/.kube sudo cp -i /etc/kubernetes/admin.conf $HOME/.kube/config sudo chown $(id -u):$(id -g) $HOME/.kube/configYou should now deploy a pod network to the cluster.Run "kubectl apply -f [podnetwork].yaml" with one of the options listed at: https://kubernetes.io/docs/concepts/cluster-administration/addons/You can now join any number of machines by running the following on each nodeas root: kubeadm join 222.201.139.151:6443 --token ar8quq.bx68gpg2ktjzagk8 --discovery-token-ca-cert-hash sha256:125083b871f062c8d4c0c7ab5cefee1ba0b74a6b3fb17c0c4b5ba4d591c1051d
~> kubectl cluster-infoKubernetes master is running at https://222.201.139.151:6443KubeDNS is running at https://222.201.139.151:6443/api/v1/namespaces/kube-system/services/kube-dns:dns/proxyTo further debug and diagnose cluster problems, use 'kubectl cluster-info dump'.~> kubectl get nodesNAME STATUS ROLES AGE VERSIONabelsu7-ubuntu Ready master 15m v1.13.3
~> kubeadm join 222.201.139.151:6443 --token ar8quq.bx68gpg2ktjzagk8 --discovery-token-ca-cert-hash sha256:125083b871f062c8d4c0c7ab5cefee1ba0b74a6b3fb17c0c4b5ba4d591c1051d[preflight] Running pre-flight checks [WARNING Service-Docker]: docker service is not enabled, please run 'systemctl enable docker.service' [WARNING SystemVerification]: this Docker version is not on the list of validated versions: 18.09.2. Latest validated version: 18.06 [WARNING Hostname]: hostname "centos-1" could not be reached [WARNING Hostname]: hostname "centos-1": lookup centos-1 on 222.201.130.30:53: no such host[discovery] Trying to connect to API Server "222.201.139.151:6443"[discovery] Created cluster-info discovery client, requesting info from "https://222.201.139.151:6443"[discovery] Requesting info from "https://222.201.139.151:6443" again to validate TLS against the pinned public key[discovery] Cluster info signature and contents are valid and TLS certificate validates against pinned roots, will use API Server "222.201.139.151:6443"[discovery] Successfully established connection with API Server "222.201.139.151:6443"[join] Reading configuration from the cluster...[join] FYI: You can look at this config file with 'kubectl -n kube-system get cm kubeadm-config -oyaml'[kubelet] Downloading configuration for the kubelet from the "kubelet-config-1.13" ConfigMap in the kube-system namespace[kubelet-start] Writing kubelet configuration to file "/var/lib/kubelet/config.yaml"[kubelet-start] Writing kubelet environment file with flags to file "/var/lib/kubelet/kubeadm-flags.env"[kubelet-start] Activating the kubelet service[tlsbootstrap] Waiting for the kubelet to perform the TLS Bootstrap...[patchnode] Uploading the CRI Socket information "/var/run/dockershim.sock" to the Node API object "centos-1" as an annotationThis node has joined the cluster:* Certificate signing request was sent to apiserver and a response was received.* The Kubelet was informed of the new secure connection details.Run 'kubectl get nodes' on the master to see this node join the cluster.
上述命令执行完成后,提示已经成功加入集群。
此时,在master上查看当前集群状态:
~> kubectl get nodesNAME STATUS ROLES AGE VERSIONabelsu7-ubuntu Ready master 26m v1.13.3centos-1 Ready <none> 24m v1.13.3centos-2 Ready <none> 16m v1.13.3
待更新
journalctl -f -u kubeletkubeadm resetcat /var/lib/kubelet/kubeadm-flags.envkubectl get pods --all-namespaceskubectl describe pod kube-flannel-ds-amd64-c2vnq --namespace=kube-system
> vim /etc/selinux/config# This file controls the state of SELinux on the system.# SELINUX= can take one of these three values:# enforcing - SELinux security policy is enforced.# permissive - SELinux prints warnings instead of enforcing.# disabled - No SELinux policy is loaded.SELINUX=disabled# SELINUXTYPE= can take one of three two values:# targeted - Targeted processes are protected,# minimum - Modification of targeted policy. Only selected processes are protected. # mls - Multi Level Security protection.SELINUXTYPE=targeted
~> git clone https://github.com/rofl0r/proxychains-ng.git~> cd proxychains-ng/~/proxychains-ng> ./configure --prefix=/usr --sysconfdir=/etc~/proxychains-ng> make && make install~/proxychains-ng> make install-config
## you'll need to enable it if you want to use an application that ## connects to localhost.# localnet 127.0.0.0/255.0.0.0## RFC1918 Private Address Ranges# localnet 10.0.0.0/255.0.0.0# localnet 172.16.0.0/255.240.0.0# localnet 192.168.0.0/255.255.0.0# ProxyList format# type ip port [user pass]# (values separated by 'tab' or 'blank')## only numeric ipv4 addresses are valid### Examples:## socks5 192.168.67.78 1080 lamer secret# http 192.168.89.3 8080 justu hidden# socks4 192.168.1.49 1080# http 192.168.39.93 8080 # ## proxy types: http, socks4, socks5# ( auth types supported: "basic"-http "user/pass"-socks )#[ProxyList]# add proxy here ...# meanwile# defaults set to "tor"socks5 127.0.0.1 1080
6. 设置 proxychains 别名
修改~/.bashrc,并设置 alias 别名:
# .bashrc# User specific aliases and functionsalias rm='rm -i'alias cp='cp -i'alias mv='mv -i'alias pc='proxychains4'# Source global definitionsif [ -f /etc/bashrc ]; then . /etc/bashrcfi
]]>
<blockquote>
<p><strong><em>Across the Great Wall we can reach every corner in the world.</em></strong></p>
</blockquote>
<figure class="image-bubble">
<div class="img-lightbox">
<div class="overlay"></div>
<img src="/2019/02/24/ssr-proxychains4-on-linux/cover.jpg" alt title>
</div>
<div class="image-caption"></div>
</figure>
Linux 安装 Shadowsocks 客户端https://abelsu7.top/2019/02/19/centos7-install-shadowsocks-client/2019-02-18T16:47:42.000Z2020-02-03T04:43:42.486Z
Across the Great Wall we can reach every corner in the world.
> mkdir -p /etc/shadowsocks> vim /etc/shadowsocks/config.json
添加如下内容:
{ "server": "x.x.x.x", # Server IP "server_port": 14131, # Server Port "local_address": "127.0.0.1", # Local IP "local_port": 1080, # Local Port "password": "password", # Your Password "timeout": 600, # Connection timeout "method": "aes-256-cfb", # Encryption method "fast_open": false, # Use TCP_FASTOPEN, requires Linux 3.7+ "workers": 1 # Number of worker threads}
]]>
<blockquote>
<p><strong><em>Across the Great Wall we can reach every corner in the world.</em></strong></p>
</blockquote>
<figure class="image-bubble">
<div class="img-lightbox">
<div class="overlay"></div>
<img src="/2019/02/19/centos7-install-shadowsocks-client/cover.jpg" alt title>
</div>
<div class="image-caption"></div>
</figure>
CentOS 7 调整 grub2 启动项顺序及等待时间https://abelsu7.top/2019/02/18/centos7-grub2/2019-02-18T06:12:31.000Z2019-09-01T13:04:11.006Z
> sudo yum repolist enabled | grep "mysql.*-community.*"mysql-connectors-community/x86_64 MySQL Connectors Community 95mysql-tools-community/x86_64 MySQL Tools Community 84mysql57-community/x86_64 MySQL 5.7 Community Server 327
2. yum 安装 MySQL
> sudo yum install mysql-community-server
3. 启动 MySQL
> sudo systemctl enable mysqld> sudo systemctl start mysqld> sudo systemctl status mysqld● mysqld.service - MySQL Server Loaded: loaded (/usr/lib/systemd/system/mysqld.service; enabled; vendor preset: disabled) Active: active (running) since Sat 2019-02-16 00:41:07 CST; 2 days ago Docs: man:mysqld(8) http://dev.mysql.com/doc/refman/en/using-systemd.html Main PID: 29143 (mysqld) Tasks: 31 Memory: 193.2M CGroup: /system.slice/mysqld.service └─29143 /usr/sbin/mysqld --daemonize --pid-file=/var/run/mysqld/mysqld.pidFeb 16 00:41:06 localhost.localdomain systemd[1]: Starting MySQL Server...Feb 16 00:41:07 localhost.localdomain systemd[1]: Started MySQL Server.
4. 修改 root 初始密码
MySQL 5.7 启动后,会在/var/log/mysqld.log文件中为用户root生成一个随机的初始密码。使用以下命令查看初始密码:
> grep 'temporary password' /var/log/mysqld.log2019-02-15T16:29:45.738097Z 1 [Note] A temporary password is generated for root@localhost: jHsg<YlYu5id
登录 MySQL 并修改密码:
> mysql -u root -pEnter password:mysql> ALTER USER 'root'@'localhost' IDENTIFIED BY 'MyNewPass4!';
MySQL 5.7 默认安装了密码安全检查插件(validate_password),默认密码检查策略要求密码必须包含:大小写字母、数字和特殊符号,并且长度不少于 8 位。
通过 MySQL 环境变量可以查看密码策略的相关信息:
mysql> SHOW VARIABLES LIKE 'validate_password%';+--------------------------------------+--------+| Variable_name | Value |+--------------------------------------+--------+| validate_password_check_user_name | OFF || validate_password_dictionary_file | || validate_password_length | 8 || validate_password_mixed_case_count | 1 || validate_password_number_count | 1 || validate_password_policy | MEDIUM || validate_password_special_char_count | 1 |+--------------------------------------+--------+7 rows in set (0.01 sec)
指定密码校验策略:
> sudo vi /etc/my.cnf[mysqld]# 添加如下键值对, 0=LOW, 1=MEDIUM, 2=STRONGvalidate_password_policy=0
禁用密码策略:
> sudo vi /etc/my.cnf[mysqld]# 禁用密码校验策略validate_password = off
重启 MySQL 服务,使配置生效:
sudo systemctl restart mysqld
5. 添加远程登录用户
MySQL 默认只允许root用户在本地登录。如果要从其他机器上连接 MySQL,必须允许root用户从远程登录,或者添加一个允许远程连接的账户。以下命令将添加一个新用户admin,并允许其从远程登录:
mysql> GRANT ALL PRIVILEGES ON *.* TO 'admin'@'%' IDENTIFIED BY 'secret' WITH GRANT OPTION;
如果需要修改权限允许root远程登录,则先以root用户登录 MySQL,再进行如下操作:
mysql> USE mysql;Database changedmysql> SELECT User, Host -> FROM user;+-----------+---------------+| Host | User |+-----------+---------------+| % | admin || localhost | mysql.session || localhost | mysql.sys || localhost | root |+-----------+---------------+4 rows in set (0.02 sec)mysql> UPDATE user -> SET Host = '%' -> WHERE User = 'root';Query OK, 1 row affected (0.04 sec)Rows matched: 1 Changed: 1 Warnings: 0mysql> SELECT User, Host -> FROM user;+-----------+---------------+| Host | User |+-----------+---------------+| % | admin || % | root || localhost | mysql.session || localhost | mysql.sys |+-----------+---------------+4 rows in set (0.00 sec)
6. 配置默认编码为 UTF-8
MySQL 默认编码为latin1,查看字符集:
mysql> SHOW VARIABLES LIKE 'character%';+--------------------------+----------------------------+| Variable_name | Value |+--------------------------+----------------------------+| character_set_client | utf8 || character_set_connection | utf8 || character_set_database | latin1 || character_set_filesystem | binary || character_set_results | utf8 || character_set_server | latin1 || character_set_system | utf8 || character_sets_dir | /usr/share/mysql/charsets/ |+--------------------------+----------------------------+8 rows in set (0.00 sec)
在配置文件/etc/my.cnf中将其修改为utf8:
> vim /etc/my.cnf[mysqld]# 在myslqd下添加如下键值对character_set_server=utf8init_connect='SET NAMES utf8'
重启 MySQL,使配置生效:
> sudo systemctl restart mysqld
再次查看字符集:
mysql> SHOW VARIABLES LIKE 'character%';+--------------------------+----------------------------+| Variable_name | Value |+--------------------------+----------------------------+| character_set_client | utf8 || character_set_connection | utf8 || character_set_database | utf8 || character_set_filesystem | binary || character_set_results | utf8 || character_set_server | utf8 || character_set_system | utf8 || character_sets_dir | /usr/share/mysql/charsets/ |+--------------------------+----------------------------+8 rows in set (0.00 sec)
package timer;/** @version 1.01 2015-05-12 @author Cay Horstmann*/import java.awt.*;import java.awt.event.*;import java.util.*;import javax.swing.*;import javax.swing.Timer; // to resolve conflict with java.util.Timerpublic class TimerTest{ public static void main(String[] args) { ActionListener listener = new TimePrinter(); // construct a timer that calls the listener // once every 10 seconds Timer t = new Timer(10000, listener); t.start(); JOptionPane.showMessageDialog(null, "Quit program?"); System.exit(0); }}class TimePrinter implements ActionListener{ public void actionPerformed(ActionEvent event) { System.out.println("At the tone, the time is " + new Date()); Toolkit.getDefaultToolkit().beep(); }}
// java.util.Arrays// 如果两个数组长度相同,并且在对应的位置上数据元素也均相同,则返回 truestatic boolean equals(type[] a, type[] b)// java.util.Objects// 如果 a 和 b 都为 null,返回 true;如果只有其中之一为 null,则返回 false;否则返回 a.equals(b)static boolean equals(Object a, Object b)
2.3 hashCode 方法
散列码(hash code)是由对象导出的一个整型值。散列码是没有规律的,如果 x 和 y 是两个不同的对象,那么x.hashCode()和y.hashCode()基本上不会相同。
public static double max(double... values) { double largest = Double.NEGATIVE_INFINITY; for (double v : values) { if (v > largest) { largest = v; } } return largest;}
获得 Class 类对象的第三种方法非常简单:如果 T 是任意的 Java 类型(或 void 关键字),T.class将代表匹配的类的对象:
Class cl1 = Random.class; // if you import java.util.*;Class cl2 = int.class;Class cl3 = Double[].class;
虚拟机为每个类型管理一个 Class 对象。因此,可以利用==运算符实现两个类对象比较的操作:
if (e.getClass() == Employee.class) ...
另一个很有用的方法newInstance()可以用来动态的创建一个类的实例:
String s = "java.util.Random";Object m = Class.forName(s).newInstance();
7.2 捕获异常
try { String name = ...; // get class name Class cl = Class.forName(name); // might throw exception do something with cl} catch (Exception e) { e.printStackTrace();}
7.3 利用反射分析类的能力
反射机制最重要的内容——检查类的结构。
package reflection;import java.util.*;import java.lang.reflect.*;/** * This program uses reflection to print all features of a class. * @version 1.1 2004-02-21 * @author Cay Horstmann */public class ReflectionTest{ public static void main(String[] args) { // read class name from command line args or user input String name; if (args.length > 0) name = args[0]; else { Scanner in = new Scanner(System.in); System.out.println("Enter class name (e.g. java.util.Date): "); name = in.next(); } try { // print class name and superclass name (if != Object) Class cl = Class.forName(name); Class supercl = cl.getSuperclass(); String modifiers = Modifier.toString(cl.getModifiers()); if (modifiers.length() > 0) System.out.print(modifiers + " "); System.out.print("class " + name); if (supercl != null && supercl != Object.class) System.out.print(" extends " + supercl.getName()); System.out.print("\n{\n"); printConstructors(cl); System.out.println(); printMethods(cl); System.out.println(); printFields(cl); System.out.println("}"); } catch (ClassNotFoundException e) { e.printStackTrace(); } System.exit(0); } /** * Prints all constructors of a class * @param cl a class */ public static void printConstructors(Class cl) { Constructor[] constructors = cl.getDeclaredConstructors(); for (Constructor c : constructors) { String name = c.getName(); System.out.print(" "); String modifiers = Modifier.toString(c.getModifiers()); if (modifiers.length() > 0) System.out.print(modifiers + " "); System.out.print(name + "("); // print parameter types Class[] paramTypes = c.getParameterTypes(); for (int j = 0; j < paramTypes.length; j++) { if (j > 0) System.out.print(", "); System.out.print(paramTypes[j].getName()); } System.out.println(");"); } } /** * Prints all methods of a class * @param cl a class */ public static void printMethods(Class cl) { Method[] methods = cl.getDeclaredMethods(); for (Method m : methods) { Class retType = m.getReturnType(); String name = m.getName(); System.out.print(" "); // print modifiers, return type and method name String modifiers = Modifier.toString(m.getModifiers()); if (modifiers.length() > 0) System.out.print(modifiers + " "); System.out.print(retType.getName() + " " + name + "("); // print parameter types Class[] paramTypes = m.getParameterTypes(); for (int j = 0; j < paramTypes.length; j++) { if (j > 0) System.out.print(", "); System.out.print(paramTypes[j].getName()); } System.out.println(");"); } } /** * Prints all fields of a class * @param cl a class */ public static void printFields(Class cl) { Field[] fields = cl.getDeclaredFields(); for (Field f : fields) { Class type = f.getType(); String name = f.getName(); System.out.print(" "); String modifiers = Modifier.toString(f.getModifiers()); if (modifiers.length() > 0) System.out.print(modifiers + " "); System.out.println(type.getName() + " " + name + ";"); } }}
7.4 在运行时使用反射分析对象
ObjectAnalyzer.java:
package objectAnalyzer;import java.lang.reflect.AccessibleObject;import java.lang.reflect.Array;import java.lang.reflect.Field;import java.lang.reflect.Modifier;import java.util.ArrayList;public class ObjectAnalyzer{ private ArrayList<Object> visited = new ArrayList<>(); /** * Converts an object to a string representation that lists all fields. * @param obj an object * @return a string with the object's class name and all field names and * values */ public String toString(Object obj) { if (obj == null) return "null"; if (visited.contains(obj)) return "..."; visited.add(obj); Class cl = obj.getClass(); if (cl == String.class) return (String) obj; if (cl.isArray()) { String r = cl.getComponentType() + "[]{"; for (int i = 0; i < Array.getLength(obj); i++) { if (i > 0) r += ","; Object val = Array.get(obj, i); if (cl.getComponentType().isPrimitive()) r += val; else r += toString(val); } return r + "}"; } String r = cl.getName(); // inspect the fields of this class and all superclasses do { r += "["; Field[] fields = cl.getDeclaredFields(); AccessibleObject.setAccessible(fields, true); // get the names and values of all fields for (Field f : fields) { if (!Modifier.isStatic(f.getModifiers())) { if (!r.endsWith("[")) r += ","; r += f.getName() + "="; try { Class t = f.getType(); Object val = f.get(obj); if (t.isPrimitive()) r += val; else r += toString(val); } catch (Exception e) { e.printStackTrace(); } } } r += "]"; cl = cl.getSuperclass(); } while (cl != null); return r; }}
ObjectAnalyzerTest.java:
package objectAnalyzer;import java.util.ArrayList;/** * This program uses reflection to spy on objects. * @version 1.12 2012-01-26 * @author Cay Horstmann */public class ObjectAnalyzerTest{ public static void main(String[] args) { ArrayList<Integer> squares = new ArrayList<>(); for (int i = 1; i <= 5; i++) squares.add(i * i); System.out.println(new ObjectAnalyzer().toString(squares)); }}
7.5 使用反射编写泛型数组代码
package arrays;import java.lang.reflect.*;import java.util.*;/** * This program demonstrates the use of reflection for manipulating arrays. * @version 1.2 2012-05-04 * @author Cay Horstmann */public class CopyOfTest{ public static void main(String[] args) { int[] a = { 1, 2, 3 }; a = (int[]) goodCopyOf(a, 10); System.out.println(Arrays.toString(a)); String[] b = { "Tom", "Dick", "Harry" }; b = (String[]) goodCopyOf(b, 10); System.out.println(Arrays.toString(b)); System.out.println("The following call will generate an exception."); b = (String[]) badCopyOf(b, 10); } /** * This method attempts to grow an array by allocating a new array and copying all elements. * @param a the array to grow * @param newLength the new length * @return a larger array that contains all elements of a. However, the returned array has * type Object[], not the same type as a */ public static Object[] badCopyOf(Object[] a, int newLength) // not useful { Object[] newArray = new Object[newLength]; System.arraycopy(a, 0, newArray, 0, Math.min(a.length, newLength)); return newArray; } /** * This method grows an array by allocating a new array of the same type and * copying all elements. * @param a the array to grow. This can be an object array or a primitive * type array * @return a larger array that contains all elements of a. */ public static Object goodCopyOf(Object a, int newLength) { Class cl = a.getClass(); if (!cl.isArray()) return null; Class componentType = cl.getComponentType(); int length = Array.getLength(a); Object newArray = Array.newInstance(componentType, newLength); System.arraycopy(a, 0, newArray, 0, Math.min(length, newLength)); return newArray; }}
7.6 调用任意方法
java.lang.reflect.Method:
public Object invoke(Object implicitParameter, Object[] explicitParameters)// 调用这个对象所描述的方法,传递给定参数,并返回方法的返回值// 对于静态方法,把 null 作为隐式参数传递
MethodTableTest.java:
package methods;import java.lang.reflect.*;/** * This program shows how to invoke methods through reflection. * @version 1.2 2012-05-04 * @author Cay Horstmann */public class MethodTableTest{ public static void main(String[] args) throws Exception { // get method pointers to the square and sqrt methods Method square = MethodTableTest.class.getMethod("square", double.class); Method sqrt = Math.class.getMethod("sqrt", double.class); // print tables of x- and y-values printTable(1, 10, 10, square); printTable(1, 10, 10, sqrt); } /** * Returns the square of a number * @param x a number * @return x squared */ public static double square(double x) { return x * x; } /** * Prints a table with x- and y-values for a method * @param from the lower bound for the x-values * @param to the upper bound for the x-values * @param n the number of rows in the table * @param f a method with a double parameter and double return value */ public static void printTable(double from, double to, int n, Method f) { // print out the method as table header System.out.println(f); double dx = (to - from) / (n - 1); for (double x = from; x <= to; x += dx) { try { double y = (Double) f.invoke(null, x); System.out.printf("%10.4f | %10.4f%n", x, y); } catch (Exception e) { e.printStackTrace(); } } }}
class Employee { private static int nextId; private int id = assignId(); ... private static int assignId() { int r = nextId; nextId++; return r; } ...}
6.5 参数名
public Employee(String aName, double aSalary) { name = aName; salary = aSalary;}
> sudo docker run hello-worldHello from Docker!This message shows that your installation appears to be working correctly.To generate this message, Docker took the following steps: 1. The Docker client contacted the Docker daemon. 2. The Docker daemon pulled the "hello-world" image from the Docker Hub. (amd64) 3. The Docker daemon created a new container from that image which runs the executable that produces the output you are currently reading. 4. The Docker daemon streamed that output to the Docker client, which sent it to your terminal.To try something more ambitious, you can run an Ubuntu container with: $ docker run -it ubuntu bashShare images, automate workflows, and more with a free Docker ID: https://hub.docker.com/For more examples and ideas, visit: https://docs.docker.com/get-started/
> sudo docker run hello-worldHello from Docker!This message shows that your installation appears to be working correctly.To generate this message, Docker took the following steps: 1. The Docker client contacted the Docker daemon. 2. The Docker daemon pulled the "hello-world" image from the Docker Hub. (amd64) 3. The Docker daemon created a new container from that image which runs the executable that produces the output you are currently reading. 4. The Docker daemon streamed that output to the Docker client, which sent it to your terminal.To try something more ambitious, you can run an Ubuntu container with: $ docker run -it ubuntu bashShare images, automate workflows, and more with a free Docker ID: https://hub.docker.com/For more examples and ideas, visit: https://docs.docker.com/get-started/
> curl -fsSL https://get.docker.com -o get-docker.sh> sudo sh get-docker.sh<output truncated>
如果需要让非root用户使用 Docker,则使用以下命令将用户添加至docker用户组:
> sudo usermod -aG docker your-user
注销并重新登录,即可生效。之后启动 Docker:
> sudo systemctl start docker
运行hello-world镜像以验证 Docker 是否正确安装:
> sudo docker run hello-worldHello from Docker!This message shows that your installation appears to be working correctly.To generate this message, Docker took the following steps: 1. The Docker client contacted the Docker daemon. 2. The Docker daemon pulled the "hello-world" image from the Docker Hub. (amd64) 3. The Docker daemon created a new container from that image which runs the executable that produces the output you are currently reading. 4. The Docker daemon streamed that output to the Docker client, which sent it to your terminal.To try something more ambitious, you can run an Ubuntu container with: $ docker run -it ubuntu bashShare images, automate workflows, and more with a free Docker ID: https://hub.docker.com/For more examples and ideas, visit: https://docs.docker.com/get-started/
public class FirstSample{ public static void main(String[] args) { System.out.println("We will not use 'Hello, World!'"); }}
2. 注释
使用//或/* */。第 3 种注释以/**开始,以*/结束,可以用来自动生成文档:
/** * This is the first sample program in Core Java Chapter 3 * @version 1.01 1997-03-22 * @author Gary Cornell */public class FirstSample{ public static void main(String[] args) { System.out.println("We will not use 'Hello, World!'"); }}
char 类型的字面量值要用单引号括起来。例如:'A'是编码值为 65 所对应的字符常量,它与"A"不同,"A"是包含一个字符 A 的字符串。
char 类型可以表示为十六进制,其范围从\u0000到\uffff。
转义序列
名称
Unicode 值
\b
退格
\u0008
\t
制表
\u0009
\n
换行
\u000a
\r
回车
\u000d
\”
双引号
\u0022
\’
单引号
\u0027
\\
反斜杠
\u005c
特别注意:
Unicode 转义序列会在解析代码之前得到处理
更隐秘的,一定要当心注释中的\u,例如// Look inside c:\users
3.4 Unicode 和 char 类型
码点(code point)是指与一个编码表中的某个字符对应的代码值。在 Unicode 标准中,码点采用十六进制书写,并加上前缀U+,例如U+0041就是拉丁字母 A 的码点。
在 Java 中,char 类型描述了 UTF-16 编码中的一个代码单元。
3.5 boolean 类型
boolean(布尔)类型有两个值:false 和 true,用来判定逻辑条件。
整型值和布尔值之间不能进行相互转换。
4. 变量
在 Java 中,每个变量都有一个类型,变量名必须是一个以字母开头并由字母或数字构成的序列。
可以使用 Character 类的isJavaIdentifierStart和isJavaIdentifierPart方法来检查那些 Unicode 字符属于 Java 中的字母。 另外,不要在代码中使用$字符,它只用在 Java 编译器或其他工具生成的名字中。
4.1 变量初始化
在 Java 中,变量的声明尽可能的靠近变量第一次使用的地方,这是一种良好的程序编写风格。
声明一个变量后,必须使用赋值语句对变量进行显式初始化,使用未初始化的变量编译器会报错:
int vacationDays;System.out.println(vacationDays); // ERROR--variable not initialized
4.2 常量
关键字 final 用来指示常量:
final double PI = 3.14;
final 表示这个变量只能被赋值一次,一旦被赋值之后,就不能够再更改了。习惯上,常量名使用全大写。
在 Java 中,经常希望某个常量可以在一个类中的多个方法使用,通常将这些常量称为类常量,可以使用关键字 static final 来修饰:
public class Main { public static final double CM_PER_INCH = 2.54; public static void main(String[] args) { double paperWidth = 8.5; double paperHeight = 11; System.out.println("Paper size in centimeters: " + paperWidth * CM_PER_INCH + " by " + paperHeight * CM_PER_INCH); }}------Paper size in centimeters: 21.59 by 27.94
import java.util.*;/** * This program demonstrates console input. * @version 1.10 2004-02-10 * @author Cay Horstmann */public class InputTest{ public static void main(String[] args) { Scanner in = new Scanner(System.in); // get first input System.out.print("What is your name? "); String name = in.nextLine(); // get second input System.out.print("How old are you? "); int age = in.nextInt(); // display output on console System.out.println("Hello, " + name + ". Next year, you'll be " + (age + 1)); }}
import java.util.*;/** * This program demonstrates a <code>do/while</code> loop. * @version 1.20 2004-02-10 * @author Cay Horstmann */public class Retirement2{ public static void main(String[] args) { Scanner in = new Scanner(System.in); System.out.print("How much money will you contribute every year? "); double payment = in.nextDouble(); System.out.print("Interest rate in %: "); double interestRate = in.nextDouble(); double balance = 0; int year = 0; String input; // update account balance while user isn't ready to retire do { // add this year's payment and interest balance += payment; double interest = balance * interestRate / 100; balance += interest; year++; // print current balance System.out.printf("After year %d, your balance is %,.2f%n", year, balance); // ask if ready to retire and get input System.out.print("Ready to retire? (Y/N) "); input = in.next(); } while (input.equalsIgnoreCase("N")); }}
8.3 for 循环
for 语句的第 1 部分通常用于对计数器初始化;第 2 部分给出每次新一轮循环执行前要检测的循环条件;第 3 部分指示如何更新计数器。
for 语句也可以看作 while 语句的一种简化形式。
for (int i = 10; i > 0; i--) { System.out.println("Counting down..." + i);}System.out.println("Blastoff!");
8.4 switch 语句
Scanner in = new Scanner(System.in);System.out.print("Select an option (1, 2, 3, 4) ");int choice = in.nextInt();switch (choice) { case 1: // do something break; case 2: // do something break; case 3: // do something break; case 4: // do something break; default: // bad input break;}
如果在某个 case 分支语句的末尾没有 break 语句,那么就会接着执行下一个 case 分支语句,这种情况很容易引发错误。可以在编译代码时加上-Xlint:fallthrough选项:
Scanner in = new Scanner(System.in);int n;read_data:while (...) { // this loop statement is tagged with the label ... for (...) { // this inner loop is not labeled System.out.print("Enter a number >=0: "); n = in.nextInt(); if (n < 0) { // should never happen - can't go on break read_data; // break out of read_data loop } ... }}// this statement is executed immediately after the labeled breakif (n < 0) { // check for bad situation // deal with bad situation} else { // carry out normal processing}
Scanner in = new Scanner(System.in);while (sum < goal) { System.out.print("Enter a number: "); n = in.nextInt(); if (n < 0) continue; sum += n; // not executed if n < 0}
for (count = 1; count <= 100; count++) { System.out.print("Enter a number, -1 to quit: "); n = in.nextInt(); if (n < 0) continue; sum += n; // not executed if n < 0}
每一个 Java 应用程序都有一个带String[] args参数的 main 方法。这个参数表明 main 方法将接收一个字符串数组,也就是命令行参数。例如:
public class Message { public static void main(String[] args) { if (args.length == 0 || args[0].equals("-h")) { System.out.print("Hello,"); } else if (args[0].equals("-g")) { System.out.print("Goodbye,"); } // print the other command-line arguments for (int i = 1; i < args.length; i++) { System.out.print(" " + args[i]); } System.out.println("!"); }}
import java.util.Arrays;import java.util.Scanner;/** * This program demonstrates array manipulation. * * @author Cay Horstmann * @version 1.20 2004-02-10 */public class LotteryDrawing { public static void main(String[] args) { Scanner in = new Scanner(System.in); System.out.print("How many numbers do you need to draw? "); int k = in.nextInt(); System.out.print("What is the highest number you can draw? "); int n = in.nextInt(); // fill an array with numbers 1 2 3 ... n int[] numbers = new int[n]; for (int i = 0; i < numbers.length; i++) { numbers[i] = i + 1; } // draw k numbers and put them into a second array int[] result = new int[k]; for (int i = 0; i < result.length; i++) { // make a random index between 0 and n - 1 int r = (int) (Math.random() * n); // pick the element at the random location result[i] = numbers[r]; // move the last element into the random location numbers[r] = numbers[n - 1]; n--; } // print the sorted array Arrays.sort(result); System.out.println("Bet the following combination. It'll make you rich!"); for (int r : result) { System.out.println(r); } }}------ How many numbers do you need to draw? 6What is the highest number you can draw? 49Bet the following combination. It'll make you rich!278173438
数组类 Arrays 的常用方法如下:
static String toString(type[] a)static type copyOf(type[] a, int length)static type copyOfRange(type[] a, int start, int end) // 包含 start, 不包含 endstatic void sort(type[] a) // 采用优化的快速排序static int binarySearch(type[] a, type v)static int binarySearch(type[] a, int start, int end, type v) // 二分查找值 v。成功则返回下标值,否则返回一个负数static void fill(type[] a, type v) // a 与 v 数据元素类型相同static boolean equals(type[] a, type[] b) // 如果两个数组大小相同、下标相同的元素都对应相等,则返回 true
> docker ps -aCONTAINER ID IMAGE COMMAND CREATED STATUS PORTS NAMES8befe85aa9b2 ubuntu "/bin/bash" 4 minutes ago Exited (0) 4 minutes ago elegant_hawkingeb9dda25b0fe ubuntu:latest "/bin/bash" About an hour ago Exited (0) About an hour ago mytest33be0880de8a ubuntu "echo 'Hello Docker'" About an hour ago Exited (0) About an hour ago loving_neumann9dbd65001cc2 ubuntu "echo hello" About an hour ago Exited (0) About an hour ago zealous_mendeleevee10555e84be hello-world "/hello" About an hour ago Exited (0) About an hour ago friendly_mestorf4219345c98a0 ubuntu-with-vi-dockerfile "/bin/bash" 2 months ago Exited (0) 2 months ago ecstatic_wilson7257b9828da4 centos "/bin/bash" 2 months ago Exited (0) 2 months ago hopeful_chaplygin26119a6e11bd centos "/bin/bash" 2 months ago Exited (0) 2 months ago brave_khoranaf48bc1339340 ubuntu-with-vi "/bin/bash" 2 months ago Exited (127) 2 months ago agitated_hugle1abe6e7341ca ubuntu "/bin/bash" 2 months ago Exited (0) 2 months ago laughing_leavitt5c5eabb13be4 hello-world "/hello" 2 months ago Exited (0) 2 months ago eloquent_wiles8f2f6854078c 2cb0d9787c4d "/hello" 4 months ago Exited (0) 4 months ago goofy_sinoussi> docker ps -lCONTAINER ID IMAGE COMMAND CREATED STATUS PORTS NAMES8befe85aa9b2 ubuntu "/bin/bash" 6 minutes ago Exited (0) 6 minutes ago elegant_hawking
> docker pull ubuntu> docker pull django> docker pull haproxy> docker pull redis> docker imagesREPOSITORY TAG IMAGE ID CREATED SIZEhaproxy latest d23194a3929a 40 hours ago 72MBredis latest 5d2989ac9711 12 days ago 95MBubuntu latest 1d9c17228a9e 12 days ago 86.7MBdjango latest eb40dcf64078 2 years ago 436MB
> docker psCONTAINER ID IMAGE COMMAND CREATED STATUS PORTS NAMES733e71e16ac5 haproxy "/docker-entrypoint.…" 30 seconds ago Up 29 seconds 0.0.0.0:6301->6301/tcp HAProxy3f91ac2a23a6 django "/bin/bash" 47 seconds ago Up 46 seconds APP2e94c7ff2c319 django "/bin/bash" 3 minutes ago Up 3 minutes APP15e7994e6ad59 redis "docker-entrypoint.s…" 5 minutes ago Up 4 minutes 6379/tcp redis-slave26fac6db730c3 redis "docker-entrypoint.s…" 8 minutes ago Up 8 minutes 6379/tcp redis-slave1936c426faa29 redis "docker-entrypoint.s…" 8 minutes ago Up 8 minutes 6379/tcp redis-master
> cd /var/lib/docker/volumes/a77509a99df7d7a9d78313c1a1bb19619bac98fedadd78dbab17f072a49a905c/_data> cp <your-own-redis-dir>/redis.conf redis.conf> vim redis.conf
对于 Redis 主数据库,需要修改模板文件中的如下几个参数:
daemonize yespidfile /var/run/redis.pidprotected-mode no # 关闭保护模式
> redis-cli127.0.0.1:6379> info replication# Replicationrole:masterconnected_slaves:2slave0:ip=172.17.0.3,port=6379,state=online,offset=1260,lag=0slave1:ip=172.17.0.4,port=6379,state=online,offset=1260,lag=0master_replid:295c948cc1bbdf21eb49fdd8417ba5b4b76fc32bmaster_replid2:0000000000000000000000000000000000000000master_repl_offset:1260second_repl_offset:-1repl_backlog_active:1repl_backlog_size:1048576repl_backlog_first_byte_offset:1repl_backlog_histlen:1260127.0.0.1:6379> set master 936cOK127.0.0.1:6379> get master"936c"
> redis-cli127.0.0.1:6379> info replication# Replicationrole:slavemaster_host:mastermaster_port:6379master_link_status:upmaster_last_io_seconds_ago:3master_sync_in_progress:0slave_repl_offset:1330slave_priority:100slave_read_only:1connected_slaves:0master_replid:295c948cc1bbdf21eb49fdd8417ba5b4b76fc32bmaster_replid2:0000000000000000000000000000000000000000master_repl_offset:1330second_repl_offset:-1repl_backlog_active:1repl_backlog_size:1048576repl_backlog_first_byte_offset:127repl_backlog_histlen:1204127.0.0.1:6379> get master"936c"
> pythonPython 3.4.5 (default, Dec 14 2016, 18:54:20) [GCC 4.9.2] on linuxType "help", "copyright", "credits" or "license" for more information.>>> import redis>>> print(redis.__file__)/usr/local/lib/python3.4/site-packages/redis/__init__.py
如果没有报错,就说明已经可以使用 Python 语言来调用 Redis 数据库。接下来开始创建 Web 程序。以APP1为例,首先在容器的 volume 目录/usr/src/app/下创建 APP:
# 在容器内> cd /usr/src/app/> mkdir dockerweb> cd dockerweb/> django-admin.py startproject redisweb> lsredisweb> cd redisweb> lsmanage.py redisweb> python manage.py startapp helloworld> lshelloworld manage.py redisweb
> python manage.py makemigrationsNo changes detected> python manage.py migrateOperations to perform: Apply all migrations: admin, auth, contenttypes, sessionsRunning migrations: Applying contenttypes.0001_initial... OK Applying auth.0001_initial... OK Applying admin.0001_initial... OK Applying admin.0002_logentry_remove_auto_add... OK Applying contenttypes.0002_remove_content_type_name... OK Applying auth.0002_alter_permission_name_max_length... OK Applying auth.0003_alter_user_email_max_length... OK Applying auth.0004_alter_user_username_opts... OK Applying auth.0005_alter_user_last_login_null... OK Applying auth.0006_require_contenttypes_0002... OK Applying auth.0007_alter_validators_add_error_messages... OK Applying auth.0008_alter_user_username_max_length... OK Applying sessions.0001_initial... OK> python manage.py createsuperuserUsername (leave blank to use 'root'): adminEmail address: admin@gmail.comPassword: Password (again): Superuser created successfully.
在启动 APP 的 Web 服务器时,可以指定服务器的端口和 IP 地址。为了通过 HAProxy 容器节点接受外网所有的公共 IP 地址访问,实现负载均衡,需要指定服务器的 IP 地址和端口。对于APP1使用 8001 端口,而APP2则使用 8002 端口。同时,都使用0.0.0.0地址。以APP1为例,启动服务器的过程如下:
> python manage.py runserver 0.0.0.0:8001Performing system checks...System check identified no issues (0 silenced).January 11, 2019 - 03:35:58Django version 1.10.4, using settings 'redisweb.settings'Starting development server at http://0.0.0.0:8001/Quit the server with CONTROL-C.[11/Jan/2019 03:37:01] "GET /helloworld HTTP/1.1" 200 3999[11/Jan/2019 03:37:14] "GET /admin/ HTTP/1.1" 200 2779...
明确了分区类型的概念之后,安装 CentOS 时还需要制订一个分区方案。在 Windows 系统中,不同的分区被 C、D、E 等盘符替代。但在 Linux 系统中没有盘符的概念,不同的分区被挂载在不同的目录下,目录称为挂载点。只要进入挂载点目录就进入了相应的分区,这样做的好处是用户可以根据需求为某个目录单独扩展空间。
很多著名的计算机语言都是那么一两个人业余时间捣鼓出来的,但是 Go 语言是 Google 养着一帮团队打造出来的。这个团队非常豪华,它被称之为 Go Team,成员之一就有大名鼎鼎的 Unix 操作系统的创造者 Ken Thompson,C 语言就是他和已经过世的 Dennis Ritchie 一起发明的。
package mainimport "fmt"func main() { // 有符号整数,可以表示正负 var a int8 = 1 // 1 字节 var b int16 = 2 // 2 字节 var c int32 = 3 // 4 字节 var d int64 = 4 // 8 字节 fmt.Println(a, b, c, d) // 无符号整数,只能表示非负数 var ua uint8 = 1 var ub uint16 = 2 var uc uint32 = 3 var ud uint64 = 4 fmt.Println(ua, ub, uc, ud) // int 类型,在32位机器上占4个字节,在64位机器上占8个字节 var e int = 5 var ue uint = 5 fmt.Println(e, ue) // bool 类型 var f bool = true fmt.Println(f) // 字节类型 var j byte = 'a' fmt.Println(j) // 字符串类型 var g string = "abcdefg" fmt.Println(g) // 浮点数 var h float32 = 3.14 var i float64 = 3.141592653 fmt.Println(h, i)}-------------1 2 3 41 2 3 45 5trueabcdefg3.14 3.14159265397
package mainimport "fmt"func main() { fmt.Println(sign(max(min(24, 42), max(24, 42))))}func max(a int, b int) int { if a > b { return a } return b}func min(a int, b int) int { if a < b { return a } return b}func sign(a int) int { if a > 0 { return 1 } else if a < 0 { return -1 } else { return 0 }}------------1
package mainimport "fmt"func main() { var squares [9]int for i := 0; i < len(squares); i++ { squares[i] = (i + 1) * (i + 1) } fmt.Println(squares)}--------------------[1 4 9 16 25 36 49 64 81]
数组的下标越界检查
Go 语言会对数组访问下标越界进行编译器检查:
package mainimport "fmt"func main() { var a = [5]int{1,2,3,4,5} a[101] = 255 fmt.Println(a)}-----./main.go:7:3: invalid array index 101 (out of bounds for 5-element array)
而当数组下标是变量时,Go 会在编译后的代码中插入下标越界检查的逻辑,在运行时也会提示数组下标越界。所以数组的下标访问效率是要打折扣的,比不上 C 语言的数组访问性能。
package mainimport "fmt"func main() { var a = [5]int{1,2,3,4,5} var b = 101 a[b] = 255 fmt.Println(a)}------------panic: runtime error: index out of rangegoroutine 1 [running]:main.main() /Users/qianwp/go/src/github.com/pyloque/practice/main.go:8 +0x3dexit status 2
package mainimport "fmt"func main() { var a = [5]int{1,2,3,4,5} for index := range a { fmt.Println(index, a[index]) } for index, value := range a { fmt.Println(index, value) }}------------0 11 22 33 44 50 11 22 33 44 5
package mainimport "fmt"func main() { var s = []int{1,2,3,4,5} for index := range s { fmt.Println(index, s[index]) } for index, value := range s { fmt.Println(index, value) }}--------0 11 22 33 44 50 11 22 33 44 5
正是因为切片追加后是新的切片变量,所以 Go 编译器禁止追加了切片后不使用这个新的切片变量,以避免用户以为追加操作的返回值和原切片变量是同一个变量。
package mainimport "fmt"func main() { var s1 = []int{1,2,3,4,5} append(s1, 6) fmt.Println(s1)}--------------./main.go:7:8: append(s1, 6) evaluated but not used
如果真的不需要使用这个新的变量,可以将 append 的结果赋值给下划线变量_。
下划线变量_是 Go 语言特殊的内置变量,它就像一个黑洞,可以将任意变量赋值给它,但是却不能读取这个特殊变量。
删除操作时,如果对应的 key 不存在,delete 函数会静默处理。读操作时,如果 key 不存在,也不会抛出异常,它会返回 value 类型对应的零值。
可以通过字典的特殊语法来判断对应的 key 是否存在:
package mainimport "fmt"func main() { var fruits = map[string]int { "apple": 2, "banana": 5, "orange": 8, } var score, ok = fruits["durin"] if ok { fmt.Println(score) } else { fmt.Println("durin not exists") } fruits["durin"] = 0 score, ok = fruits["durin"] if ok { fmt.Println(score) } else { fmt.Println("durin still not exists") }}-------------durin not exists0
字典的下标读取可以返回两个值,使用第二个返回值都表示对应的 key 是否存在。它只是 Go 语言提供的语法糖,内部并没有太多的玄妙。
正常的函数调用可以返回多个值,但是并不具备这种“随机应变”的特殊能力 —— 「多态返回值」。
字典的遍历
字典的遍历提供了以下两种方式:一种是需要携带 value,另一种是只需要 key,需要使用到 Go 语言的 range 关键字:
package mainimport "fmt"func main() { var fruits = map[string]int { "apple": 2, "banana": 5, "orange": 8, } for name, score := range fruits { fmt.Println(name, score) } for name := range fruits { fmt.Println(name) }}------------orange 8apple 2banana 5applebananaorange
package mainimport "fmt"type Circle struct { x int y int Radius int}func main() { var c1 Circle = Circle{ x: 100, y: 100, Radius: 50, } var c2 Circle = Circle{ Radius: 50, } var c3 Circle = Circle{} fmt.Printf("%+v\n", c1) fmt.Printf("%+v\n", c2) fmt.Printf("%+v\n", c3)}----------{x:100 y:100 Radius:50}{x:0 y:0 Radius:50}{x:0 y:0 Radius:0}
package mainimport "fmt"type Circle struct { x int y int Radius int}func main() { var c Circle = Circle{100, 100, 50} fmt.Printf("%+v\n", c)}-------{x:100 y:100 Radius:50}
结构体变量和普通变量都有指针形式,使用取地址符&就可以得到结构体的指针类型:
package mainimport "fmt"type Circle struct { x int y int Radius int}func main() { var c *Circle = &Circle{100, 100, 50} fmt.Printf("%+v\n", c)}-----------&{x:100 y:100 Radius:50}
package mainimport "fmt"type Circle struct { x int y int Radius int}func main() { var c *Circle = new(Circle) fmt.Printf("%+v\n", c)}----------&{x:0 y:0 Radius:0}
第四种创建形式也是零值初始化:
package mainimport "fmt"type Circle struct { x int y int Radius int}func main() { var c Circle fmt.Printf("%+v\n", c)}----------{x:0 y:0 Radius:0}
三种零值初始化形式对比:
var c1 Circle = Circle{}var c2 Circlevar c3 *Circle = new(Circle)
package mainimport "fmt"import "unsafe"type Circle struct { x int y int Radius int}func main() { var c Circle = Circle{Radius: 50} fmt.Println(unsafe.Sizeof(c))}-------24
Go 语言的接口类型非常特别,它的作用和 Java 语言的接口一样,但是在形式上有很大的差别。Java 语言需要在类的定义上显式实现了某些接口,才可以说这个类具备了接口定义的能力。但是 Go 语言的接口是隐式的,只要结构体上定义的方法在形式上(名称、参数和返回值)和接口定义的一样,那么这个结构体就自动实现了这个接口,我们就可以使用这个接口变量来指向结构体对象。
package mainimport "fmt"// 可以闻type Smellable interface { smell(s string)}// 可以吃type Eatable interface { eat(s string)}// 苹果既可以闻又可以吃type Apple struct { name string}func (a Apple) smell(s string) { fmt.Println(s + " can smell")}func (a Apple) eat(s string) { fmt.Println(s + " can eat")}// 花只可以闻type Flower struct { name string}func (f Flower) smell(s string) { fmt.Println(s + " can smell")}func main() { var s1 Smellable var s2 Eatable var apple = Apple{ name: "Apple", } var flower = Flower{ name: "Flower", } s1 = apple s1.smell(apple.name) s1 = flower s1.smell(flower.name) s2 = apple s2.eat(apple.name)}--------------------apple can smellflower can smellapple can eat
Apple 结构体同时实现了Smellable和Eatable这两个接口,而 Flower 结构体只实现了Smellable接口。可以看到在 Go 语言中,无需使用类似于 Java 语言的 implements 关键字,结构体和接口就自动产生了关联。
空接口
如果一个接口里面没有定义任何方法,那么它就是空接口,任意结构体都隐式的实现了空接口。
Go 语言为了避免用户重复定义,自己内置了一个名为interface{}的空接口。空接口里没有方法,所以它也不具备任何能力,其作用相当于 Java 的 Object 类型,可以容纳任意对象,是一个万能容器。比如一个字典的 key 是字符串,但是希望 value 可以容纳任意类型的对象,类似于 Java 语言的 Map 类型,这时候就可以使用空接口类型interface{}。
package mainimport "fmt"func main() { var user = map[string]interface{}{ "age": 30, "address": "Guangdong Guangzhou", "married": true, } fmt.Println(user) // 类型转换语法 var age = user["age"].(int) var address = user["address"].(string) var married = user["married"].(bool) fmt.Println(age, address, married)}-------------map[age:30 address:Guangdong Guangzhou married:true]30 Guangdong Guangzhou true
因为 user 字典变量的类型是map[string]interface{},从这个字典中直接读取得到的 value 类型是interface{},所以需要通过类型转换才能得到期望的变量。
接口变量的本质
可以将 Go 语言中的接口看成一个特殊的容器:这个容器只能容纳一个对象,只有实现了这个接口类型的对象才可以放进去。
Go 语言中的接口变量
查看 Go 语言的源码发现,接口变量也是由结构体来定义的。这个结构体包含两个指针字段,所以接口变量的内存占用是 2 个机器字:
package mainimport "fmt"import "unsafe"func main() { var s interface{} fmt.Println(unsafe.Sizeof(s)) var arr = [10]int{1, 2, 3, 4, 5, 6, 7, 8, 9, 10} fmt.Println(unsafe.Sizeof(arr)) s = arr fmt.Println(unsafe.Sizeof(s))}----------168016
package mainimport "fmt"type Rect struct { Width int Height int}func main() { var a interface{} var r = Rect{50, 50} a = r var rx = a.(Rect) r.Width = 100 r.Height = 100 fmt.Println(rx)}------{50 50}
package mainimport "fmt"type Rect struct { Width int Height int}func main() { var a interface{} var r = Rect{50, 50} a = &r // 指向了结构体指针 var rx = a.(*Rect) r.Width = 100 r.Height = 100 fmt.Println(rx)}-------&{100 100}
可以看到指针变量 rx 指向的内存和变量 r 的内存是同一份,因为在类型转换的过程中只发生了指针变量的内存复制,而指针变量指向的内存是共享的。
package mainimport ( "fmt" "time")func main() { fmt.Println("run in main goroutine") go func() { fmt.Println("run in child goroutine") go func() { fmt.Println("run in grand child goroutine") go func() { fmt.Println("run in grand grand child goroutine") }() }() }() time.Sleep(time.Second) fmt.Println("main goroutine will quit")}------run in main goroutinerun in child goroutinerun in grand child goroutinerun in grand grand child goroutinemain goroutine will quitProcess finished with exit code 0
package mainimport ( "fmt" "time")func main() { fmt.Println("run in main goroutine") go func() { fmt.Println("run in child goroutine") go func() { fmt.Println("run in grand child goroutine") go func() { fmt.Println("run in grand grand child goroutine") defer func() { if err := recover(); err != nil { // log error fmt.Println("wtf error happen!") } }() panic("wtf") }() }() }() time.Sleep(time.Second) fmt.Println("main goroutine will quit")}------run in main goroutinerun in child goroutinerun in grand child goroutinerun in grand grand child goroutinewtf error happen!main goroutine will quitProcess finished with exit code 0
协程的本质
Go 语言中的协程有如下特点:
一个进程内部可以运行多个线程,而每个线程又可以运行多个协程
线程要负责对协程进行调度,保证每个协程都有机会得到执行
当一个协程睡眠时,它要将线程的运行权让给其他协程来运行,而不能持续霸占这个线程
同一个线程内部最多只会有一个协程正在运行
同一个线程内部最多只会有一个协程正在运行
线程的调度是由操作系统负责的,调度算法运行在内核态。而协程的调用是由 Go 语言的运行时负责的,调度算法运行在用户态。
package mainimport "fmt"func main() { var ch = make(chan int, 4) ch <- 1 ch <- 2 close(ch) // for range 遍历通道 for value := range ch { fmt.Println(value) }}------12Process finished with exit code 0
如果将上面关闭通道的语句注释掉,使用for range语法遍历通道就会报错:
package mainimport "fmt"func main() { var ch = make(chan int, 4) ch <- 1 ch <- 2 // close(ch) // for range 遍历通道 for value := range ch { fmt.Println(value) }}------12fatal error: all goroutines are asleep - deadlock!goroutine 1 [chan receive]:main.main.func1(0xc00007e000) C:/Users/abel1/go/src/hello/quickgo.go:13 +0xa1main.main() C:/Users/abel1/go/src/hello/quickgo.go:17 +0xa1Process finished with exit code 2
package mainimport ( "fmt" "time")// 每隔一段时间产生一个数func send(ch chan int, gap time.Duration) { i := 0 for { i++ ch <- i time.Sleep(gap) }}// 将多个原通道内容拷贝到单一的目标通道func collect(source chan int, target chan int) { for v := range source { target <- v }}// 从目标通道消费数据func recv(ch chan int) { for v := range ch { fmt.Printf("receive %d\n", v) }}func main() { var ch1 = make(chan int) // 原通道 1 var ch2 = make(chan int) // 原通道 2 var ch3 = make(chan int) // 目标通道 go send(ch1, time.Second) go send(ch2, 2*time.Second) go collect(ch1, ch3) go collect(ch2, ch3) recv(ch3)}------receive 1receive 1receive 2receive 2receive 3receive 4receive 3receive 5receive 6receive 4receive 7receive 8receive 5receive 9receive 10receive 6...
但是这种形式比较繁琐:一来需要单独编写collect()汇聚函数,二来一旦多路通道的规模很大,就需要为每一种消费来源都单独启动一个汇聚协程。好在 Go 语言为这种使用场景提供了「多路复用」语法糖——select语句,它可以同时管理多个通道的读写:如果所有通道都不能读写,它就整体阻塞,只要有一个通道可以读写,它就会继续:
package mainimport ( "fmt" "time")// 每隔一段时间产生一个数func send(ch chan int, gap time.Duration) { i := 0 for { i++ ch <- i time.Sleep(gap) }}// 从目标通道消费数据func recv(ch1 chan int, ch2 chan int) { for { select { case v := <-ch1: fmt.Printf("recv %d from ch1\n", v) case v := <-ch2: fmt.Printf("recv %d from ch2\n", v) } }}func main() { var ch1 = make(chan int) var ch2 = make(chan int) go send(ch1, time.Second) go send(ch2, time.Second * 2) recv(ch1, ch2)}------recv 1 from ch2recv 1 from ch1recv 2 from ch1recv 2 from ch2recv 3 from ch1recv 4 from ch1recv 3 from ch2recv 5 from ch1recv 6 from ch1recv 4 from ch2recv 7 from ch1...
Go 语言的通道内部结构是一个循环数组,通过读写偏移量来控制元素发送和接收。它为了保证线程安全,内部会有一个全局锁来控制并发。对于发送和接收操作都会有一个队列来容纳处于阻塞状态的协程。Go 语言中通道的源码位于$GOROOT/src/runtime/chan.go:
type hchan struct { qcount uint // 通道有效元素个数 dataqsiz uint // 通道容量,循环数组总长度 buf unsafe.Pointer // 数组地址 elemsize uint16 // 内部元素的大小 closed uint32 // 是否已关闭,0 或者 1 elemtype *_type // 内部元素类型信息 sendx uint // 循环数组的写偏移量 recvx uint // 循环数组的读偏移量 recvq waitq // 阻塞在读操作上的协程队列 sendq waitq // 阻塞在写操作上的协程队列 // lock protects all fields in hchan, as well as several // fields in sudogs blocked on this channel. // // Do not change another G's status while holding this lock // (in particular, do not ready a G), as this can deadlock // with stack shrinking. lock mutex // 全局锁}
读、写分别是两个协程,存在明显的安全隐患,运行竞态检查指令go run -race quickgo.go观察输出结果:
C:\Users\abel1\go\src\hello>go run -race quickgo.go==================WARNING: DATA RACERead at 0x00c000052240 by goroutine 6: runtime.mapaccess1_faststr() C:/Go/src/runtime/map_faststr.go:12 +0x0 main.read() C:/Users/abel1/go/src/hello/quickgo.go:10 +0x64Previous write at 0x00c000052240 by main goroutine: runtime.mapassign_faststr() C:/Go/src/runtime/map_faststr.go:190 +0x0 main.main() C:/Users/abel1/go/src/hello/quickgo.go:6 +0x8fGoroutine 6 (running) created at: main.main() C:/Users/abel1/go/src/hello/quickgo.go:15 +0x60====================================WARNING: DATA RACERead at 0x00c0000422f8 by goroutine 6: main.read() C:/Users/abel1/go/src/hello/quickgo.go:10 +0x77Previous write at 0x00c0000422f8 by main goroutine: main.main() C:/Users/abel1/go/src/hello/quickgo.go:6 +0xa4Goroutine 6 (running) created at: main.main() C:/Users/abel1/go/src/hello/quickgo.go:15 +0x60==================2Found 2 data race(s)exit status 66
func TypeOf(v interface{}) Typefunc ValueOf(v interface{}) Value
对结构体变量进行反射:
package mainimport ( "fmt" "reflect")type Rect struct { Width int Height int}func main() { var s int = 42 fmt.Println(reflect.TypeOf(s)) fmt.Println(reflect.ValueOf(s)) var r = Rect{200, 100} fmt.Println(reflect.TypeOf(r)) fmt.Println(reflect.ValueOf(r))}------int42main.Rect{200 100}Process finished with exit code 0
type Value struct { typ *rtype // 变量的类型结构体 ptr unsafe.Pointer // 数据指针 flag uintptr // 标志位}
来看一个简单的例子:
package mainimport ( "fmt" "reflect")func main() { type SomeInt int var s SomeInt = 42 var t = reflect.TypeOf(s) var v = reflect.ValueOf(s) // reflect.ValueOf(s).Type() 等价于 reflect.TypeOf(s) fmt.Println(t == v.Type()) fmt.Println(v.Kind() == reflect.Int) // 元类型 // 将 Value 还原成原来的变量 var is = v.Interface() fmt.Println(is.(SomeInt))}------truetrue42Process finished with exit code 0
func (v Value) SetLen(n int) // 修改切片的 len 属性func (v Value) SetCap(n int) // 修改切片的 cap 属性func (v Value) SetMapIndex(key, val Value) // 修改字典 kvfunc (v Value) Send(x Value) // 向通道发送一个值func (v Value) Recv() (x Value, ok bool) // 从通道接受一个值// Send 和 Recv 的非阻塞版本func (v Value) TryRecv() (x Value, ok bool)func (v Value) TrySend(x Value) bool// 获取切片、字符串、数组的具体位置的值进行读写func (v Value) Index(i int) Value// 根据名称获取结构体的内部字段值进行读写func (v Value) FieldByName(name string) Value// 将接口变量装成数组,一个是类型指针,一个是数据指针func (v Value) InterfaceData() [2]uintptr// 根据名称获取结构体的方法进行调用// Value 结构体的数据指针 ptr 可以指向方法体func (v Value) MethodByName(name string) Value...
Go 语言官方的反射三大定律
Reflection goes from interface value to reflection object.
Reflection goes from reflection object to interface value.
To modify a reflection object, the value must be settable.
第一条定律的意思是反射将接口变量转换成反射对象Type和Value:
func TypeOf(v interface{}) Typefunc ValueOf(v interface{}) Value
panic: reflect: reflect.Value.SetInt using unaddressable valuegoroutine 1 [running]:reflect.flag.mustBeAssignable(0x82) C:/Go/src/reflect/value.go:234 +0x15ereflect.Value.SetInt(0x47b4a0, 0xc00004c000, 0x82, 0x2b) C:/Go/src/reflect/value.go:1472 +0x36main.main() C:/Users/abel1/go/src/hello/routine.go:8 +0xc7Process finished with exit code 2------43Process finished with exit code 0
结构体也是值类型,也必须通过指针类型来修改。下面尝试使用反射来动态修改结构体内部字段的值:
package mainimport "fmt"import "reflect"type Rect struct { Width int Height int}func SetRectAttr(r *Rect, name string, value int) { var v = reflect.ValueOf(r) var field = v.Elem().FieldByName(name) field.SetInt(int64(value))}func main() { var r = Rect{50, 100} SetRectAttr(&r, "Width", 100) SetRectAttr(&r, "Height", 200) fmt.Println(r)}-----{100 200}Process finished with exit code 0
现在尝试编写第一个 Go 语言算法模块mathy,提供两个方法:Fib用来计算斐波那契数,Fact用来计算阶乘:
> mkdir -p $GOPATH/src/github.com/abelsu7/mathy> cd $GOPATH/src/github.com/abelsu7/mathy
然后创建mathy.go文件:
package mathy// 函数名大写,其它的包才可以看的见func Fib(n int) int64 { if n <= 1 { return 1 } var s = make([]int64, n+1) s[0] = 1 s[1] = 1 for i := 2; i <= n; i++ { s[i] = s[i-1] + s[i-2] } return s[n]}func Fact(n int) int64 { if n <= 1 { return 1 } var s int64 = 1 for i := 2; i <= n; i++ { s *= int64(i) } return s}
shutdown命令用于重启或关闭本地/远程的 Linux 设备,并提供了多个选项。如果定义了时间参数,则系统会在关机的 5 分钟前创建/run/nologin文件,以确保后续的登录请求会被拒绝。
通用语法如下:
> shutdown [OPTION] [TIME] [MESSAGE]
运行以下命令则会立即关闭 Linux 设备。-h now表示立刻杀死所有进程,并关闭系统:
-h:如果不特指-halt选项,则等价于-poweroff选项
> shutdown -h now
另外我们可以使用带有-halt选项的shutdown命令立即关闭设备:
-H、--halt:停止设备运行
> shutdown --halt now # 或者> shutdown -H now
还可以使用带有poweroff选项的shutdown命令:
-P、--poweroff:切断电源(默认)
> shutdown --poweroff now# 或者> shutdown -P now
如果没有使用时间选项运行以下命令,则命令会在一分钟之后执行:
[root@centos-1~] > shutdown -hShutdown scheduled for Mon 2018-10-08 06:42:31 EDT, use 'shutdown -c' to cancel.[root@centos-2~] >Broadcast message from root@centos-1 (Mon 2018-10-08 06:41:31 EDT):The system is going down for power-off at Mon 2018-10-08 06:42:31 EDT!
若要取消关机计划,则可使用shutdown -c:
[root@centos-1~] > shutdown -cBroadcast message from root@centos-1 (Mon 2018-10-08 06:39:09 EDT):The system shutdown has been cancelled at Mon 2018-10-08 06:40:09 EDT!
同样的,其他登录用户都能在中断中看到如下的广播消息:
[root@centos-2~] >Broadcast message from root@centos-1 (Mon 2018-10-08 06:41:35 EDT):The system shutdown has been cancelled at Mon 2018-10-08 06:42:35 EDT!
[root@centos-1~] > shutdown -r +5 "To activate the latest Kernel"Shutdown scheduled for Mon 2018-10-08 07:13:16 EDT, use 'shutdown -c' to cancel.[root@centos-2~] >Broadcast message from root@vps.2daygeek.com (Mon 2018-10-08 07:08:16 EDT):To activate the latest KernelThe system is going down for reboot at Mon 2018-10-08 07:13:16 EDT!
运行以下命令则会立即杀死所有进程并重启系统:
> shutdown -r now
reboot 命令
reboot命令同样可以重启或关闭本地/远程的 Linux 设备。
执行不带任何参数的reboot命令以重启 Linux 设备:
> reboot
执行带-p参数的reboot命令以关闭 Linux 设备电源:
-p、--poweroff:调用halt或poweroff命令,切断设备电源
> reboot -p
执行带-f参数的reboot命令以强制重启 Linux 设备(类似按压机器上的电源键):
-f、--force:立刻强制终端,切断电源或重启
> reboot -f
init 命令
init进程是 Linux 系统启动的第一个进程。
它会检查/etc/inittab文件并决定 Linux 的运行级别。同时,允许用户在 Linux 设备上执行关机或重启操作。级别范围为0~6,共七个运行等级。
class Solution { public boolean isPalindrome(int x) { /** * if x < 0 or end up with 0 ( except 0 itself ) * then return false */ if (x < 0 || (x % 10 == 0 && x != 0)) { return false; } int reverseNumber = 0; while (x > reverseNumber) { reverseNumber = reverseNumber * 10 + x % 10; x /= 10; } return x == reverseNumber || x == reverseNumber / 10; }}
Go 实现
func isPalindrome(x int) bool { if x < 0 || (x % 10 == 0 && x != 0) { return false } reverseNumber := 0 for x > reverseNumber { reverseNumber = reverseNumber * 10 + x % 10 x /= 10 } return x == reverseNumber || x == reverseNumber / 10}
class Solution { public List<List<Integer>> generate(int numRows) { List<List<Integer>> triangle = new ArrayList<>(); // Case 1: if numRows equals zero, then return zero rows. if (0 == numRows) { return triangle; } // Case 2: the first row is always [1]. triangle.add(new ArrayList<>()); triangle.get(0).add(1); // Case 3: if numRows > 1, calculate according to the previous row. for (int curRow = 1; curRow < numRows; curRow++) { List<Integer> row = new ArrayList<>(); List<Integer> preRow = triangle.get(curRow - 1); // The first element is 1. row.add(1); // DP: row[i][j] = row[i-1][j-1] + row[i-1][j] for (int j = 1; j < curRow; j++) { row.add(preRow.get(j-1) + preRow.get(j)); } // The last element is 1. row.add(1); triangle.add(row); } return triangle; }}
Python 3 实现
class Solution: def generate(self, num_rows): triangle = [] for row_num in range(num_rows): # The first and last row elements are always 1. row = [None for _ in range(row_num+1)] row[0], row[-1] = 1, 1 # Each triangle element is equal to the sum of the elements # above-and-to-the-left and above-and-to-the-right. for j in range(1, len(row)-1): row[j] = triangle[row_num-1][j-1] + triangle[row_num-1][j] triangle.append(row) return triangle
# This file controls the state of SELinux on the system.# SELINUX= can take one of these three values:# enforcing - SELinux security policy is enforced.# permissive - SELinux prints warnings instead of enforcing.# disabled - No SELinux policy is loaded.SELINUX=disabled# SELINUXTYPE= can take one of three two values:# targeted - Targeted processes are protected,# minimum - Modification of targeted policy. Only selected processes are protected.# mls - Multi Level Security protection.SELINUXTYPE=targeted
docker imagesREPOSITORY TAG IMAGE ID CREATED SIZEubuntu-with-vi latest 9d2fac08719d About a minute ago 169MBubuntu latest ea4c82dcd15a 2 weeks ago 85.8MB
# my dockerfileFROM busyboxMAINTAINER abelsu7@gmail.comWORKDIR /testdirRUN touch tmpfile1COPY ["tmpfile2", "."]ADD ["bunch.tar.gz", "."]ENV WELCOME "You are in my container, welcome!"
运行容器,验证镜像内容:
> docker run -it my-image/testdir > lsbunch tmpfile1 tmpfile2/testdit > echo $WELCOMEYou are in my container, welcome!
• 无法确定请求发送至目标的 Web 服务器是否是按真实意图返回响应的那台服务器。有可能是已伪装的 Web 服务器。 • 无法确定响应返回到的客户端是否是按真实意图接收响应的那个客户端。有可能是已伪装的客户端。 • 无法确定正在通信的对方是否具备访问权限。因为某些 Web 服务器上保存着重要的信息,只想发给特定用户通信的权限。 • 无法判定请求是来自何方、出自谁手。 • 即使是无意义的请求也会照单全收。无法阻止海量请求下的 DoS 攻击(Denial of Service,拒绝服务攻击)。
提供文件下载服务的 Web 网站也会提供相应的以 PGP(Pretty Good Privacy,完美隐私)创建的数字签名及 MD5 算法生成的散列值。PGP 是用来证明创建文件的数字签名,MD5 是由单向函数生成的散列值。不论使用哪一种方法,都需要操纵客户端的用户本人亲自检查验证下载的文件是否就是原来服务器上的文件。浏览器无法自动帮用户检查。
IP 协议的作用是把各种数据包传送给对方。而要保证确实传送到对方那里,则需要满足各类条件。其中两个重要的条件是 IP 地址和 MAC 地址(Media Access Control Address)。
IP 地址指明了节点被分配到的地址,MAC 地址是指网卡所属的固定地址。IP 地址可以和 MAC 地址进行配对。IP 地址可变换,但 MAC 地址基本上不会更改。
使用 ARP 协议凭借 MAC 地址进行通信
IP 间的通信依赖 MAC 地址。在网络上,通信的双方在同一局域网(LAN)内的情况是很少的,通常是经过多台计算机和网络设备中转才能连接到对方。而在进行中转时,会利用下一站中转设备的 MAC 地址来搜索下一个中转目标。这时,会采用 ARP 协议(Address Resolution Protocol)。ARP 是一种用以解析地址的协议,根据通信方的 IP 地址就可以反查出对应的 MAC 地址。
在1995年以Personal Home Page Tools(PHP Tools)开始对外发表第一个版本,Lerdorf写了一些介绍此程序的文档,并且发布了PHP1.0。在这早期的版本中,提供了访客留言本、访客计数器等简单的功能。以后越来越多的网站使用了PHP,并且强烈要求增加一些特性,比如循环语句和数组变量等等。
Brian Wilson Kernighan是一位加拿大计算机科学家。在贝尔实验室,他与Unix的创造者Thompson以及C语言之父Dennis Ritchie一起工作,同时他也是开发Unix的主要贡献者。他是AWK和AMPL编程语言的作者之一,AWK中的K说的就是Kernighan。同时,它也是《C程序设计语言》的作者之一,他与C语言的发明人Dennis Ritchie共同合作了这本书,该书被很多人简称为“K&R C”,K&R就是两人名字的缩写。Brian Kernighan现在是普林斯顿大学计算机学院的教授,同时也是本科学部的代表。
Guido van Rossum是一名荷兰的计算机程序员,于1982年获得了阿姆斯特丹大学的数学和计算机科学的硕士学位,并于同年加入一个多媒体组织CWI,做调研员。他作为Python编程语言的作者而为人熟知。在Python社区,Guido被公认为终身仁慈独裁者(Benevolent Dictator For Life,BDFL),意思是他仍然关注Python的开发进程,并在必要的时刻做出决定。
关于Guido还有一个著名的段子:Guido van Rossum 去 Google 应聘,简历只写了三个词「I wrote Python」。当然事后证明这只是为了调侃Google面试流程冗长复杂,事实上在他2005年加入Google时,Google内部已经有相当一部分工程师在使用Guido发明的Python了,而Google请Guido就是冲着Python去的——条件是允许他用一半的工作时间来维护Python, 版权归他自己。
var top = document.documentElement.scrollTop || document.body.scrollTop;// 或者var top = document.documentElement.scrollTop ? document.documentElement.scrollTop : document.body.scrollTop;
kubectl rollout status deployment/nginx-serverWaiting for rollout to finish: 1 out of 3 new replicas have been updated...Waiting for rollout to finish: 1 out of 3 new replicas have been updated...Waiting for rollout to finish: 1 out of 3 new replicas have been updated...Waiting for rollout to finish: 2 out of 3 new replicas have been updated...Waiting for rollout to finish: 2 out of 3 new replicas have been updated...Waiting for rollout to finish: 2 out of 3 new replicas have been updated...Waiting for rollout to finish: 1 old replicas are pending termination...Waiting for rollout to finish: 1 old replicas are pending termination...deployment "nginx-server" successfully rolled out
3.你可以使用describe命令手动检查应用程序版本:
kubectl describe pod <pod-name>
4.如果发生错误,回滚(Rollout)将被挂起,系统将强制要求用户输入 CTRL + C 以取消更新。通过设置无效的NGINX版本来测试:
kubectl set image deployment/nginx-server nginx=nginx:1.18.
5.查看当前Pod状态:
kubectl get pods -o wideNAME READY STATUS RESTARTS AGE IP NODEnginx-server-76976d4555-7nv6z 1/1 Running 0 3m 192.168.127.15 kube-worker-2nginx-server-76976d4555-wg785 1/1 Running 0 3m 192.168.180.13 kube-worker-1nginx-server-76976d4555-ws4vf 1/1 Running 0 3m 192.168.127.14 kube-worker-2nginx-server-7ddd985dd6-mpn9h 0/1 ImagePullBackOff 0 2m 192.168.180.16 kube-worker-1
bash-4.2# mysql -u root -pEnter password:Welcome to the MySQL monitor. Commands end with ; or \g.Your MySQL connection id is 11Server version: 5.7.20Copyright (c) 2000, 2017, Oracle and/or its affiliates. All rights reserved.Oracle is a registered trademark of Oracle Corporation and/or itsaffiliates. Other names may be trademarks of their respectiveowners.Type 'help;' or '\h' for help. Type '\c' to clear the current input statement.mysql> ALTER USER 'root'@'localhost' IDENTIFIED BY 'new_root_password';Query OK, 0 rows affected (0.00 sec)mysql> CREATE DATABASE guacamole_db;Query OK, 1 row affected (0.00 sec)mysql> CREATE USER 'guacamole_user'@'%' IDENTIFIED BY 'guacamole_user_password';Query OK, 0 rows affected (0.00 sec)mysql> GRANT SELECT,INSERT,UPDATE,DELETE ON guacamole_db.* TO 'guacamole_user'@'%';Query OK, 0 rows affected (0.00 sec)mysql> FLUSH PRIVILEGES;Query OK, 0 rows affected (0.00 sec)mysql> quitBye
mysql> USE guacamole_db;Reading table information for completion of table and column namesYou can turn off this feature to get a quicker startup with -ADatabase changedmysql> SHOW TABLES;+---------------------------------------+| Tables_in_guacamole_db |+---------------------------------------+| guacamole_connection || guacamole_connection_group || guacamole_connection_group_permission || guacamole_connection_history || guacamole_connection_parameter || guacamole_connection_permission || guacamole_sharing_profile || guacamole_sharing_profile_parameter || guacamole_sharing_profile_permission || guacamole_system_permission || guacamole_user || guacamole_user_password_history || guacamole_user_permission |+---------------------------------------+13 rows in set (0.00 sec)
退出bash终端:
exit
在浏览器中访问Guacamole
1.在Docker中启动guacd:
docker run --name example-guacd -d guacamole/guacd
mysql -u root -pCREATE DATABASE wordpress;GRANT ALL PRIVILEGES ON wordpress.* TO 'wordpressuser'@'localhost' IDENTIFIED BY 'password';FLUSH PRIVILEGES;EXIT
Configuration file '/etc/init/tty1.conf' ==> File on system created by you or by a script. ==> File also in package provided by package maintainer. What would you like to do about it ? Your options are: Y or I : install the package maintainer's version N or O : keep your currently-installed version D : show the differences between the versions Z : start a shell to examine the situation The default action is to keep your current version.*** tty1.conf (Y/I/N/O/D/Z) [default=N] ?
crontab -eno crontab for user - using an empty oneSelect an editor. To change later, run 'select-editor'. 1. /bin/ed 2. /bin/nano 3. /usr/bin/vim.basic 4. /usr/bin/vim.tinyChoose 1-4 [2]:
# Edit this file to introduce tasks to be run by cron.## Each task to run has to be defined through a single line# indicating with different fields when the task will be run# and what command to run for the task## To define the time you can provide concrete values for# minute (m), hour (h), day of month (dom), month (mon),# and day of week (dow) or use '*' in these fields (for 'any').## Notice that tasks will be started based on the cron's system# daemon's notion of time and timezones.## Output of the crontab jobs (including errors) is sent through# email to the user the crontab file belongs to (unless redirected).## For example, you can run a backup of all your user accounts# at 5 a.m every week with:# 0 5 * * 1 tar -zcf /var/backups/home.tgz /home/## For more information see the manual pages of crontab(5) and cron(8)## m h dom mon dow command@reboot /usr/bin/vncserver :1
(1) 编辑配置文件 /etc/systemd/system/multi-user.target.wants/docker.service,在环境变量 ExecStart 后面添加 -H tcp://0.0.0.0,允许来自任意 IP 的客户端连接。
[Service]Type=notify# the default is not to use systemd for cgroups because the delegate issues still# exists and systemd currently does not support the cgroup feature set required# for containers run by dockerExecStart=/usr/bin/dockerd -H fd:// -H tcp://0.0.0.0ExecReload=/bin/kill -s HUP $MAINPID
]]>
<blockquote>
<p><strong><em>开源下载工具 <a href="http://aria2.github.io" target="_blank" rel="noopener">Aria2</a> 相关资料整理</em></strong></p>
</blockquote>
CentOS 执行 sudo 提示 xxx is not in the sudoers filehttps://abelsu7.top/2018/05/09/not-in-the-sudoers-file/2018-05-09T08:05:30.000Z2019-09-01T13:04:11.593Z在新安装的CentOS系统中,使用默认创建的用户执行sudo命令时终端报错:
xxx is not in the sudoers file. This incident will be reported.
## Sudoers allows particular users to run various commands as## the root user, without needing the root password.#### Examples are provided at the bottom of the file for collections## of related commands, which can then be delegated out to particular## users or groups.## ## This file must be edited with the `visudo` command.
## Next comes the main part: which users can run what software on## which machines (the sudoers file can be shared between multiple systems).## Syntax:#### user MACHINE=COMMANDS#### The COMMANDS section may have other options added to it.#### Allow root to run any commands anywhereroot ALL=(ALL) ALL
以及
## Allow people in group wheel to run all commands# %wheel ALL=(ALL) ALL## Same thing without a password# %wheel ALL=(ALL) NOPASSWD: ALL
]]>
<p>在新安装的<strong>CentOS</strong>系统中,使用默认创建的用户执行<code>sudo</code>命令时终端报错:</p>
<pre><code class="lang-bash">xxx is not in the sudoers file. This incident will be reported.
</code></pre>
<h2 id="报错原因"><a href="#报错原因" class="headerlink" title="报错原因"></a>报错原因</h2><p><strong>CentOS</strong>默认创建的用户并没有<code>sudo</code>命令的执行权限,而且<strong>CentOS</strong>中也并不存在<code>sudo</code>用户组。</p>
<p>不同于<strong>CentOS</strong>,<strong>Ubuntu</strong>在安装后默认创建的用户属于<code>sudo</code>用户组,因此可以使用<code>sudo</code>命令。</p>
Linux 网络管理https://abelsu7.top/2018/04/20/linux-network/2018-04-20T08:15:56.000Z2019-09-01T13:04:11.501Z
“软件研发效率在不断提升,开发工具也需要同步更新迭代,这就对计算资源提出了更高要求。每台 Cloud Studio 的背后,都有腾讯云云服务器、容器服务等服务在提供计算支持,帮助用户升级开发模式、变更应用交付、重构数据管理方式,提速企业应用部署。依托腾讯云的强大弹性能力,还能够做到资源快速伸、容灾等。开发者使用Cloud Studio 时登录浏览器即可进行编程,提供完整的 Linux 环境,并且支持自定义域名指向、动态计算资源调整,可以完成各种应用的开发编译与部署。另外,每个 Cloud Studio 拥有独立的计算资源,支持多环境快速切换、协同编辑、全功能 Terminal 等功能。据悉,下一步,Cloud Studio 将开放调配资源、在线 Terminal 操作云资源等功能。”
#!/usr/local/bin/python3# -*- coding: utf-8 -*-"""Simple Snake console game for Python 3.From https://github.com/borisuvarov/cursed_snakeUse it as introduction to curses module.Warning: curses module available only in Unix.On Windows use UniCurses (https://pypi.python.org/pypi/UniCurses).UniCurses is not installed by default."""import curses # https://docs.python.org/3/library/curses.htmlimport timeimport randomdef redraw(): # Redraws game field and it's content after every turn # win.erase() win.clear() draw_food() # Draws food on the game field draw_snake() # Draws snake draw_menu() win.refresh()def draw_menu(): win.addstr(0,0, "Score: " + str(len(snake) - 2) + " Press 'q' to quit", curses.color_pair(5))def draw_snake(): try: n = 0 # There can be only one head for pos in snake: # Snake is the list of [y, x], so we swap them below if n == 0: win.addstr(pos[1], pos[0], "@", curses.color_pair(ex_foodcolor)) # Draws head else: win.addstr(pos[1], pos[0], "#", curses.color_pair(ex_foodcolor)) # Draws segment of the body n += 1 except Exception as drawingerror: print(drawingerror, str(cols), str(rows))def draw_food(): for pos in food: win.addstr(pos[1], pos[0], "+", curses.color_pair(foodcolor))def drop_food(): x = random.randint(1, cols - 2) y = random.randint(1, rows - 2) for pos in snake: # Do not drop food on snake if pos == [x, y]: drop_food() food.append([x, y])def move_snake(): global snake # List global grow_snake # Boolean global cols, rows # Integers head = snake[0] # Head is the first element of "snake list" if not grow_snake: # Remove tail if food was not eaten on this turn snake.pop() else: # If food was eaten on this turn, we don't pop last item of list, grow_snake = False # but we restore default state of grow_snake if direction == DIR_UP: # Calculate the position of the head head = [head[0], head[1] - 1] # We will swap x and y in draw_snake() if head[1] == 0: head[1] = rows - 2 # Snake passes through the border elif direction == DIR_DOWN: head = [head[0], head[1] + 1] if head[1] == rows - 1: head[1] = 1 elif direction == DIR_LEFT: head = [head[0] - 1, head[1]] if head[0] == 0: head[0] = cols - 2 elif direction == DIR_RIGHT: head = [head[0] + 1, head[1]] if head[0] == cols - 1: head[0] = 1 snake.insert(0, head) # Insert new headdef is_food_collision(): for pos in food: if pos == snake[0]: food.remove(pos) global foodcolor global ex_foodcolor ex_foodcolor = foodcolor foodcolor = random.randint(1, 6) # Pick random color of the next food return True return Falsedef game_over(): global is_game_over is_game_over = True win.erase() win.addstr(10, 20, "Game over! Your score is " + str(len(snake)) + " Press 'q' to quit", curses.color_pair(1))def is_suicide(): # If snake collides with itself, game is over for i in range(1, len(snake)): if snake[i] == snake[0]: return True return Falsedef end_game(): curses.nocbreak() win.keypad(0) curses.echo() curses.endwin()# Initialisation starts --------------------------------------------DIR_UP = 0 # Snake's directions, values are not important,DIR_RIGHT = 1 # they сan be "a", "b", "c", "d" or something elseDIR_DOWN = 2DIR_LEFT = 3is_game_over = Falsegrow_snake = Falsesnake = [[10, 5], [9, 5]] # Set snake size and positiondirection = DIR_RIGHTfood = []foodcolor = 2ex_foodcolor = 3win = curses.initscr() # Game field in console initialised with curses modulecurses.start_color() # Enables colorscurses.init_pair(1, curses.COLOR_CYAN, curses.COLOR_BLACK)curses.init_pair(2, curses.COLOR_BLUE, curses.COLOR_BLACK)curses.init_pair(3, curses.COLOR_GREEN, curses.COLOR_BLACK)curses.init_pair(4, curses.COLOR_MAGENTA, curses.COLOR_BLACK)curses.init_pair(5, curses.COLOR_RED, curses.COLOR_BLACK)curses.init_pair(6, curses.COLOR_YELLOW, curses.COLOR_BLACK)win.keypad(1) # Enable arrow keyswin.nodelay(1) # Do not wait for keypresscurses.curs_set(0) # Hide cursorcurses.cbreak() # Read keys instantaneouslycurses.noecho() # Do not print stuff when keys are pressedrows, cols = win.getmaxyx() # Get terminal window size# Initialisation ends ---------------------------------------------# Main loop starts ------------------------------------------------drop_food()redraw()while True: if is_game_over is False: redraw() key = win.getch() # Returns a key, if pressed time.sleep(0.1) # Speed of the game if key != -1: # win.getch returns -1 if no key is pressed if key == curses.KEY_UP: if direction != DIR_DOWN: # Snake can't go up if she goes down direction = DIR_UP elif key == curses.KEY_RIGHT: if direction != DIR_LEFT: direction = DIR_RIGHT elif key == curses.KEY_DOWN: if direction != DIR_UP: direction = DIR_DOWN elif key == curses.KEY_LEFT: if direction != DIR_RIGHT: direction = DIR_LEFT elif chr(key) == "q": break if is_game_over is False: move_snake() if is_suicide(): game_over() if is_food_collision(): drop_food() grow_snake = Trueend_game()# Main loop ends --------------------------------------------------
]]>
<p>To be updated…</p>
《死亡诗社》诗歌赏析https://abelsu7.top/2018/03/28/o-captain-my-captain/2018-03-28T03:10:04.000Z2019-09-01T13:04:11.594Z《死亡诗社》(Dead Poets Society)由澳大利亚导演彼得·威尔(Peter Weir)指导,罗宾·威廉姆斯(Robin Williams)、伊桑·霍克(Ethan Hawke)以及罗伯特·肖恩·莱纳德(Robert Sean Leonard)等人主演。电影讲述了1959年,威尔顿预备学院的新任英文教师John Keating以自由发散式的哲学思维对抗传统教育枷锁,激励学生独立思考求索、勇敢追问人生路途的故事。该片获得1990年第62届奥斯卡金像奖四项提名,并收获最佳原创剧本奖。
《死亡诗社》电影海报
《死亡诗社》引用了多首诗作推动剧情发展,美国著名诗人沃尔特·惠特曼(Walt Whitman)的代表作《O Captain! My Captain!》便是其中之一。虽然影片中只引用了诗名,但却丝毫不妨碍其贯穿全片,见证着Keating对学生们春风化雨般的教育以及润物无声的人格影响。下面就来一起欣赏这首诗。
原诗欣赏
O Captain! my Captain! our fearful trip is done, 啊,船长,船长!我的船长!可怕的航程已完成,
The ship has weather’d every rack, the prize we sought is won, 这船历尽风险,企求的目标已完成,
The port is near, the bells I hear, the people all exulting, 港口在望,钟声响,人们在欢欣,
While follow eyes the steady keel, the vessel grim and daring; 千万双眼镜注视着船——平稳,勇敢,坚定;
But O heart! heart! heart! 但是痛心啊!痛心!痛心!
O the bleeding drops of red, 瞧一滴滴鲜红的血,
Where on the deck my Captain lies, 甲板上躺着我的船长,
Fallen cold and dead. 他倒下去,冰冷,永别。
O Captain! my Captain! rise up and hear the bells; 啊,船长!我的船长!起来吧,倾听钟声;
Rise up—for you the flag is flung—for you the bugle trills, 起来吧,号角为您长鸣,旌旗为您高悬;
For you bouquets and ribbon’d wreaths—for you the shores a-crowding, 迎着您,多少花束花圈——候着您,千万人蜂拥岸边,
For you they call, the swaying mass, their eager faces turning; 他们向您高呼,拥来挤去,扬起殷切的脸;
Here Captain! dear father! 啊,船长!亲爱的父亲!
This arm beneath your head! 我的手臂托着您的头!
It is some dream that on the deck, 莫非是一场梦——在甲板上,
You’ve fallen cold and dead. 您倒下去,冰冷,永别。
My Captain does not answer, his lips are pale and still, 我的船长不做声,嘴唇惨白,毫不动弹,
My father does not feel my arm, he has no pulse nor will, 我的父亲没感觉到我的手臂,没有脉搏,没有遗愿,
The ship is anchor’d safe and sound, its voyage closed and done, 船舶抛锚停下,平安抵达,航程终了,
From fearful trip the victor ship comes in with object won; 历经艰险返航,夺得胜利目标;
Exult O shores, and ring O bells! 啊,岸上钟声齐鸣,啊,人们一片欢腾!
But I with mournful tread, 但是,我在甲板上,在船长身旁,
Walk the deck my Captain lies, 心悲切,步履沉重,
Fallen cold and dead. 因为他倒下去,冰冷,永别。
关于作者
Walt Whitman
沃尔特·惠特曼(Walt Whitman,1819年5月31日—1892年3月26日)出生于纽约州长岛,美国著名诗人、人文主义者,创造了诗歌的自由体(Free Verse),其代表作品是诗集《草叶集》(Leaves of Grass)。
Notes for a revision
《O Captain! My Captain!》是沃尔特·惠特曼于1865年林肯(Lincoln)总统遇刺之后写下的一首隐喻诗,也可被归为纪念林肯总统的挽歌。船长即象征遭暗杀去世的林肯,而船则象征着刚刚结束南北战争的美国。
《O Captain! My Captain!》在影片中的首次出现,始于Keating老师的第一堂课:Keating将学生们带到了陈列室,提到了惠特曼的诗作,并告诉学生可以称呼他为O Captain! My Captain!。此外,Keating还教给学生们怎样去聆听逝者的声音——Carpe Diem,及时行乐,不负芳华。
Keating的第一课
此后,这个称呼就自然而然的贯穿于学生们与Keating之间的对话中。而O Captain! My Captain!的最后一次出现,则是在片尾Keating离开学校的一幕——也是全片最为感人的场景。
临别之际,在重新回归教条死板的课堂上,总是畏惧发声的Todd不再沉默——就像Keating曾经教过的那样,他站在课桌上高呼”O Captain! My Captain!”,向自己的人生导师致以最崇高的敬意。而古诗人社成员集体站在书桌上高呼”O Captain! My Captain!”的这一幕,必将成为电影史上的经典画面。
<script> var options = eval({ "list": [ ['Google', 10], ['Tencent', 9], ['Alibaba', 7], ['Baidu', 6], ['NetEase', 4], ['JD', 5], ['Youku', 4], ['Meituan', 3], ['Douban', 3] ], "gridSize": 16, // size of the grid in pixels "weightFactor": 10, // number to multiply for size of each word in the list "fontWeight": 'normal', // 'normal', 'bold' or a callback "fontFamily": 'Times, serif', // font to use "color": 'random-light', // 'random-dark' or 'random-light' "backgroundColor": '#333', // the color of canvas "rotateRatio": 1 // probability for the word to rotate. 1 means always rotate }); var canvas = document.getElementById('canvas'); WordCloud(canvas, options);</script>
]]>
<h4 id="Atwood’s-Law"><a href="#Atwood’s-Law" class="headerlink" title="Atwood’s Law"></a>Atwood’s Law</h4><blockquote>
<p>Atwood’s Law: “Any application that <strong>can</strong> be written in JavaScript, <strong>will</strong> be written in JavaScript.”</p>
</blockquote>
<p>著名的<strong>Atwood’s Law</strong>是<a href="http://www.codinghorror.com/" target="_blank" rel="noopener">Jeff Atwood</a>在2007年提出的。通俗来说就是:<em>任何可以使用JavaScript来实现的应用,最终都会使用JavaScript来实现。</em></p>
Linux 上的 Shebang 符号(#!)https://abelsu7.top/2018/03/01/linux-shebang/2018-03-01T07:21:00.000Z2019-09-01T13:04:11.506Z使用Linux或者Unix系统的同学可能都对#!这个符号并不陌生,尤其是在初学bash的时候,第一行一定要加上#!/bin/bash


 :
:


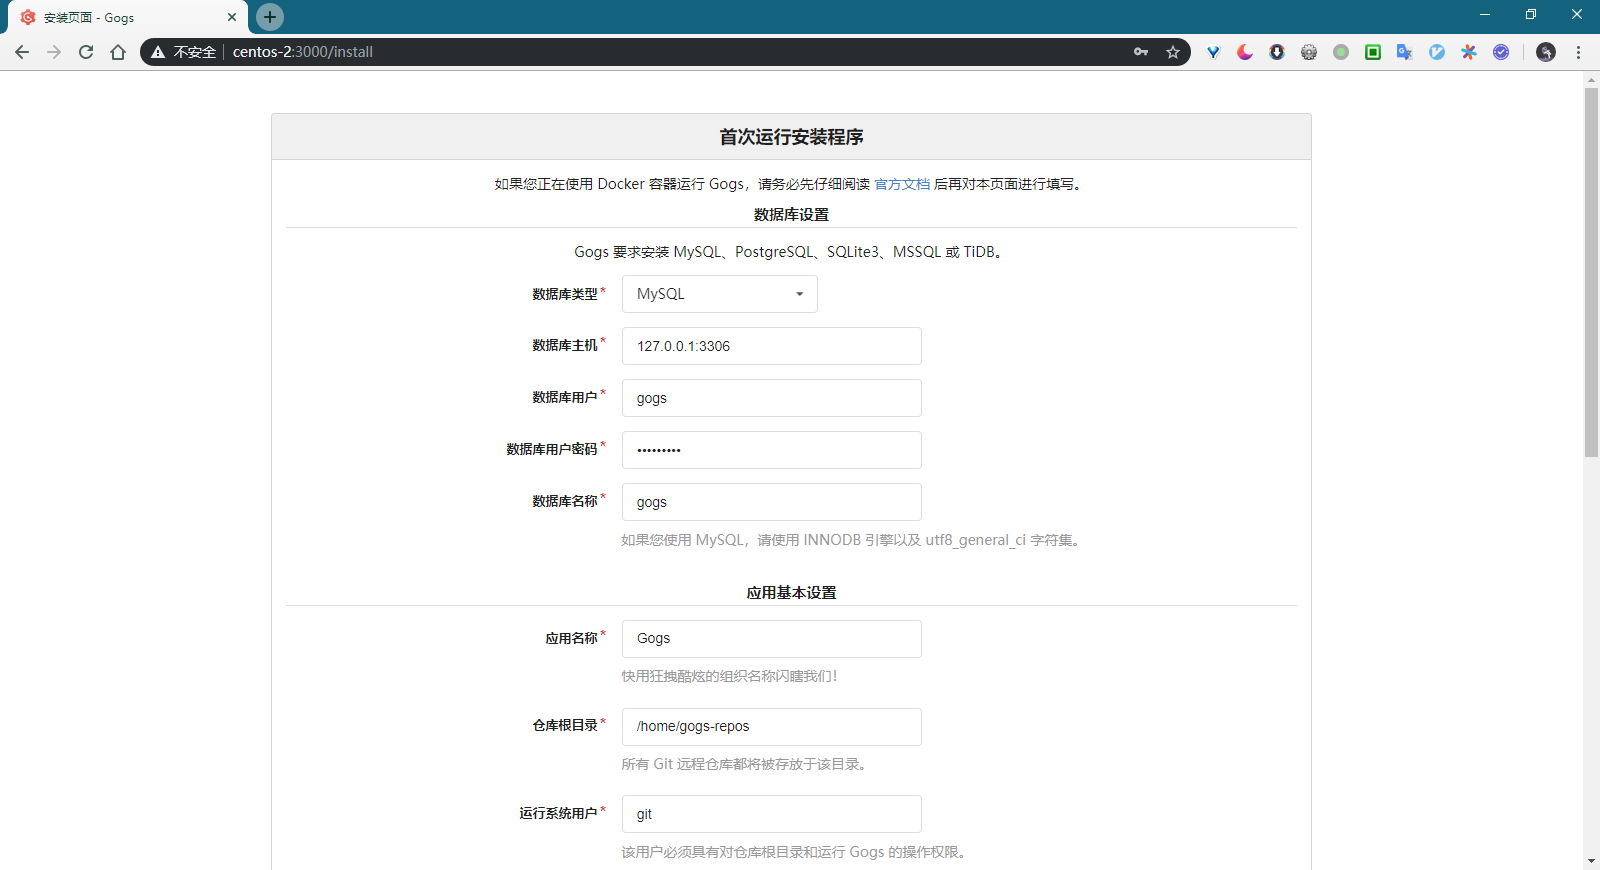


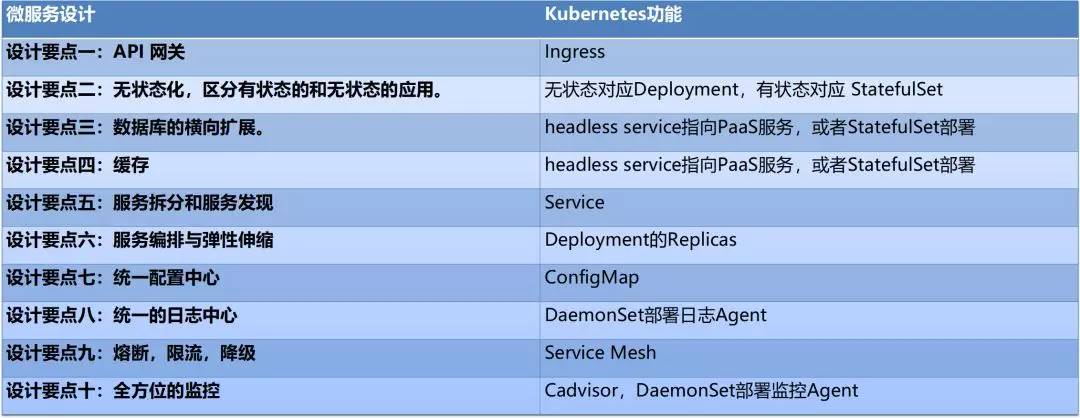
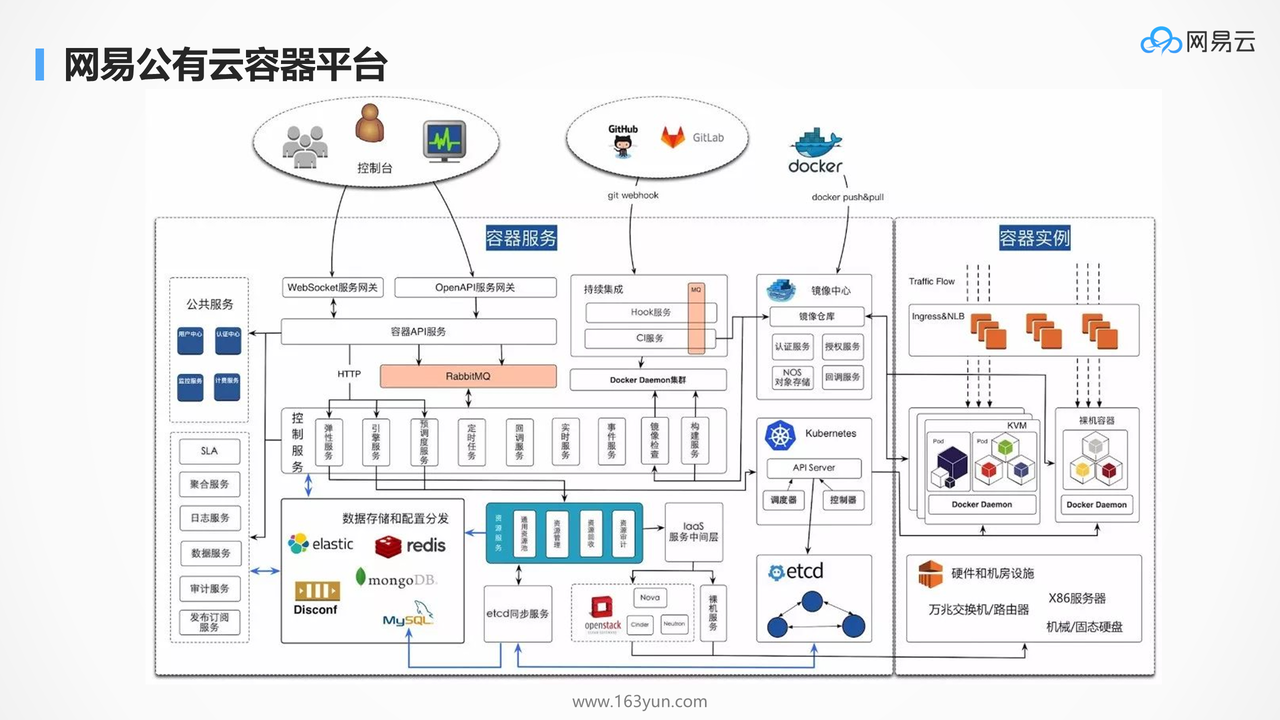


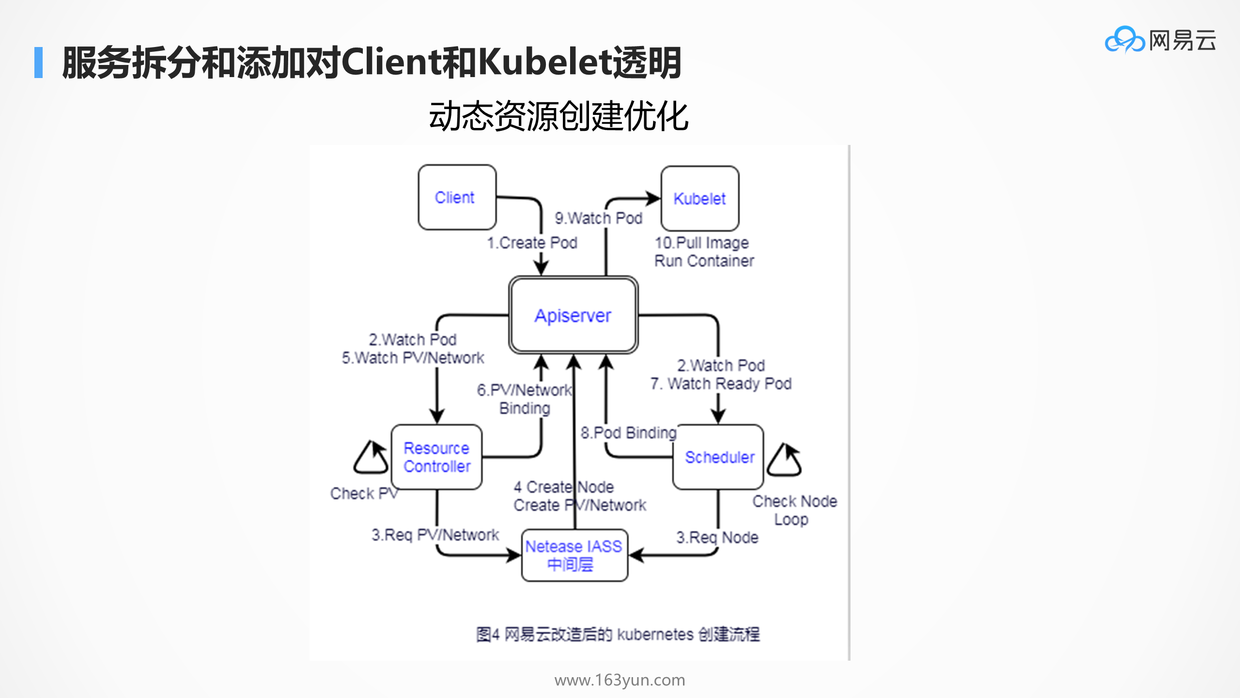


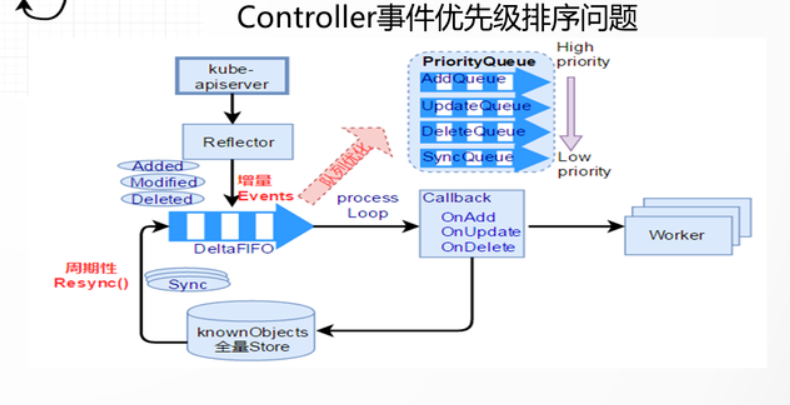


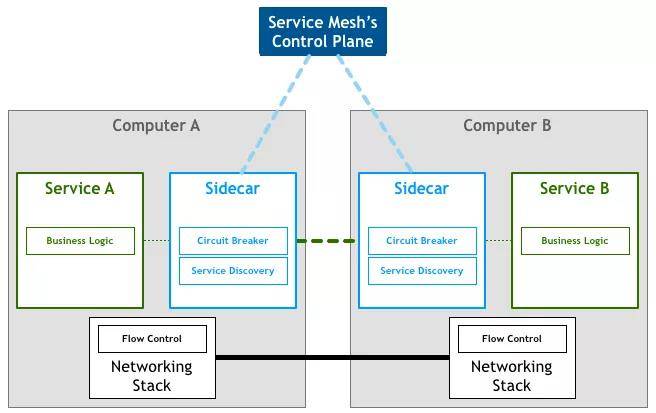


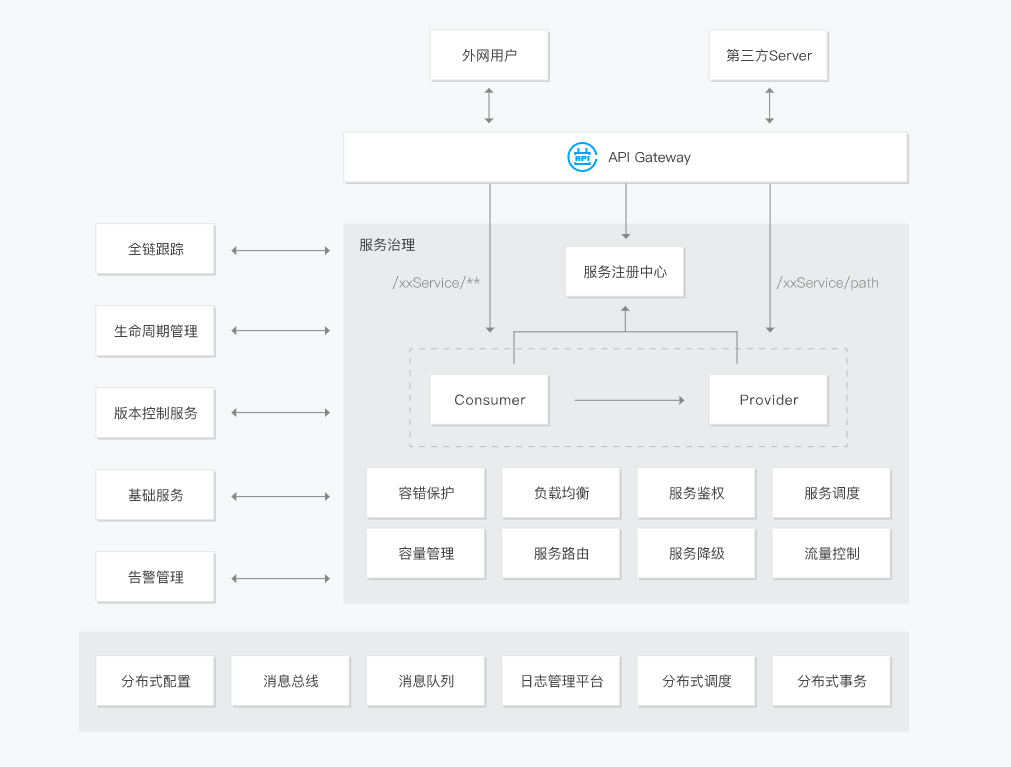

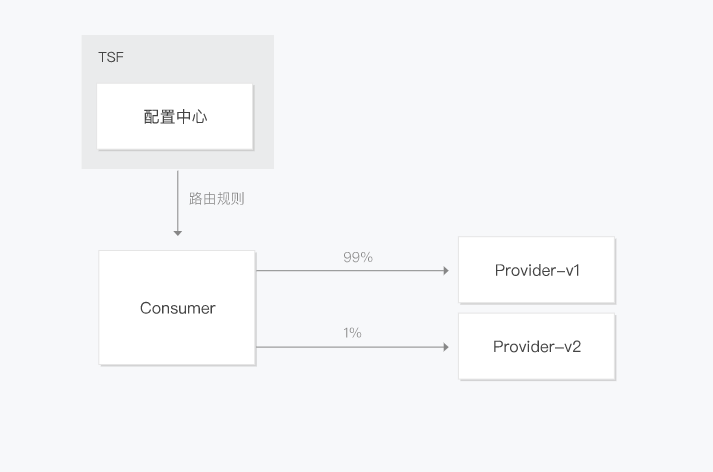


 需要仔细思考


 微信了。微信公众号也正在变成一个越来越庞大的内容集散地。
 浏览器中打开文章链接,Ctrl+U 查看源码,Ctrl+F 搜索


